
In the MyRec.com system, activities are what your customers will be registering into. Activities populate the calendar and their registrants populate the rosters.
Activities are created within a program. If you add Fee Adjustments at the Program level, they will apply to all activities across the program unless excluded. This is particularly helpful with sibling discounts for children of different ages within separate activities.
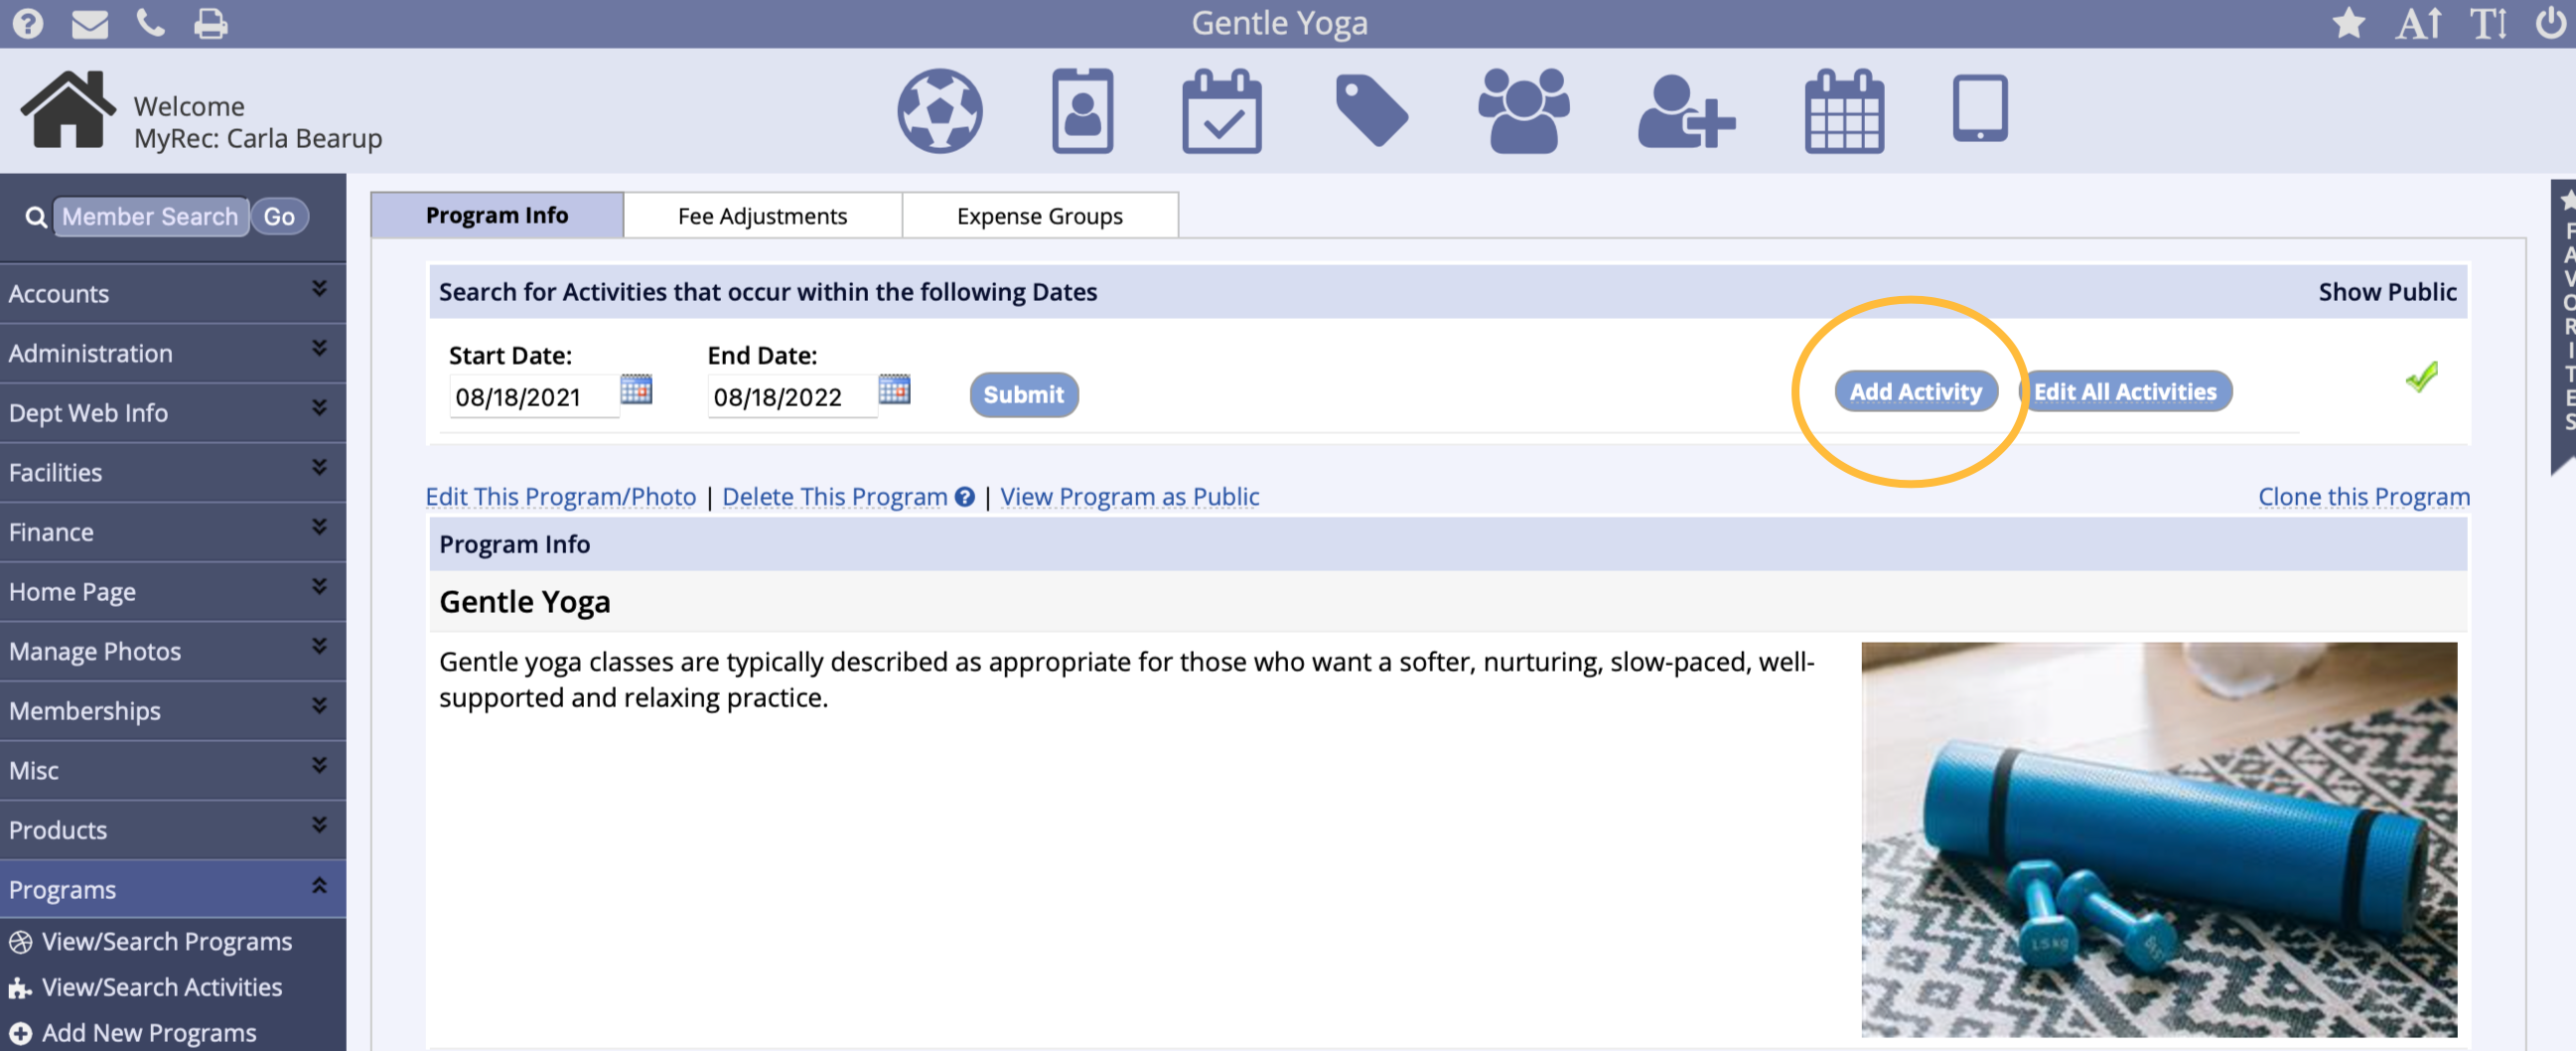
Adding a New Activity
- On the program page, click Add New Activity
- Due to the fact that Programs house activities, they must be created first in order to add activities
- See the Program Creation article for more details
- Adding a new activity will take the user through several setup screens, listed below, which will become editable tabs across the top of the page once the activity is saved and added
- Basic Info - set the activity name and category, along with other optional information
- Schedule - set the dates and time along with location of the activity
- Financial Info - assign fees and budget groups to the activity, along with optional expenses and fee adjustments
- Demographic Info - set age, grade, gender, and other demographic restrictions, registration dates, and registration type
- Requirements - apply questions, forms, or required documents for the public
- Confirm and Complete - review settings and submit for completion
Basic Info

- Activity Name - We suggest using a recognizable activity name, such as “yoga flow AM”, instead of “morning class”
- The Activity Code field is used if your department assigns codes to activities
- Activities can be searched on the code for registration
- The Activity Order number shows the order in which the activities are organized on the site, the lower the number, the higher on the list the activity will appear
- Select a Category from the drop down menu or add a new one
- A category is the section this activity will be filed under when viewing all activities from the public side.
- Click View/Add Coaches & Instructors to give access to rosters for this activity, which are viewable on the Coach or Instructor public side accounts
- Activity Notes is a place to enter additional need to know information
- This information shows under the activity for the public prior to registration
- If Receipt Notes are entered, they will appear on the printable and emailed receipt upon the completion of the registration
- Maintenance Notes are a place to enter any setup or staff details that will only appear on the facility maintenance report
- Date to Show on Public Site defines the date this activity is visible to the public
- If it is blank, the activity will appear immediately
- If the second field is blank, the activity will drop off the public side after the last activity date
- Check applicable Hide options
- When Hide This Activity from Public is checked, the public will not be able to view this activity
- When Hide This Activity from Management is checked, the activity will not appear in the activity search results for management side registration
- When Hide from Management Calendar is checked, the activity will not appear on the management calendar
- This is useful is a lot of repetitive activities are filling your staff calendar, like swim lessons
- Next, are several special settings that can be used
- Please see the question mark next to each setting for a description
- Click Next Step to create a schedule
Schedule Dates
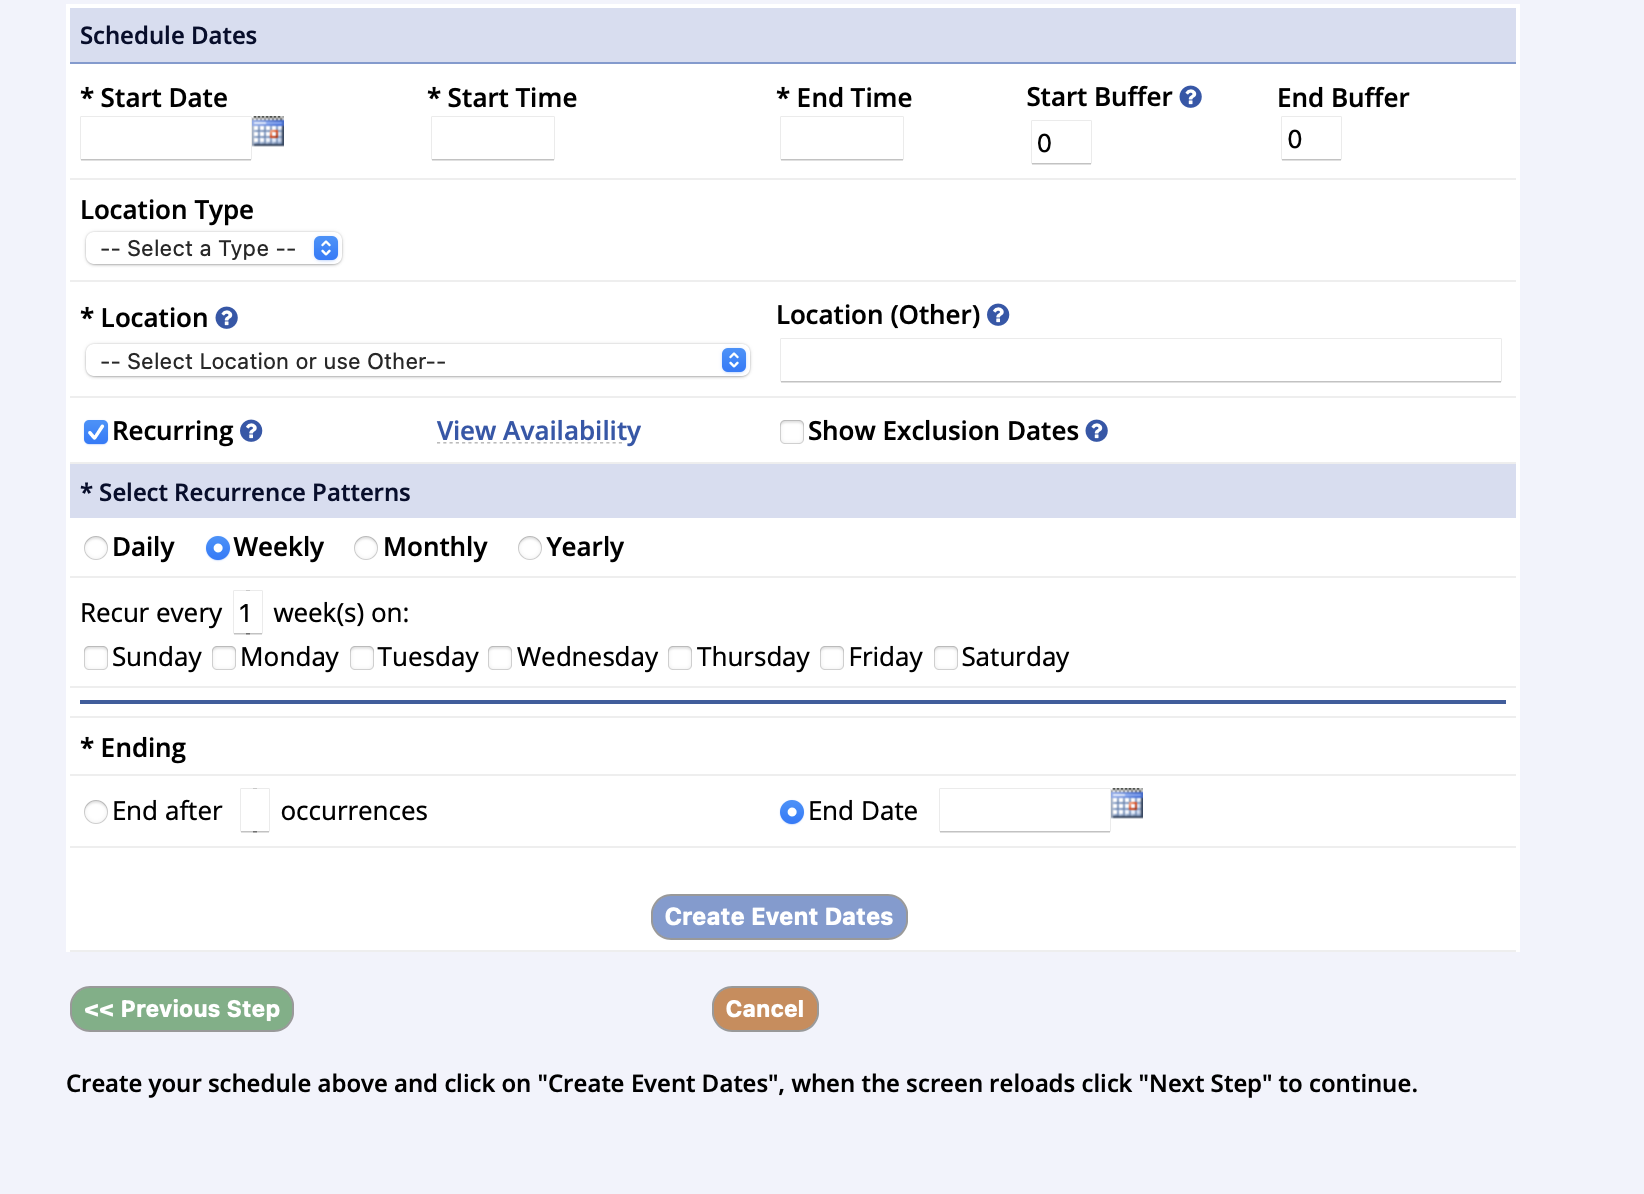
The scheduling screen defines the dates, times and location of the activity. This also creates a booking on the facility calendar.
- To schedule dates, choose the Start Dates, Times, and Location of the activity
- Use Recurring if entering more than one date in a range
- Select the Recurrence Pattern: These define when the activity will take place between the start date and the end by date
- Recurrence patterns are Daily, Weekly, Monthly or Yearly
- If it is not recurring, uncheck the Recurring box
- The Show Exclusion Dates checkbox is used to choose dates that you do not want to have the activity take place
- For example, if that activity falls on a holiday in that schedule
- Choose when the activity will end
- This is required if you're doing a recurring pattern, you can End After X Occurrences or the activity will end after a defined number of occurrences, by choosing End Date
- This defines the final date on which the activity will occur
- Click Create Event Dates
- This may be repeated for additional date patterns
- When all dates are added, click Next Step
Financial Info
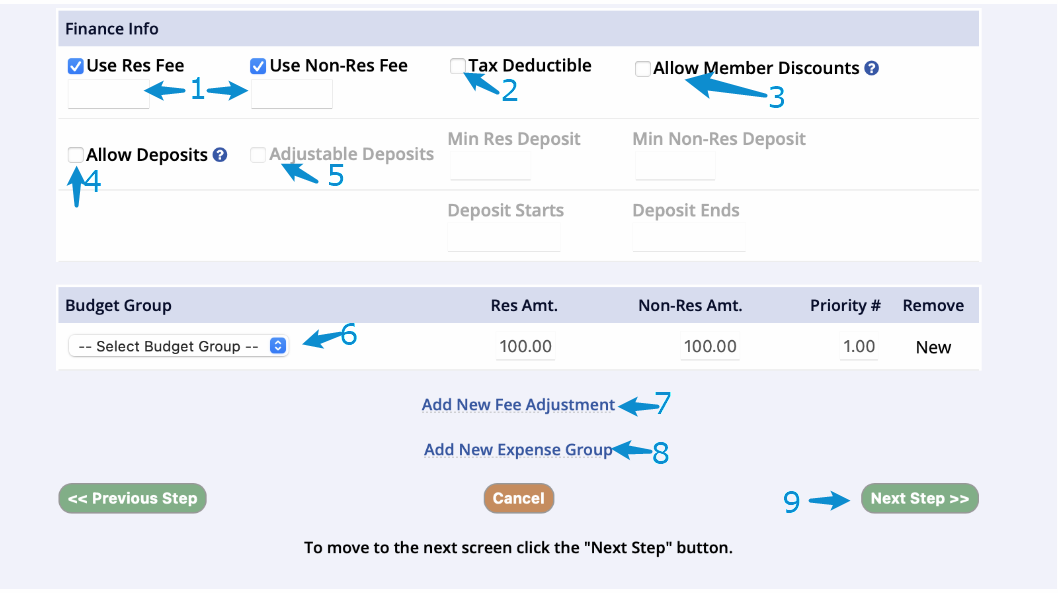
On the financial screen, you will set the fees and the budget group information for the activity.
-
Use Res Fee checkbox is to assign the amount to be charged to residents
-
Use Non-Res Fee checkbox is the amount that is charged to non residents
- If not allowing non-residents to register, uncheck the Use Non-Res Fee checkbox
-
Use Non-Res Fee checkbox is the amount that is charged to non residents
- Checking Tax Deductible lists the activity under the tax deductible section of an Account's finance statement
- Checking Allow Member Discounts will apply defined discounts for individual household account members
- Those discounts are set up on the members account page
- Checking Allow Deposits, allows registrants to pay less than 100% on checkout
- Using Adjustable Deposits allows the users to pay more than the set deposit if deposit is in use
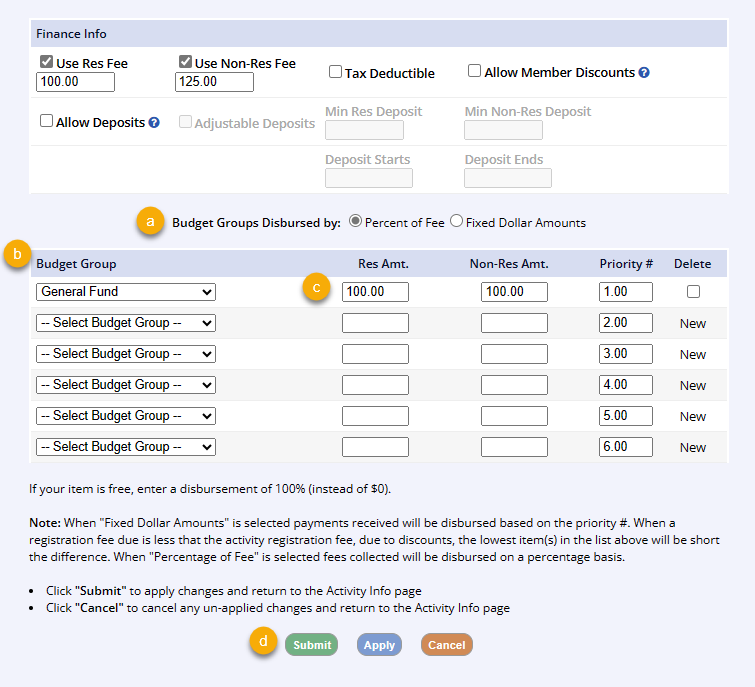
- Next, select the Budget Group and the disbursement amount for resident and non-resident
- Select Percent of Fee for Budget Groups Disbursed by
-
Only if your department has turned on Advanced Disbursements and is dividing the fees into multiple budget groups will you select Fixed Dollar Amount
- An OVERFLOW budget group will need to be selected for amounts in excess of the fixed dollar amount you set when using the Fixed Dollar Amount setting (for late fees, transfer fees, etc…)
- Do not select Fixed Dollar Amount if you are using only one budget group for the fee disbursements due to the way credit card processing fees are calculated outside of MyRec.com within your payment gateway
-
Only if your department has turned on Advanced Disbursements and is dividing the fees into multiple budget groups will you select Fixed Dollar Amount
- Choose from the Budget Group Dropdown
- Enter the percentage (or dollar value) in the fields for Resident and Non-Resident Amount
- If you are selecting a single budget group, the percentage for each field should be 100
- If you have selected multiple budget groups from the dropdowns, you can enter values that total 100% in the columns if you are disbursing by Percentage of Fee, or you can enter values that total the sum of the registration fee if you are disbursing by Fixed Dollar Amount
- Click Submit
- Select Percent of Fee for Budget Groups Disbursed by
- Click Add New Fee Adjustment to add discounts and/or fees to the activity such as late fees or additional sibling discounts
- Click Add New Expense Group to track expenses related to the activity
- Groups are created under the Finance tab, applied at the item level and reported on by Finance Reports
- Activity level expense: Per Registration type will apply to every registration under this Activity only (percentage or amount); Per Activity will apply to only this activity (amount only)
- When finished, click Next Step
Registrant Settings
Registrant demographic restrictions, waitlist settings, registration type, and registration dates are all set on the Demographic/Seating Info page.
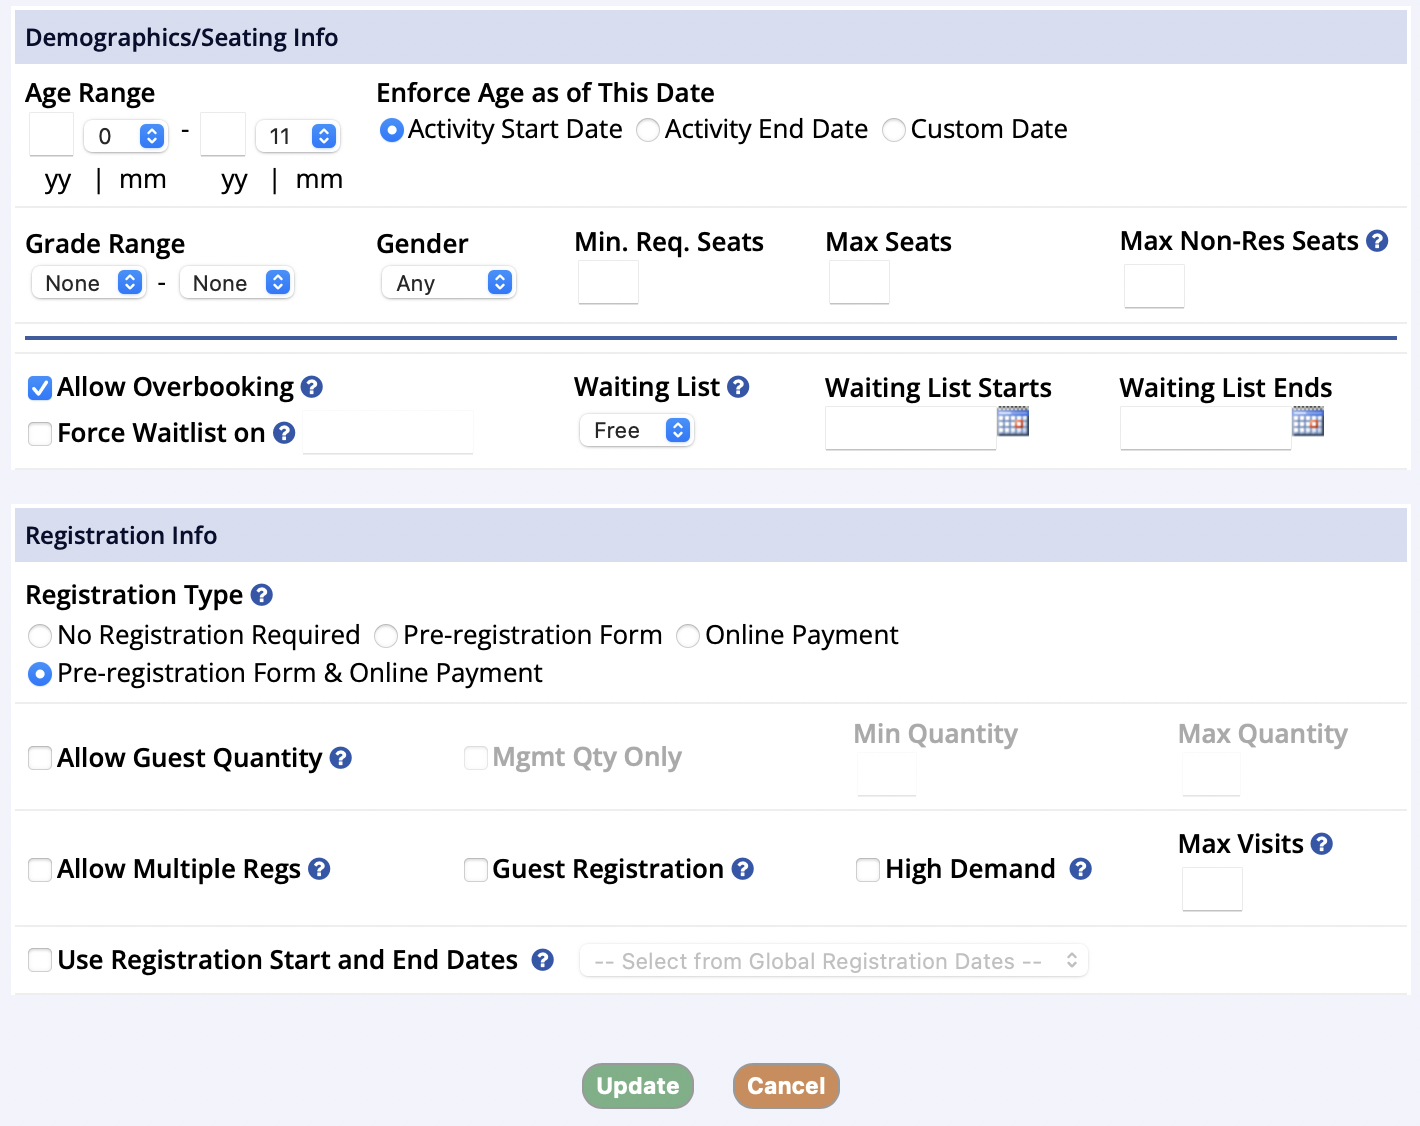
-
Age Range defines the ages that can sign up for this activity
- Enforce Age as of This Date determines the date used by the activity to determine a registrants age for eligibility
- Grade Range defines the grades that can sign up for this activity.
Note:
It is not recommended to use both Age Range and Grade Range settings simultaneously because they can conflict with each other depending on the outlying ages of specific grade-level registrants.
- Gender defines whether this activity is available to males, females or both
- The Minimum Seats Required box is an optional setting that is used to record the amount of people who must sign up for an activity in order for the activity to take place
-
Max Seats box is the maximum amount of people able to sign up for the activity
- Max Non-Res Seats, is the maximum number of non residents who may sign up for the activity, out of the number of Max seats
-
Allow Overbooking allows the office to add more people than the seats of the activity allow
- If waiting list is active, it will take the precedent
-
Waiting list options are free, paid, or none
- This setting will determine whether registrants will go to a waiting list after the activity is full and whether they need to pay to do so
- With Waiting List Starts & Ends Dates, you can define when the waiting list will begin and end
- In the Registration Info box, Registration Type is determined
- Use No Registration Required if it is desired that users not be able to register online or with the form
- Registration Title and Registration Message are required to display instructions to the user
- With the use of the Pre-Registration Form setting, users will only be able to register with a Pre-registration form created for the activity
- This form must be processed by the staff when payment is received
- This does not hold a seat until paid
- Online Payment setting makes it so that users on the public side will then be able to register online with a credit card payment
- Selecting Pre-registration Form & Online Payment, makes it so that public side users can choose to register either online or use a pre-registration form
-
Allow Guest Quantity allows guests of the account to be registered
- Will be disabled if Add Required Membership, Add-ons, or Add Required Activity is in use
- Allow Multiple Registrations allows the same person to register more than once
-
Guest Registration allows the public to register as a guest without creating an account
- Guests registrations do not support waitlists, deposits, or offline payments
- The system will not have any record of the name of the guest for cash payments, so take that into account for refund-likely scenarios
- Please contact a MyRec Client Support Team Member to have this setting turned on
- You will need to have a Guest Account Turned on in addition to turning on this feature function
- Please contact a MyRec Client Support Team Member to have this setting turned on
-
High demand setting gives users approximately 15 minutes to reach payment screen during the checkout process or the item will expire from the cart
- Typically, items in the cart will expire after approximately one day when this setting is not enabled
- Once the credit card payment screen is reached, the user has approximately 15 minutes to complete their payment info and submit the payment before it will timeout
- Typically, items in the cart will expire after approximately one day when this setting is not enabled
- Using the Registration Start and End Dates determines when registration is available
- It must be defined for both resident and non-resident users and must match the registration type
- You can edit this tab within an activity or by using the Edit All Activities button on the Program screen
- You can extend the registration window by changing the end dates and updating/submitting the settings
- Some departments may refer to this as the registration deadline
Requirements
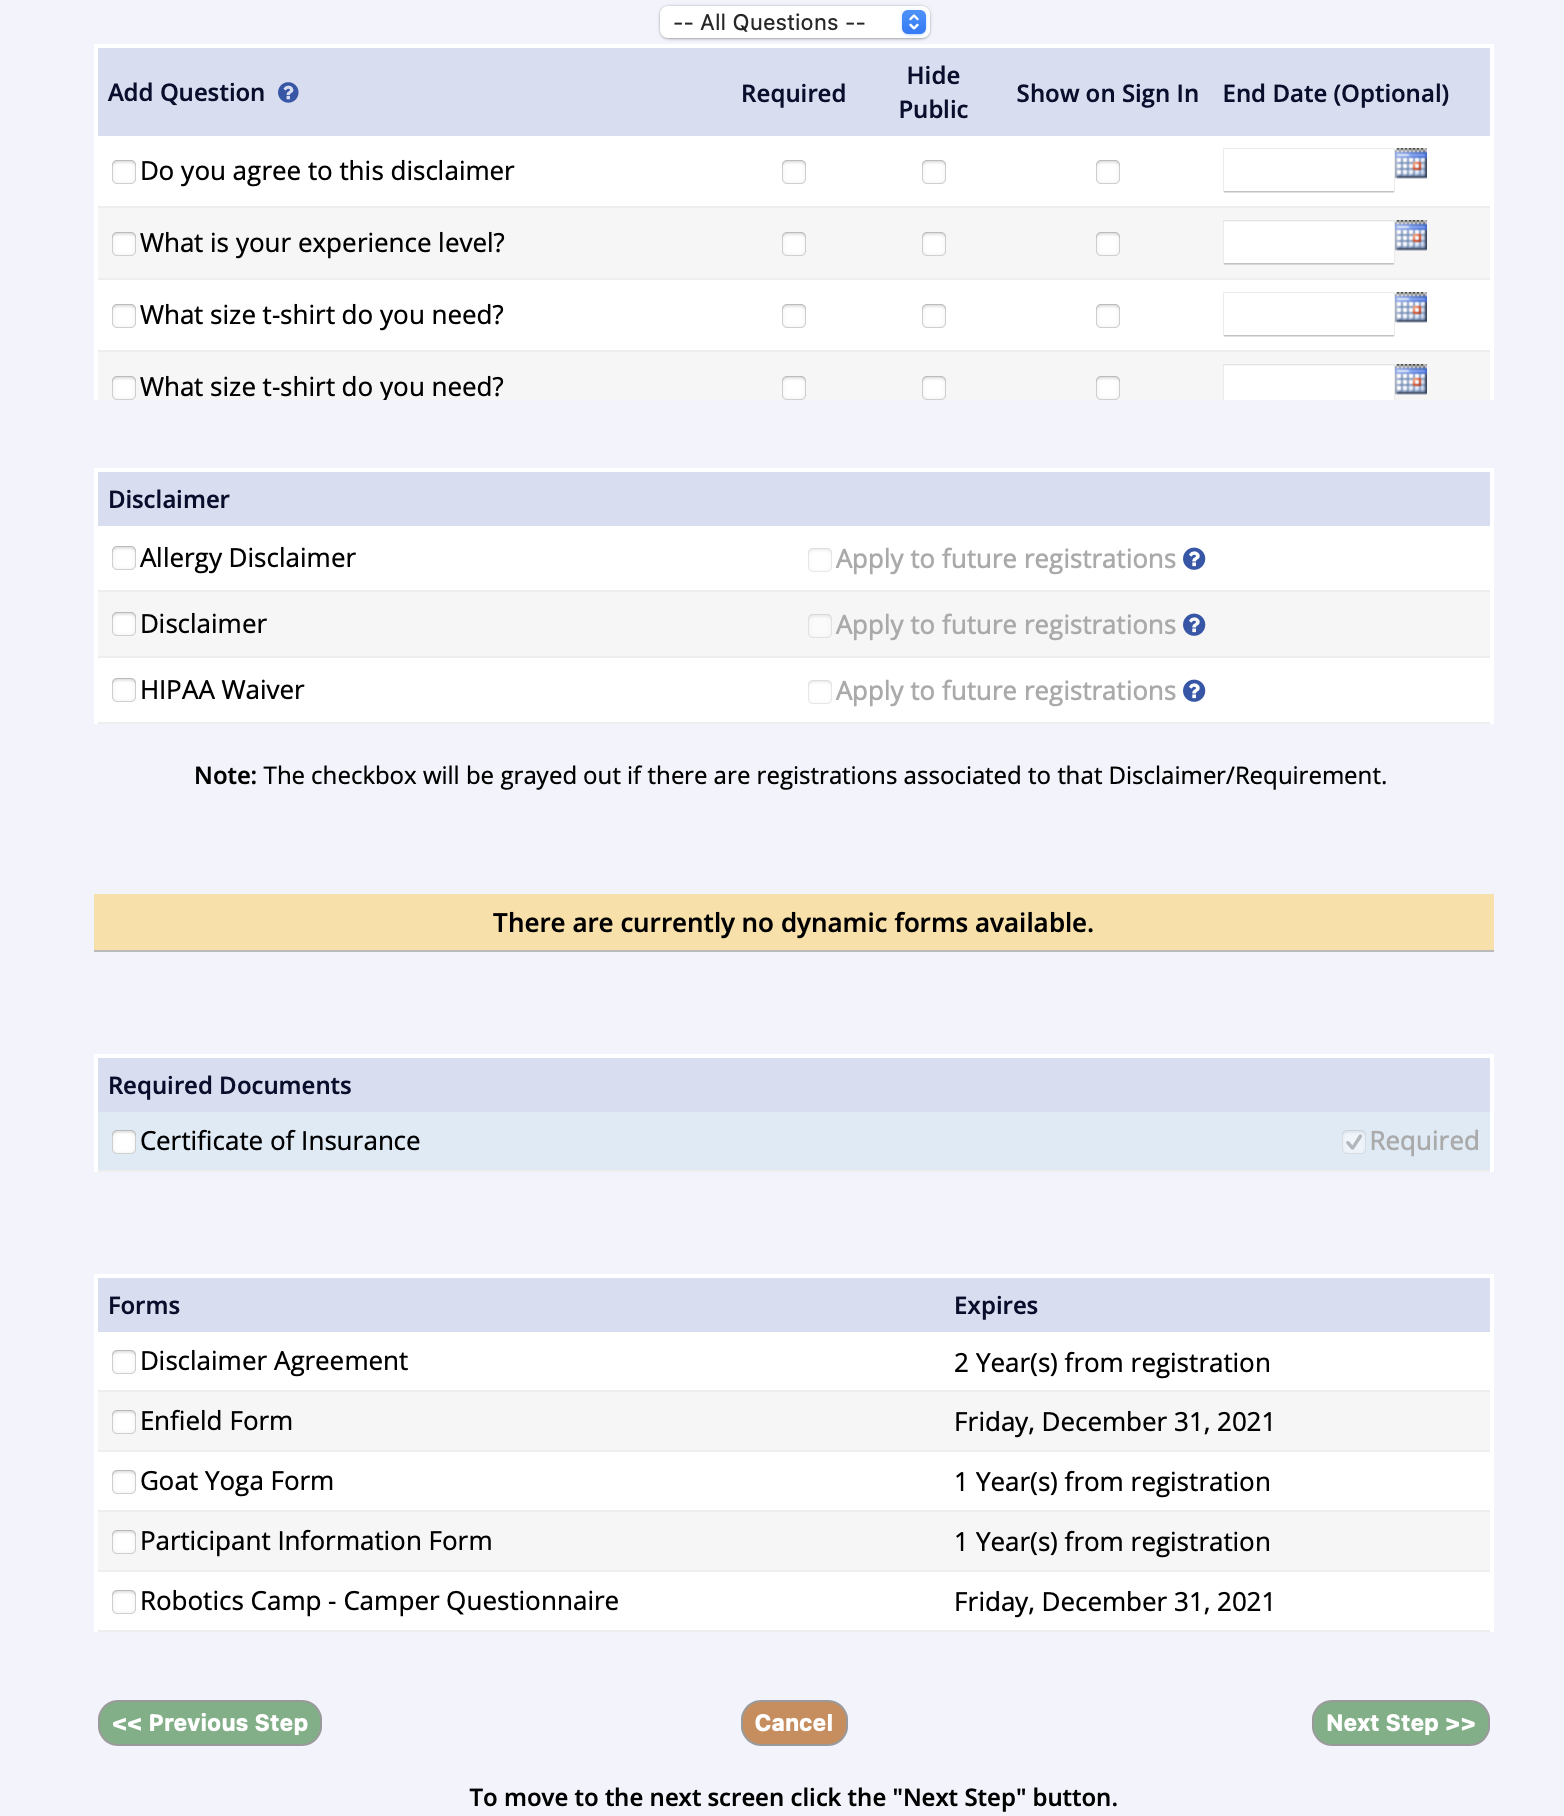
On this step, special requirements can be added to the registration process by using existing questions, custom disclaimers, custom forms, and required documents.
- Make selections, then click Next Step
Confirm & Complete
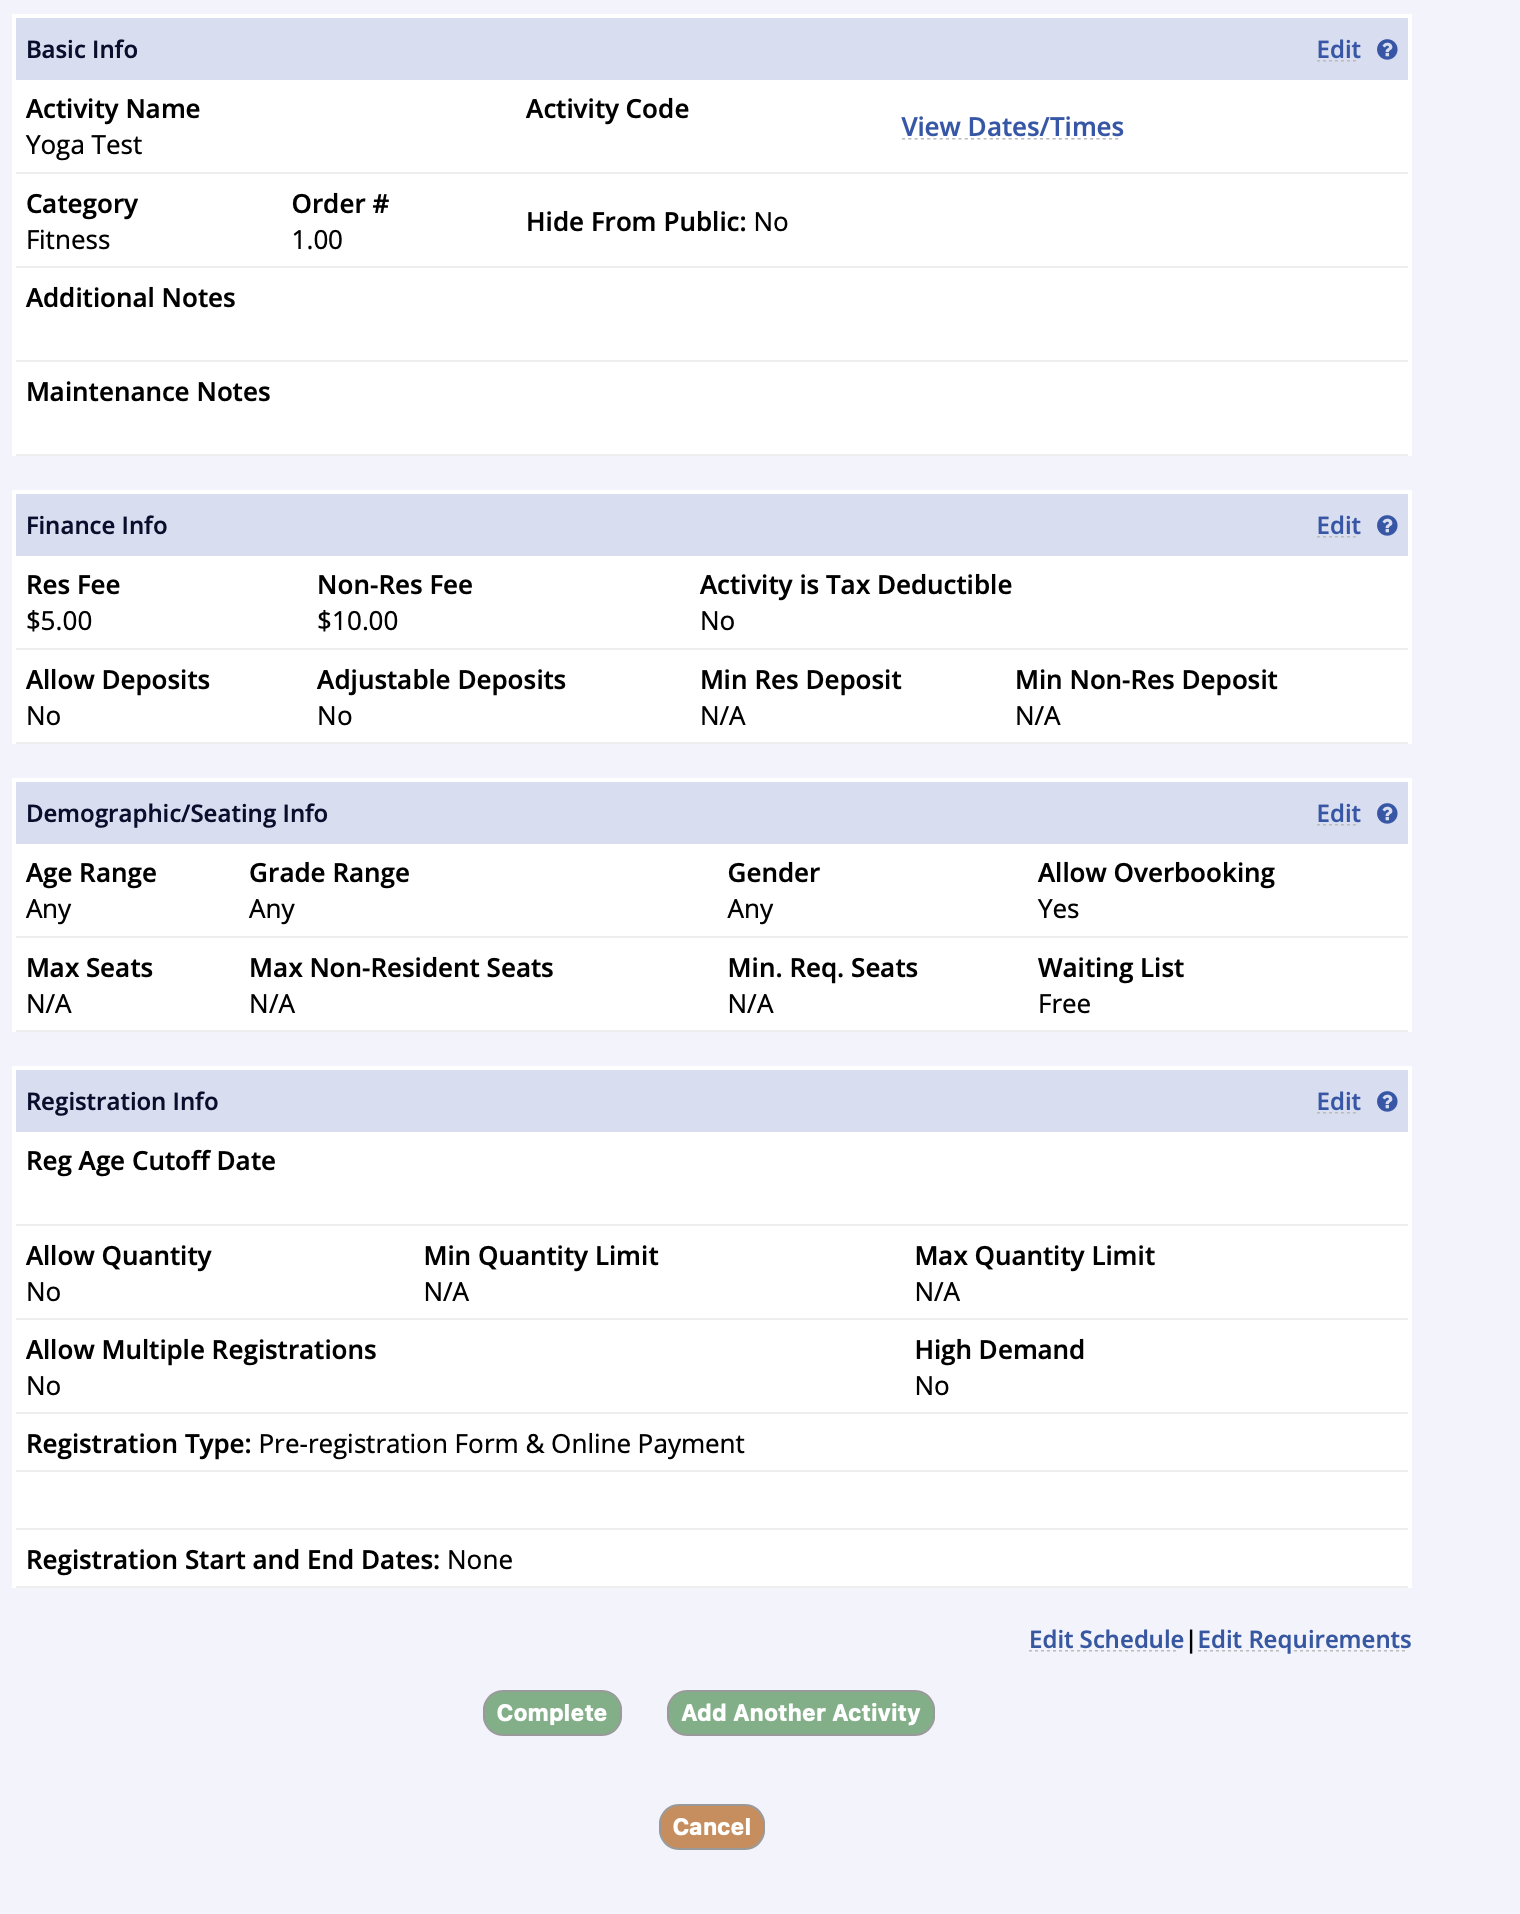
On this last screen, we can click to Complete to finish our activity creation or click Add Another Activity to create a new activity using the existing data. This option saves time by bringing over all fields pre-filled with data you had just entered. All you need to do is change info where needed.
Standard Activity Video
...
Standard activities are the simplest way to set up registration for your customers. They offer a single fee structure per activity and have the benefit of a waitlist feature. You can also set up teams and keep scores in Standard Activities.