Advanced Activities Video
...
This video will help you learn more about Advanced Activities within the Programs feature of MyRec.com
Creating an Advanced Activity
Because Programs house activities, they must be created first in order to add activities. See Program Creation article for more details.
- On the management side, go to the Programs tab in the lefthand navigation, then click Add New Program
- Enter information as needed
- Make sure to select Advanced Activity as program type
- Click Next
- This will take you to the program screen
- Click the Add Activity button on the upper right
Basic Info

- Name the Activity
- We suggest entering something recognizable by the activity name only, as this it what appears on the calendar
- The Activity Code field is used if your department assigns codes to activities. Activities can be searched on the code for registration
- The Activity Order number shows the order in which the activities are organized on the site, the lower the number, the higher on the list the activity will appear
- Select a Category from the dropdown or add a new one
- A category is the section this activity will be filed under when viewing all activities from the public side
- Activity Notes is a place to enter additional need to know information. This information shows under the activity for the public
- If Receipt Notes are entered, they will appear on the printable and emailed receipt upon the completion of the registration
- Maintenance Notes is a place to enter any setup or staff details that will appear on the facility maintenance report
-
Date to Show on Public Site defines the date this activity is visible to the public
- If it is blank, it will appear immediately
- If the second field is blank, the activity will drop off the public side after the last activity date
- When Hide This Activity From Public is checked, the public will not be able to view this activity
- When Hide This Activity from Management is checked, the activity will not appear in the activity search results for management side registration
- Note that these will be unchecked by default upon creation
- When Hide Activity from Calendar if checked, the activity will not populate the management calendar
- This is useful for activities like swim lessons that would fill your staff's calendar view
- Click View/Add Coaches & Instructors to give access to rosters for this activity, which are viewable on their public side accounts
- Checking Allow Member Discounts will apply defined discounts for individual household account members. Those discounts are set up on the members account page
- If this activity will have time slots, check the box Register by Time Slot
- Checking the Show Add-On Products box allows activity to suggest/require purchase of products during checkout
- Click Next Step to move on to create a schedule
Schedule Dates
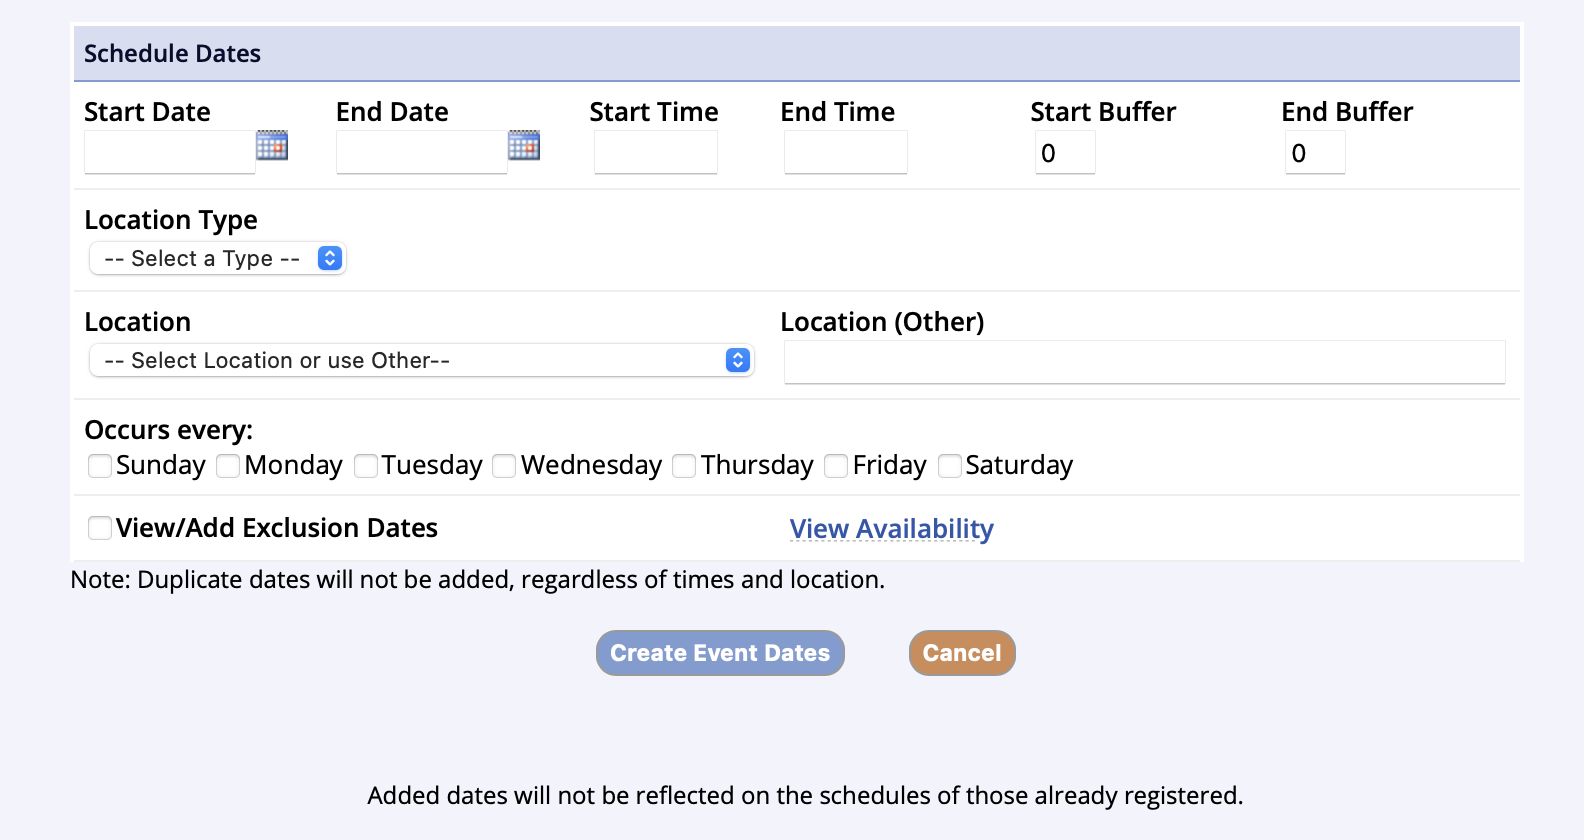
The scheduling screen defines the dates, times and location of the activity. This also creates a booking on the facility calendar.
- To schedule dates, choose the Start Date and End Date, Time and Location of the activity
- Check boxes for the day(s) of the week the activity occurs
- Use the View/Add Exclusion Dates checkbox to choose dates that you do not want to have the activity take place
- For example, if that activity falls on a holiday in that schedule
- If you wish to reduce the fee for pricing options that include an Exclusion Date, you will need to add the Missed Day Credit for residents and/or non-residents in the pricing option screen
- For example, if that activity falls on a holiday in that schedule
- Click Create Event Dates
This may be repeated for additional date/time patterns.
- When all dates are added, click Save Info
- Confirm the list of dates, edit, exclude or delete as necessary, then click the Add Pricing Options button (lower right of screen)
Pricing Options

- On the Pricing Option popup box, click the dropdown Choose a Pricing Matrix and select the option that works best for your activity
-
Single Day allows purchase of individual days in a session
- Ex: September 1st, October 31st, and December 7th
-
Weekly allows purchase of individual weeks in a session
- Ex: Week 1 (Sept 1st - 7th) and Week 3 (Sept 14th - 21st)
- Using Min and Max Fixed rate Days allows customers to choose which days of the week they would like to register for during that week
- For example, if 1 to 1 is used, a customer could select only Monday for the week(s) selected) or if 3 to 5 is used, they could do MWF of M-F for the week(s) selected
-
Monthly allows purchase of individual months in a session. ex: Month 2 (October) and Month 4 (December)
- Using Min and Max Fixed rate Days allows customers to choose which days of the week they would like to register for during that month
- For example, if 1 to 1 is used, a customer could select every Monday for the Month(s) selected) or if 3 to 5 is used, they could do every MWF of M-F for the month(s) selected
- Choosing the days of the week allowed to be registered for allows customers to only register for the days you have available
- Using Min and Max Fixed rate Days allows customers to choose which days of the week they would like to register for during that month
-
Entire Session allows purchase every day in a session
- Ex. All Days would allow the customer to attend all activity dates just like any standard activity
- Session Dates - if you use an Entire Session pricing option, you can set a range for which weeks of the activity that fee covers Example: If you have three sessions of swimming lessons available, and each session is two weeks in length, you can set up three “entire session” pricing options that would each be set to the appropriate two-week interval. You would title each pricing option Session 1, Session 2, etc…
- Ex. All Days would allow the customer to attend all activity dates just like any standard activity
-
Single Day allows purchase of individual days in a session
- Once an option is chosen, the screen will reload
- After it does, click Add
- On the screen that loads, fill out the fee information, description, and any other applicable information
- Change the name of the option to better inform the public of the option
- For example, the default name might be “Multi Days”, but you can change that to something like MWF Entire Session
- Keep the description brief so it is more easily read
- Change the name of the option to better inform the public of the option
- There are other options you may choose to use, depending on the type of pricing option you choose
- Certain options may not be used together such as recurring payments and deposits
- These options will either disallow selection when not available or have notes explaining the conflict
- Allow Deposits allows the registrant to pay only part of the cost at time of purchase
- Standard Deposit requires a deposit of a set figure on purchase
- First Week/Month Deposit requires a deposit in the amount of the first week/month
- Last/Week/Month Deposit requires a deposit in the amount of the last week/month
- First & Last Week/Month Deposit requires a deposit for both first and last week/month
- Adjustable Deposits allows the registrant to pay more than the set deposit amount
- Repeating Deposits sets the deposit on each time block rather than only on the first
- Fixed Rate Days per Week sets the minimum days that must be registered for per week
-
Missed Day Credit reduces the cost of a block of time when there is an exclusion date
- Use this in combination with adding an exclusion date to the schedule to reduce the fee of a pricing option that has dates including an exclusion date
- Just add the exclusion date alone will not impact the fee, just the schedule
- Use this in combination with adding an exclusion date to the schedule to reduce the fee of a pricing option that has dates including an exclusion date
- Min/Max Weeks/Months requires a min/max number of weeks or months in a purchase
- Registration Deadline disallows registration a set number of days before it occurs
- Automatic Recurring Payments* charges the customer automatically for each week/month
- Show on Site Date sets dates that the pricing option hides and shows on the public site
- Require Remaining Weeks auto-selects all remaining Weeks for registration (required for public, suggested for staff)
5. Click Next Step when finished
6. Select Add another option to add more options to this activity or No, I am finished to continue setup
7. Select the Budget Group assignment(s)
8. Click Next Step
*Automatic Recurring Payments requires that Authorize.net is being used as your merchant gateway. Additionally, administrative settings must be activated in order for this option to be used. Contact a MyRec.com Representative for more information.
Registration Info
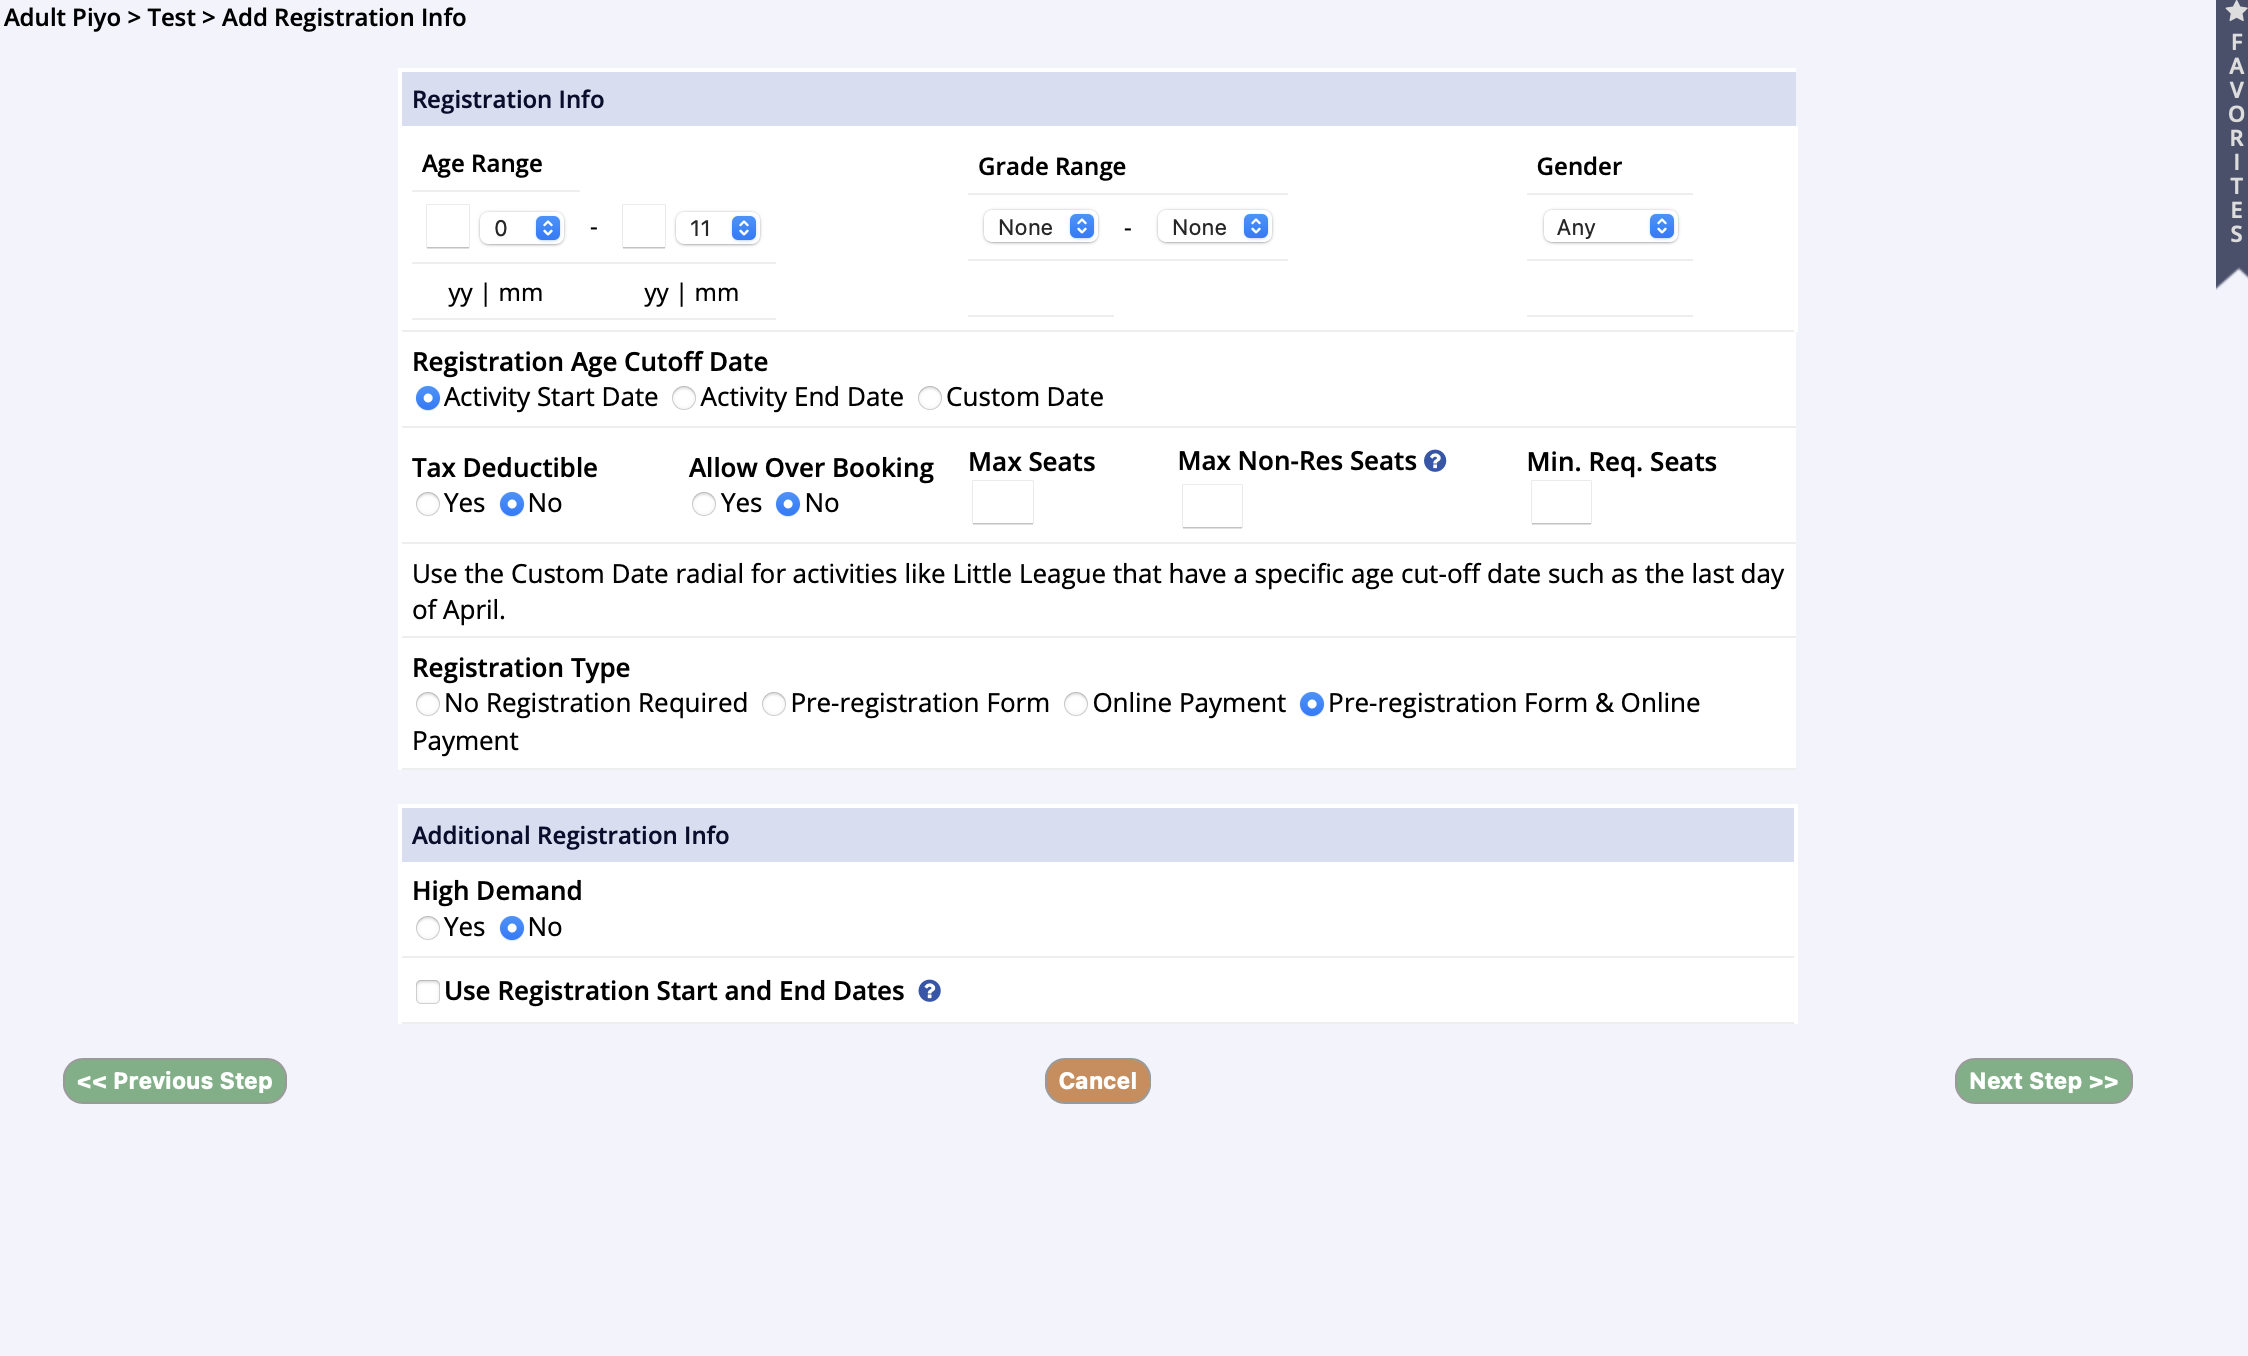
- Make selections for Registrant restrictions
-
Age Range defines the ages that can sign up for this activity
- Registration Age Cutoff Date determines the date used by the activity to determine a registrants age for eligibility
- Grade Range defines the grades that can sign up for this activity
- Assigning an Age Range and Grade Range simultaneously may result in confusion with certain age and grade combinations depending on your community
- Be aware of this with Pre-K activities, for instance, where you can have 3, 4, 5, and 6 years olds in Pre-K, so you will be excluding the Pre-K 3 and 4 year olds if you set the age to 5 and the grade to Pre-K
-
Gender defines whether this activity is available to males, females, or both
- If you have added a Custom Gender in your admin settings, choosing Male or Female in this dropdown will exclude the Custom Gender from registration
- To include the Custom Gender registrants, you will need to set this to Any in the dropdown
- If you have added a Custom Gender in your admin settings, choosing Male or Female in this dropdown will exclude the Custom Gender from registration
-
Age Range defines the ages that can sign up for this activity
- Checking Tax Deductible lists the activity under the tax deductible section of an Account's finance statement
- Allow Overbooking allows the office to add more people than the seats of the activity allow
- Max Seats is the maximum amount of people able to sign up for the activity per day
- Max Non-Res Seats is the maximum number of non residents who may sign up for the activity per day, out of the number of Max seats
- The Minimum Seats Required box is an optional setting that is used to record the amount of people who must sign up for an activity in order for the activity to take place
- In the Registration Info box, Registration Type is determined
- Use No Registration Required if attendees for this activity do not need to register online or with the form
- Registration Title and Registration Message are required to display instructions to the user
- Using Pre-Registration Form as the Registration Type will only allow users to process a Pre-registration form created for the activity not actually register at this time
- This does not hold a seat until the invoice has been paid and processed by the staff
- This form must be processed by the staff when payment is received
- Selecting Online Payment makes it so that users on the public side will then be able to register online using a credit card payment
- Selecting Pre-registration Form & Online Payment makes it so that public side users can choose to register either online or use a pre-registration form
- Again, any registrants who choose the Pre-registration Form option will not be registered or holding a seat for the activity until payment is applied by staff
- Use No Registration Required if attendees for this activity do not need to register online or with the form
- Checking High Demand gives users approximately 15 minutes to reach payment screen during the checkout process
- This is helpful to avoid Cart Holds and the Waiting List beginning while people sit on their registration decision
- Enter the Registration Start and End Dates, which determines when registration is available and automates the start and end of registration so the staff does not have to remember to open and close it
- It must be defined for both resident and non-resident users and must match the registration type
Using the Hide Feature Instead of Start/End Dates?
Hiding a program or activity from the public does not have the same effect as using Registration Start and End Dates. If a customer has bookmarked the activity page and you are not using an End Date for registration, the participant can register for that activity even after you've hidden it (if seats are available) because they have the direct link. Using the Registration Start and End dates effectively opens and closes registrations automatically at the time and date you select to avoid having this issue.
- It must be defined for both resident and non-resident users and must match the registration type
Requirements
On this step, special requirements can be added to the registration process by using existing questions, disclaimers, custom forms and required documents.
- Make selections and then click Next Save and Review
- If the question, disclaimer, or custom form does not yet exist, you will need to create it
- Right click Questions/Disclaimer/Custom Forms from the leftside navigation bar and Open in New Window
- Create the Questions/Disclaimer/Custom Form and click the button at the bottom to save/add/update
- Return to the screen where you are creating the advanced activty and refresh to see newly created item
- If the question, disclaimer, or custom form does not yet exist, you will need to create it
Add Required Documents
Add Required Documents
Access the Required Documents
- Open the Administration tab on the leftside navigation menu
- Select the Settings option
- Click the Account Settings tabs
- Scroll to the bottom of the page and click the Add Required Documents link
- Required Documents can be added to Accounts, to Activities, or to Memberships and are stored in the member's information page
- Only users who are listed as Administrators are able to Add Required Documents
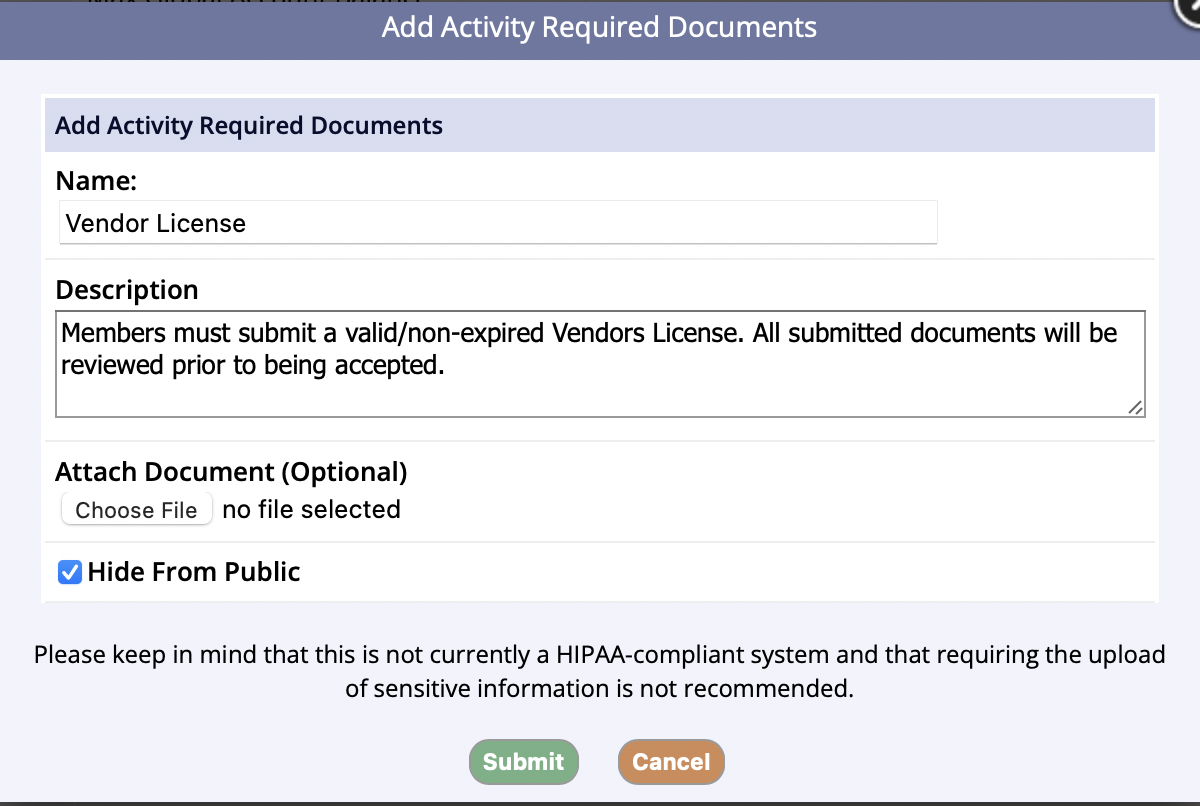
- You will be prompted to fill in the Add Activity Required Documents where you can enter the name of the Required Document, add a Description, attach an optional Document, and Hide from Public
- Required Documents that have attached documents will show up as a hyperlink; required documents without attached documents will not be hyperlinked
- Prior to clicking Submit, you are notified to ‘Please keep in mind that this is not currently a HIPPA-compliant system and that requiring the upload of sensitive information is not recommended’
Hide From Public and Upload Document
If you choose to hide the Required Document from the public, the document will be listed on the Member Info page only on the management side.
Staff will be able to upload the Required Document and set an Expiration Date.
- Once the Required Document has been created, click the Submit button
Account Required Document
- If Required Documents aren't hidden from the public, members are able to Upload Required Documents from the Account Member page on the public side
- When the member uploads the document it, will be listed as pending until the staff decides to Approve, Decline, or Delete the upload
- At the time of determining the status of the uploaded document, edits can be made

Require Proof of Residency

In the Account Settings tab of the Administration Setting screen, you can find the account Proof of Residency setting. This can be applied at the account or at the member level.
This is intended to be used in conjunction with the Pending Approval Account/Member process, but if you do not use the pending account approval process, your staff will need to manually review the uploaded image and then update the residency status manually within the account. If you are using this with the pending approval process, your staff will review the upload when the account/member is approved/declined.
Declining an account will also delete any required residency document uploads.
To access the Proof of Residency Required Documents, on the Account level, navigate to the homepage for the household. The document will be located just above the Account Details section.
To access the Proof of Residency Required Documents, on the Member level, navigate to the member page. The document will be located all the way at the bottom of the Member Info screen in the Member Proof of Residency documentation.
Activity Required Document
Overview:
- You are able to Add Required Documents to Activities
- If the Required Document is hidden from the public, and it is marked as Required for an Activity, it will be required to Upload from the public side during the activity registration
- If the Required Document is submitted during an activity registration from the management side, the staff will be prompted to enter an Expiration Date
To Add a Required Document to an Activity:
- Go to Programs
- Click View/Search Programs
- Select the Program, locate the Activity that needs to have the Required Document
- Once in the selected Activity, click on the Requirements tab
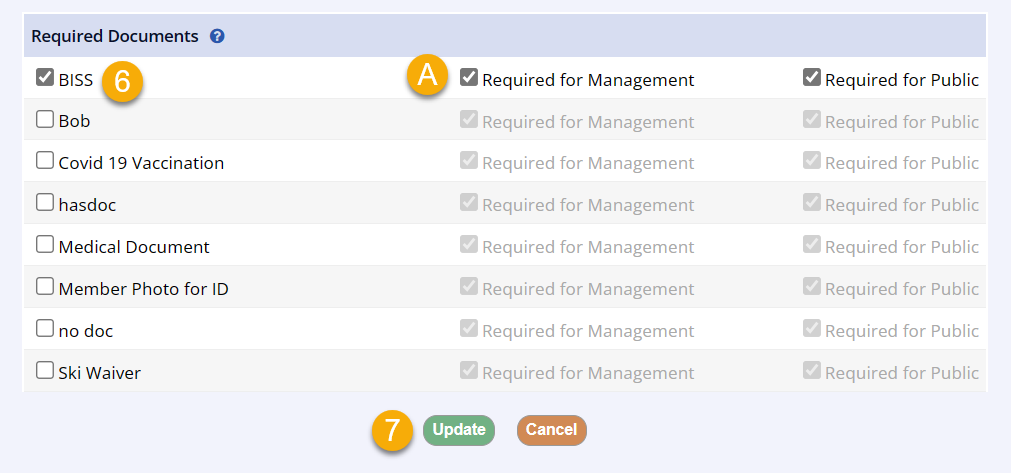
- Click the Add/Edit Required Document link

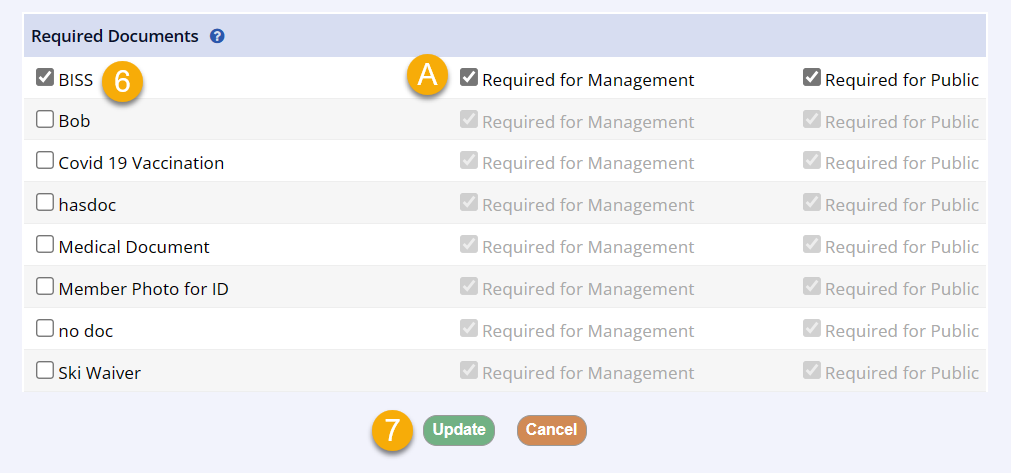
- Here, you have the option to select which Required Document to add to the activity
- It's optional to make the document Required
- If you uncheck Required for Management, then when a staff member completes a management registration, the document will be optional upon checkout
- The staff can let the user know to upload the document from their public-side account
- If you uncheck Required for Management, then when a staff member completes a management registration, the document will be optional upon checkout
- It's optional to make the document Required
- Click Update
Membership Required Document
Overview:
- You are able to Add Required Documents to Memberships
- If the Required Document is hidden from the public, and it is marked as Required for a Membership, it will be required to Upload from the public side during the membership registration
- If the Required Document is submitted during a membership registration from the management side, the staff will be prompted to enter an Expiration Date
To Add a Required Document to a Membership:
- Go to Memberships
- Click View Memberships
- Select the Membership where you want to add a Required Document
- Once in the selected Membership, click on the Requirements tab
- Click the Add/Edit Document Requirements link

- Here, you have the option to select which Required Document to add to the activity
- It's optional to make the document Required
- If you uncheck Required for Management, then when a staff member completes a management registration, the document will be optional upon checkout
- The staff can let the user know to upload the document from their public-side account
- If you uncheck Required for Management, then when a staff member completes a management registration, the document will be optional upon checkout
- It's optional to make the document Required
- Click Update
Facility Required Document

- Go to the Requirements tab for the facility or facility area
- Click Add/Edit Document Requirements
- Check the boxes for any documents you want to required on the reservation for that facility
- Use the checkboxes to require or not require the selected documents
- Click Update
Reports
Required Documents Report
Overview This report is for those activities (also available for Memberships) tha
Overview
This report is for activities, memberships and accounts that have Required Documents. When the activity / membership is selected, the results show the registrants with the required document name, date stamp of submission and update, as well as status. Results can be filtered by document, by status, and by type.
When the account is selected, results can be filtered from an expiration date range, document, and by status. You have the option to filter the report to show submissions by no expiration date or to view the summary and filter by status.
Document Status
There are many document statuses for Required Documents:
- Active (by Account only): Document has been uploaded and is in the members account
- Approved: Document has been uploaded via management or management has approved document uploaded by customer
- Declined: Document has been uploaded but declined by management
- Expiring Soon (by Account only): Document had been uploaded and an expiration date was determined upon approval and is going to expire soon
- Expired: Document had been uploaded and an expiration date was determined upon approval and it is now past
- Missing: Document is required for the activity but is not uploaded in the account
- Pending: Document has been uploaded via the public side and is awaiting management approval
Required Documents by Activity
- Go to Reports > Activity Reports > Select Required Documents in the Activity Reports section
- Select the activity name for the documents status you would like to check
- Filter by Document, Status, and/or Type
- Click the Submit button
- This report includes the:
- Account
- Member Name
- Document
- Submitted
- Status Update
- Status
- Required
- Expiration Date
Clicking the members name will bring you to the View Member Info page for that member within their account. This is where the document can be updated.

Required Documents by Membership
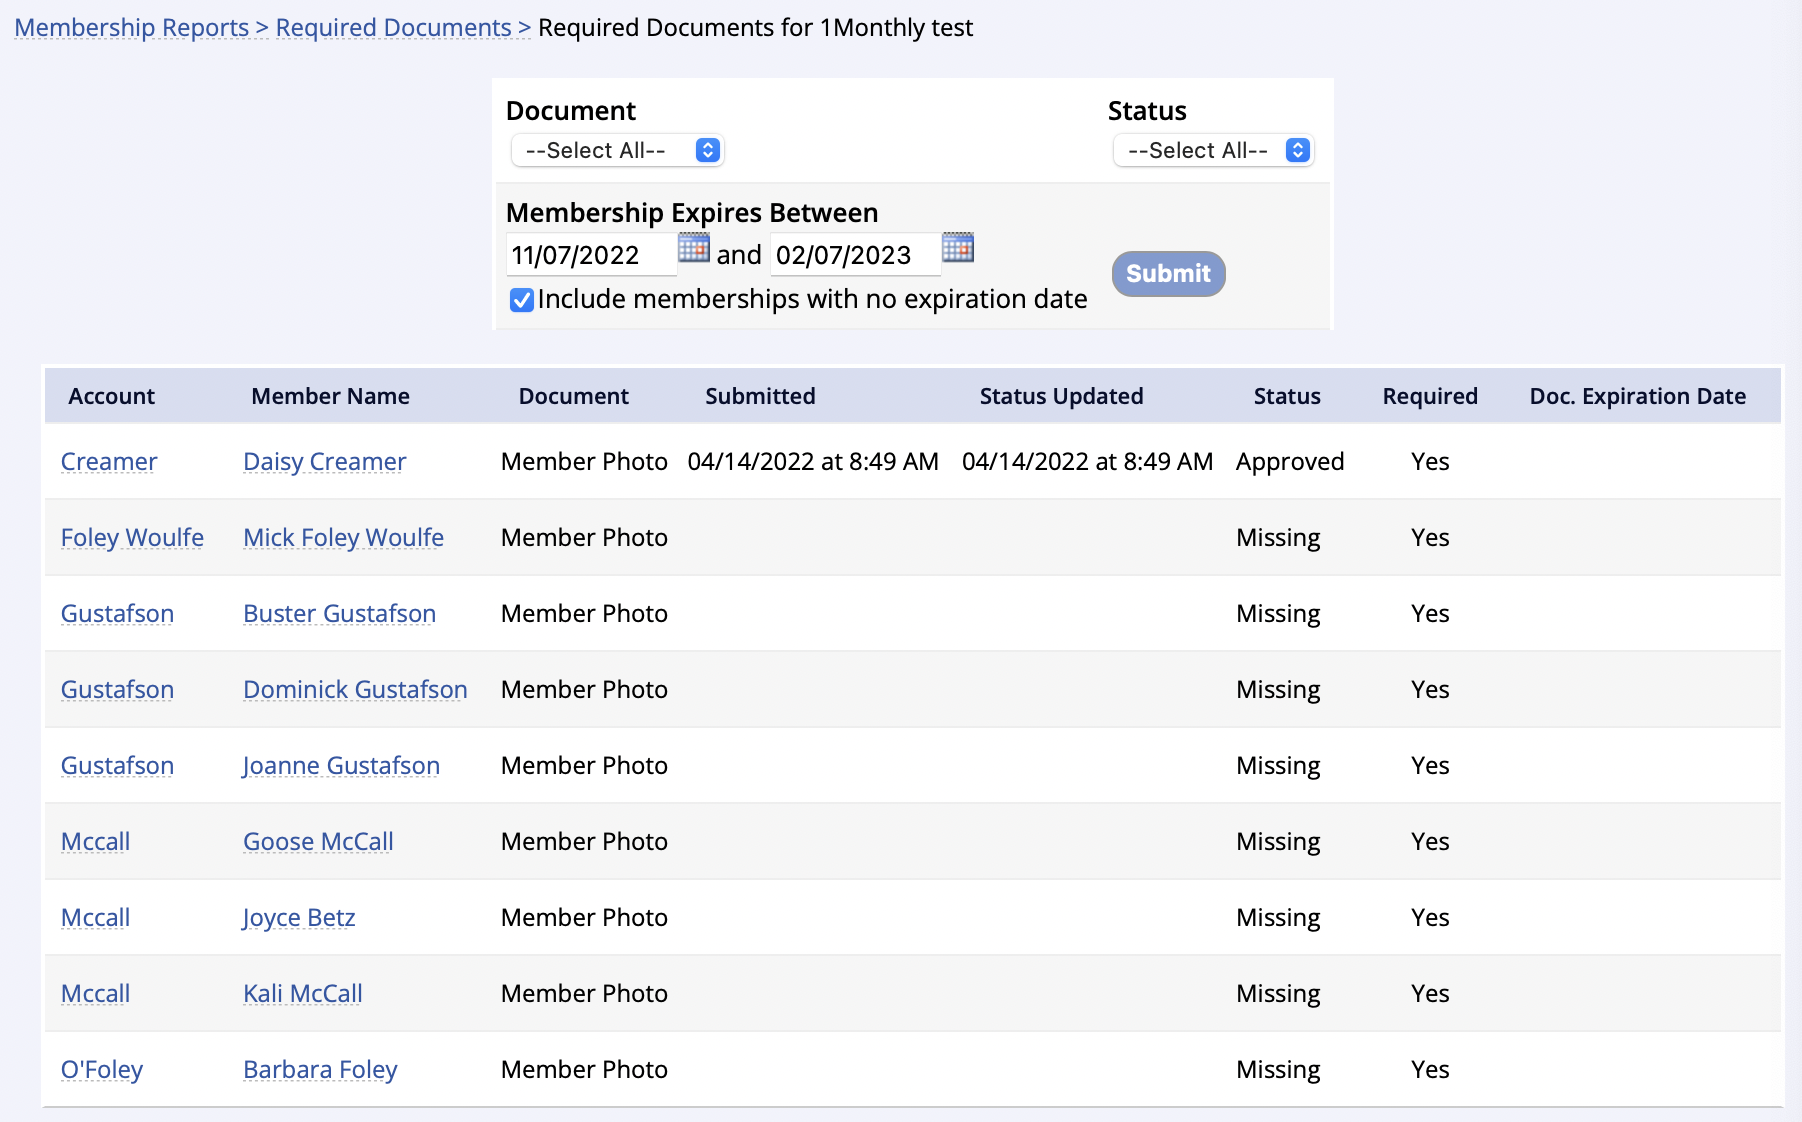
- Go to Reports > Membership Reports > Select Required Documents in the Requirements section > Select the membership name
- Filter by Document, Status and/or the date range when the Membership Expires Between
- This report is able to be filtered to Include memberships with no expiration dates
- Click the Submit button
- This report includes the:
- Account
- Member Name
- Document
- Submitted
- Status Update
- Status
- Required
- Expiration Date
Clicking the members name will bring you to the View Member Info page for that member within their account. This is where the document can be updated
Required Documents by Account
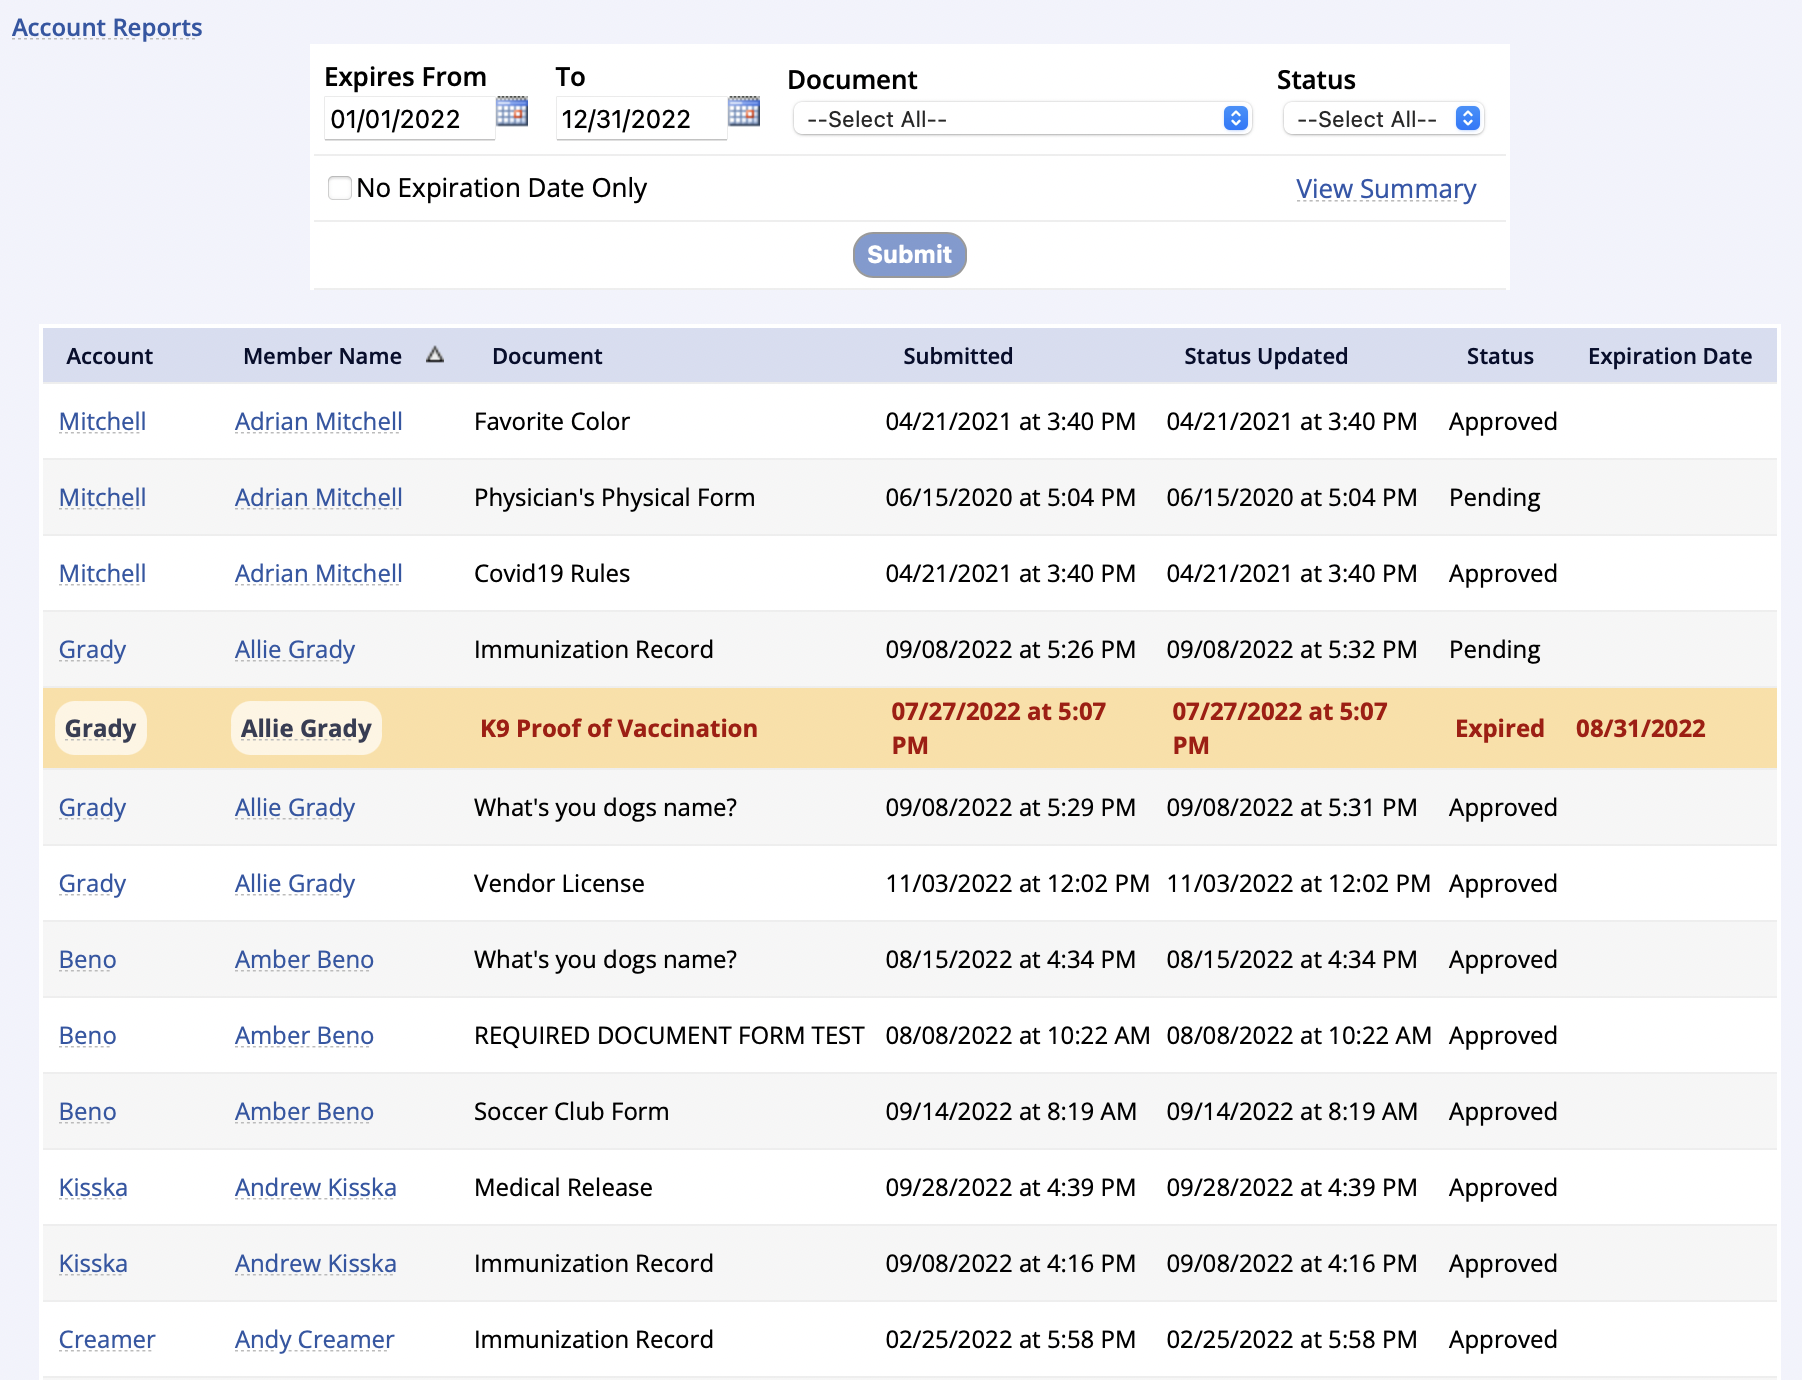
- Go to Reports > Account Reports > Select the Required Documents in the Account Requirements section
- Filter the date range when the membership Expires From-To, Document and/or by Status
- This report is able to be filtered by No Expiration Date Only
- Click the Submit button
- This report includes the:
- Account
- Member Name
- Document
- Submitted
- Status Update
- Status
- Required
- Expiration Date
Clicking the Member Name will bring you to the View Member Info page of that member within their account. This is where the document can be updated.
- Users are able to select:
- View Summary: gives the user the option to view the required documents by account and the option to filter by Status
View Summary Report
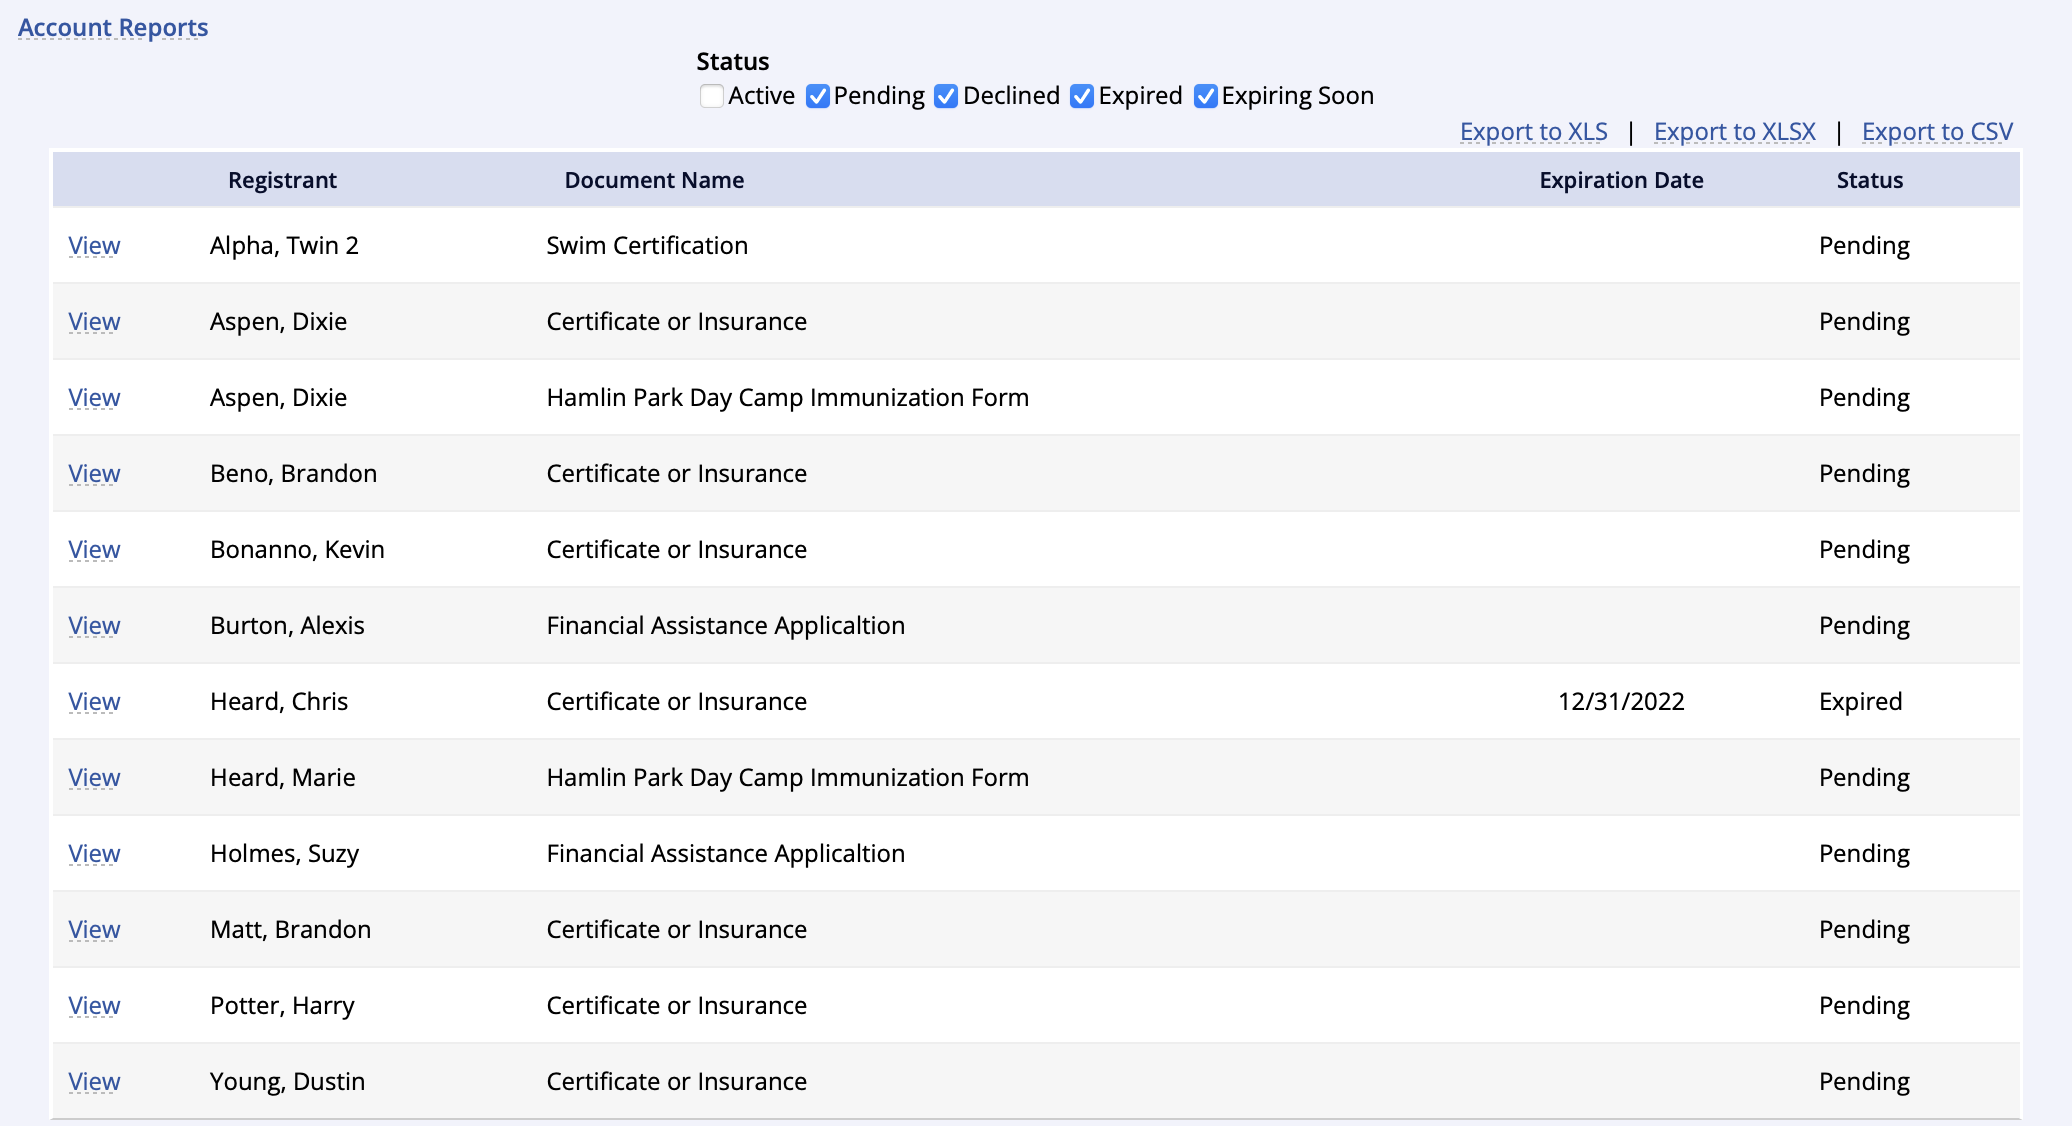
Selecting View Summary will allow the user to view the required documents by account and the option to view by their Status
- This report includes the:
- View, the submitted required document
- Registrant
- Document Name
- Expiration Date
- Status
- Clicking the View link will allow you to View Attached File, Edit, Approve, Decline or Delete the submitted document
- This filtered report is able to be exported
Reminders
The Required Document will not be listed on the Account Member page on the public side.
If the Required Document isn't hidden from the public, the member is able to upload the document, which will be listed as Pending until the staff approves the document.