This guide is designed for the public customer to use when accessing their coach information. This guide is not for the department staff to use in setting up coaches. If you need to add access for a coach/instructor, please see the article Assigning a Coach/Instructor.
Accessing Coach/Instructor Materials
- Pull up your recreation department's website
- Hover over the word Account in the main menu
- Click Account Login to log in
- If you do not have an account yet, click Create Account and complete the required information
Don't See a Soccer Ball icon?
To access coach or instructor materials, you must log in with your own individual credentials (not your spouse's or your kid's credentials). Using a username and password for another person in the household account will not show the Rosters icon. This may occur if your Autofill feature is on and your spouse's credentials get applied automatically. In this event, log the other user out and log back into the site using your own, existing username and password.
Contact the rec department if you need assistance with your credentials. The department has to have already designated you as a coach and assigned you to an activity for the soccer ball icon for the Rosters to appear on your screen.
You do not want to create a new account if you already have one within your household account.
- After logging in or creating your account, you will be brought to the Account Overview page
- You should see a soccer ball icon in the center of the icon menu, labeled Rosters
- Click the soccer ball icon

Still no Rosters icon?
- Make sure you logged in using your own username and password
- Using another household member's login will not show the Rosters icon
- If your login is correct and you still don't see the Soccer ball icon, get in touch with department staff to make sure you have been assigned to an activity
Accessing Coach Features on a Mobile Device
- Navigate to your department's MyRec.com page in the mobile device browser
- Click the Log In icon
- Log in using your account credentials (must be for the actual coach member, not another member of the household)
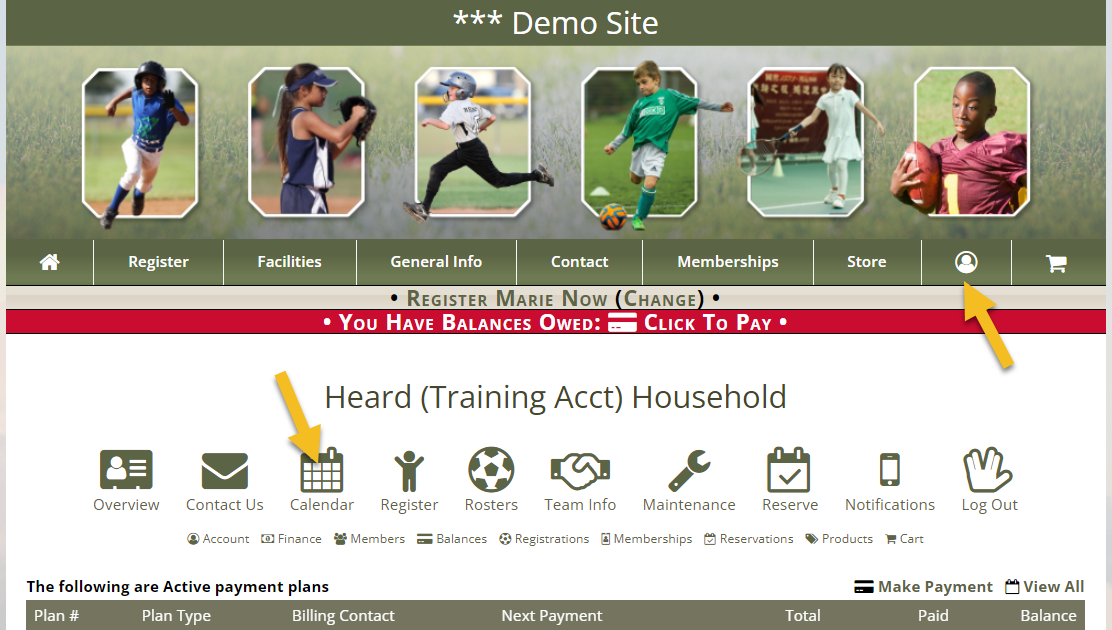
- Click the My Account icon (a circle with a person inside)

- Click the Rosters link in the menu under the Register Now link

- Or scroll to the bottom of the screen and click the soccer ball Rosters icon

You will see the information on each activity for which you are assigned as coach/instructor
- Options may be different from those below depending on the permissions the department has set for coaches

Calendar View for Coaches & Instructors
- You will need to log in if not already in your account
- In your Household account, click the Calendar icon

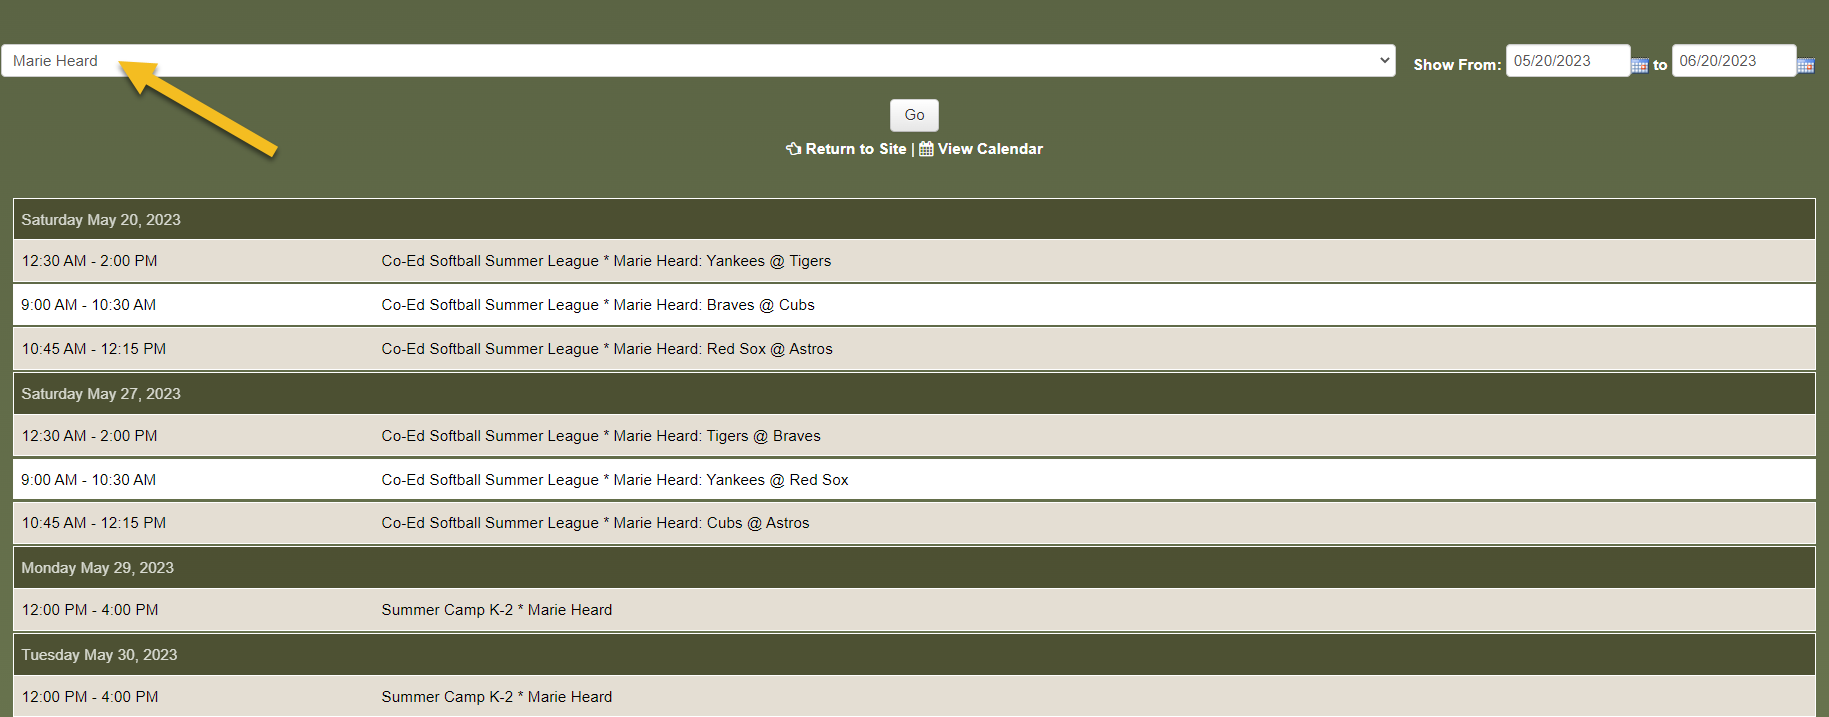
- On the top bar of the calendar, click Coach/Instructor Schedule

- A different view will show up with the default member selected at the top
- That member's coach/instructor schedule will show up below
- You can change the selected member in the dropdown and change the date range
- Click Go to see the schedule for the newly selected member/dates

- There is also a link for the coach/instructor schedule on your account calendar screen
Rosters for Coaches & Instructors
The Rosters icon brings you to a page that shows all of the activities and/or team sports to which you are assigned. Please note that each recreation department shares different information with their coaches, so you may not have access to all of the items listed below. (Please note: mobile device viewing will not have the soccer ball icon. Please use the Utilities menu to find your rosters instead.)
Each activity or team will show a list containing any of the following links
- View Roster: Provides all player information with filtering abilities across the top of the page. It is ideal for carrying to games along with Emergency Cards
- View Digital Sign In/Out Sheet: Used to record when attendees arrive and leave. Simply tap to note the date and time. Records for past attendance sheets are also available
- View Custom Disclaimers: Displays signed disclaimers, if applicable
- View Dynamic/Custom Forms: Displays form responses, if applicable
- Export Roster: Exports roster information to a spreadsheet file
- View Attendance/Sign In Sheet: Displays basic information along with multiple attendance boxes, as well as several other boxes. Must be printed out to use
-
Email Roster: Displays a list of player email addresses. This can be copied and pasted into the Recipients field in any email message
- For best results, send the same email to a few players at a time
- For email privacy, place your own email address in the To field and the player addresses in the "BCC" field
-
Text Message Roster: Displays a list of player mobile phone numbers. This can be copied and pasted into the Recipients field in any email message. Keep your message to less than 160 characters
- Place your email address in the “To” field and the player addresses in the “BCC” field. If you do not see this field, ask for assistance
- Keep your text content under 160 characters
- Manage Teams and Team Rosters: Allows the head coach of a sport to create teams, and assign coaches and players to those specific teams
Creating and Managing Teams
If you have been assigned as the head coach of an activity (staff: on the Basic Info tab), you have the ability to create teams and assign coaches and players if the department has added this permission.
To Create Team
- In the center of the screen, click on Add New Team/Group
- Give the team a name
- Click Submit
To Assign Coach to Team
- Click on Coaches/Instructor under the team to be assigned
- On the right click on Add Coach/Instructor
- Check the box of the coach to be assigned
- If the coach does not appear, then the coach has not been assigned as a coach by the department. Contact the department to add this user as a coach
- Click Submit
To Assign Registrants to Teams
- Click on Members under the team to be assigned
- Check the boxes of the students being assigned that team
- Click Submit
- You can assign the same student to two teams if applicable
Add/Edit Scores
- Click Add New Team Scores
- Select the game date
- Choose the teams
- Enter scores and notes if applicable
- Click Submit
Note: Team coaches will not be able to view a roster until the teams are established and entered into the system by the office or the activity-level coach. Team coaches will also not be able to Add/Edit Scores. That is an activity-level coach feature.
Want to print a pdf for your coaches/instructors? Download pdf