
Once Point of Sale has been activated for your site, you will see a Products tab in the main navigation of your management. Your first step after clicking that tab is to click Product Categories.
Adding a Category
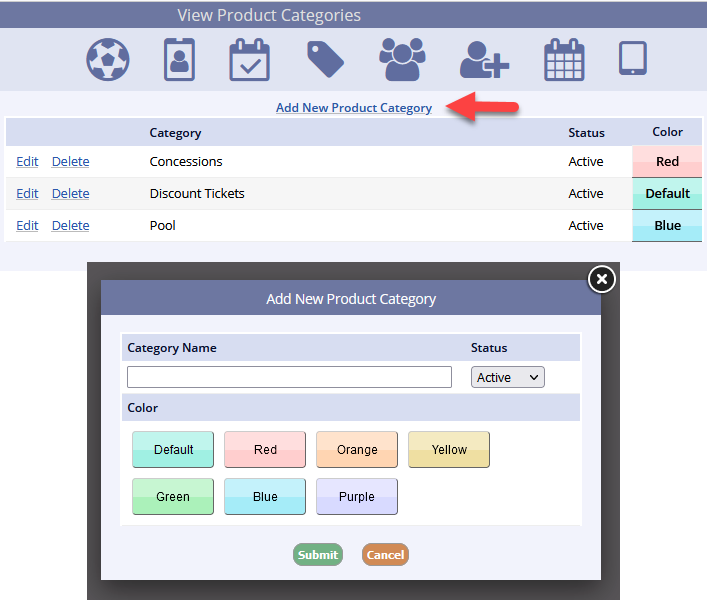
- Click Add New Product Category at the top
- Here you can add your category by filling in the name, leaving the status set to active, and choosing a color for that category
- After clicking Submit, you can repeat this step for each category you need
- You may also add sub-categories if you choose, they will be the same color as the category they sit under
- When you're done, you'll be presented with a list to review
- If it looks good, you can move on to products by clicking the Products link under the Products tab in your navigation
- Once that page loads, you are presented with four tabs across the top for entering Standard Products, Tickets, Adjustments, and Combo Packages
- If you need to make change, click Edit next to any you'd like to change
- If it looks good, you can move on to products by clicking the Products link under the Products tab in your navigation

- Choose which type of product you'd like to enter, and click Add New in upper right corner
Creating a Product
Creating Different Types of Products
Creating a Standard Product
To enter a Standard Product:
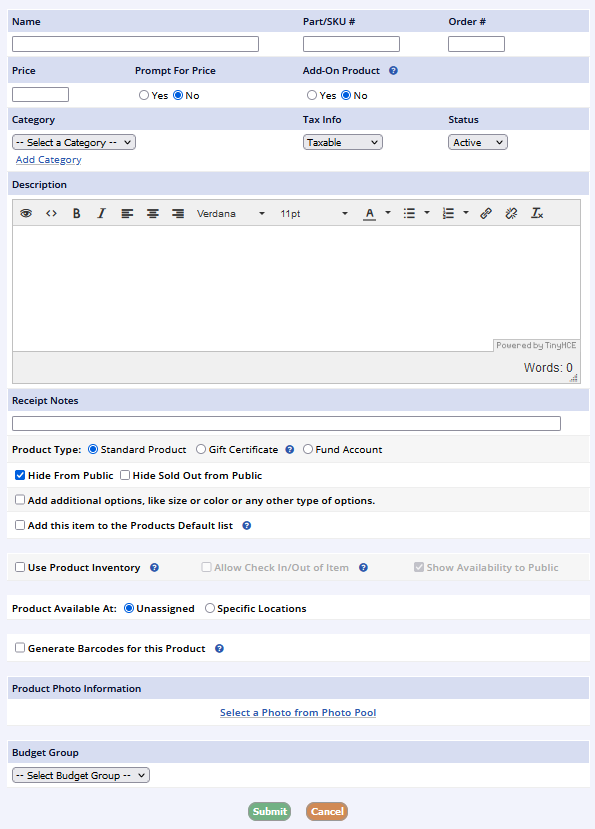
- Enter a product name
- If your department records SKU #s for products or to keep inventory, there is a field where that information can be entered
- You can use the link from the Inventory Refill Alert Report to view the product page and SKU # for items you need to reorder
- The barcode scanner for membership cards and access barcodes is not compatible with commercial product SKU #s and is not intended to be used for POS purchases
- If your department records SKU #s for products or to keep inventory, there is a field where that information can be entered
- Add the price and description, as applicable
- If your item will have the same price at all times, leave Prompt for Price set to No
- If the price will change, set this to Yes and upon checkout, you'll be prompted to enter the price
- Add-on Product allows activities to suggest/require purchase of this product during checkout, and it requires a set price
- Choose the category
- You may add a new one here if it was not set when initially creating them
- Choose the Tax Info from the dropdown
- You can deactivate a product that is no longer in use under the Status dropdown
- Add your description and any receipt notes for this item, if applicable
- You will then choose the Product Type: Standard Product, Gift Certificate, or Fund Account
- If you need assistance on these product types, check out the Gift Certificate Video and Fund Account Video
Informational-Only Product
You can select the Info Only setting to make a product visible to the public, much in the same way as an Info Only Program, so the information is visible but the ability to purchase is deactivated. You can turn this setting off when you are ready to sell the product on the public side. Good uses for this setting include seasonal products or products that are not yet in stock.
- If you choose to Add Additional Options for variations on the product like color and size, you will be able to see these purchases in a point of sale options report we will discuss in the reports section
- Using this will also add an extra step on checkout for each type of option so the answers can be selected
- Adding a product to the default list means that you will not have to select a category to view this product for checkout, but it will instead appear in the initial list that comes up in your point of sale screen
- Using Product Inventory allows you to set a limit to how many of this product you can sell
- This number is tracked on the product overview screen
- If you attempt to exceed the maximum inventory in a sale, the system will not allow you to proceed
- This number is tracked on the product overview screen
-
Allow Check In/Out of Item allows products to checked out of inventory when purchased and can be checked back into inventory via the Product Check In report in POS reports or the facility portal
- Inventory use is required for this setting
- This can be useful for items like skis, balls, kayaks, etc. If a product is checked out one at a time, like a locker, create a product for each one
- If the product is only at specific locations, you can choose that radio button, which will allow purchases of this package only from specific locations within the facility portal
- Location settings are required for your department's products if you are using EMV terminals/readers
EMV Clients
You must assign a product location(s) to each product in order for it to appear in the POS portal. Return to the product setup screen and update locations if you do not see the product in your POS. There is an option to Add to Locations from the product list page to assign to multiple locations at once.
-
Generate Barcodes creates barcodes that can be printed or emailed after purchase
- Barcodes allow the purchaser to scan into a facility for access to it like a membership card
- These are not used for purchase or redemption.
- You can also select a photo for the product and must choose a budget group
- Once you have finished filling in the information for your product, click Submit
- You can repeat this for each product you need to add
- Upon completion, you'll be presented with a screen that displays each product, its basic information, and inventory counts if applicable
- Review these products and click the name of any product you'd like to edit or click edit next to an inventory number to adjust that amount

- By clicking on the Product Name, you will find the options to edit, delete, and clone the product
- If you choose to edit the product, you'll note the edit screen is much like the add screen with the same abilities
- If you choose the delete option instead, you should note that deleting a product is permanent
- You can also elect to clone a product which will create an exact duplicate except any inventory involved will not be carried over
- Additionally, you have the ability to review and add new product options and review or modify any options currently in place
Assigning Locations to Products
EMV Clients
You must assign a product location(s) to each product in order for it to appear in the POS portal. Return to the product setup screen and update locations if you do not see the product in your POS. There is an option to Add to Locations from the product list page to assign to multiple locations at once.
Click Add to Location in the top right corner of the screen.
- Select the location from the dropdown
- Choose to Add Location or Add Locations to connec to the products
- You can also remove locations by clicking Delete Locations
- Check the boxes for all of the products you want to add to these locations
- Click Update
- Complete this process for all products

Tickets are much like standard products that use an inventory system except a specified number is assigned to each sale.
-
Add New Ticket on the upper right and you'll see many of the same options we just went through for a standard product
- The main difference here is that a ticket includes the option to Allow Duplicate Tickets across sections and a set of fields for various sections
- A section can be either a type of ticket like Child, Adult, etc. or a physical area like Section A at a concert
- You have the option to allow Section A and Section B to either be numbered sequentially or concurrently
- For example, you can number sequentially where A can be 1-100 and B can be 101-200
- For example, you can number concurrently where both A and B are numbered 1-100)
- If you elect to allow duplicate tickets, you cannot change this once tickets have been sold
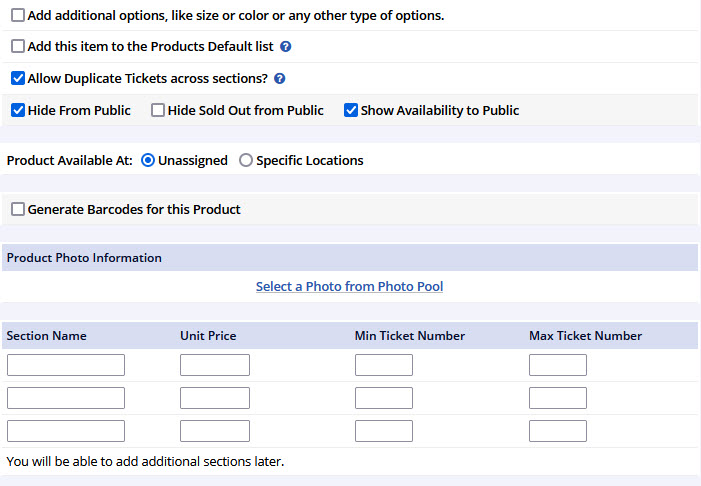
- Enter in section names (only one is necessary)
- Enter price
- Set the minimum and maximum ticket number in the range you intend to sell
- Submit your entry and repeat as needed
There are 3 different types of adjustment types you can enter. A membership, a promo code, and a quantity adjustment
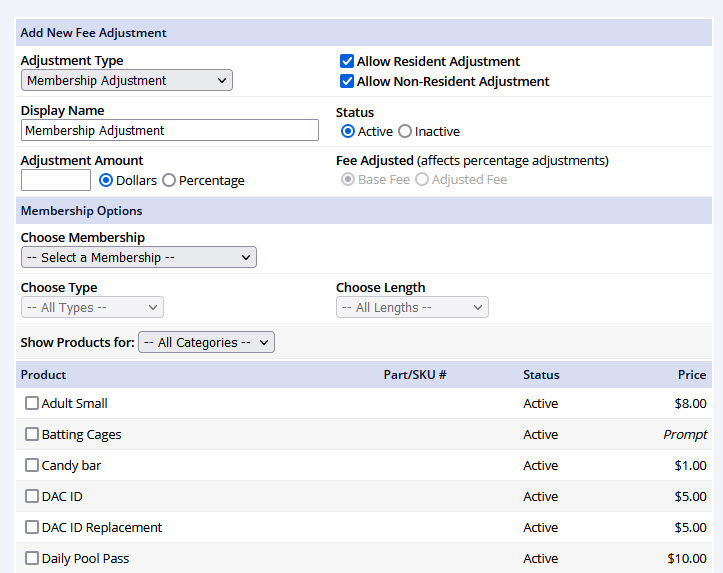
Membership Adjustment
- Check the boxes for either a resident, non-resident, or both
- Change the display name of the adjustment as it appears for the public
- Enter either the dollar amount (off the base fee), or if you choose percentage, can choose between base fee or adjusted fee
- You then will choose which membership this adjustment is for, which type, and which length
-
Submit and repeat for other memberships, types, or lengths
Promo Code Adjustment
- Enter a display name and the amount of adjustment
- Choose the options for the promo type
- Unique - One time use only for one person
- Universal - Many uses for many people
- Per Member - This promo code can only be used once ever per member
- Per Account - This promo code can only be used once ever per account
- Enter a promo code and expiration date if necessary
- Choose your products it will apply to
- Click Submit

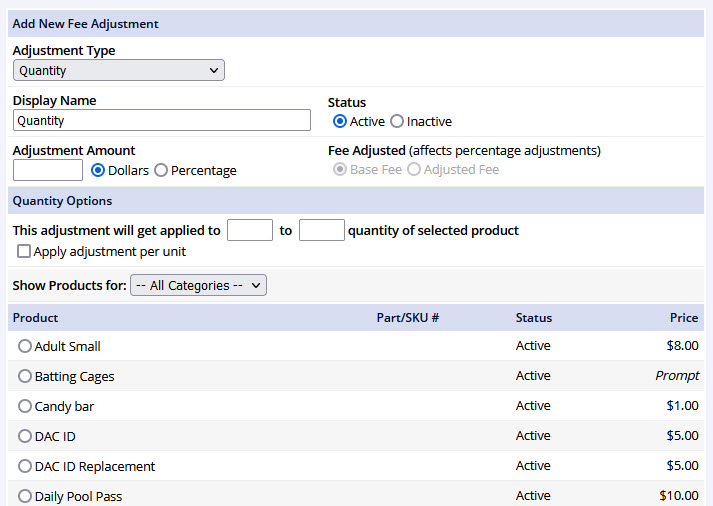
Quantity Adjustment
- Enter a display name and the amount of adjustment
- Enter the number of items the discount applies to from x quantity to x quantity
- Example: Buy 5 tickets and $2 off your total, so enter 5 to 5
- Apply adjustment per unit allows the discount to apply to each item
- Example: Buy 5 tickets and get the tickets $2 off per ticket
- Choose your products
- Click Submit
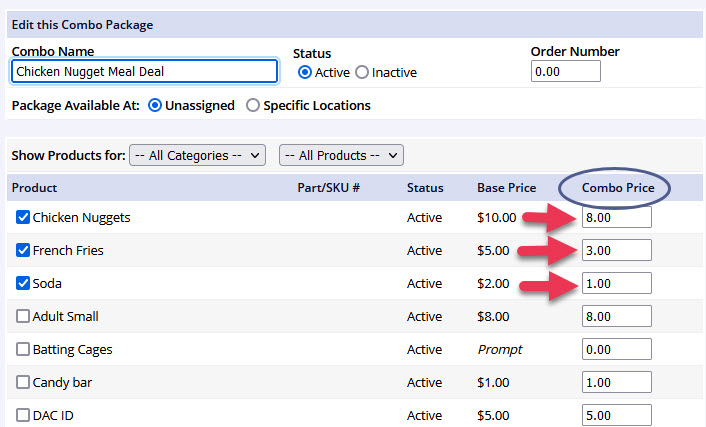
- Combo Packages are used if you want to make a meal package for example
- Click add a new combo package in the upper right corner
- Name the combo and if there are many packages, apply an order number
- If the package is only at specific locations, you can choose that radio button which will allow purchases of this package only from specific locations within the facility portal
- Choose which products are included in the package (example, chicken nuggets, french fries, soda), and edit the fees for each
- Click submit
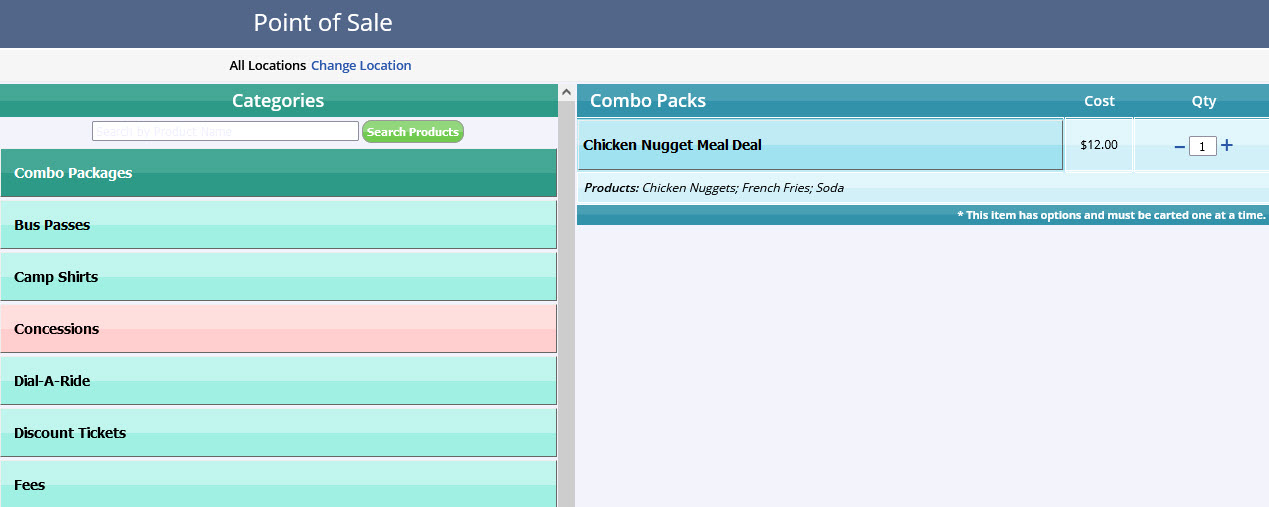
- This package will be a new combo product and sell for the discounted price when chosen
Don't see the product in POS?
If you are an EMV client, you will need to have locations assigned to each and every product you want to appear in the POS portal. Once you assign locations and update, you will see those product in the portal.