
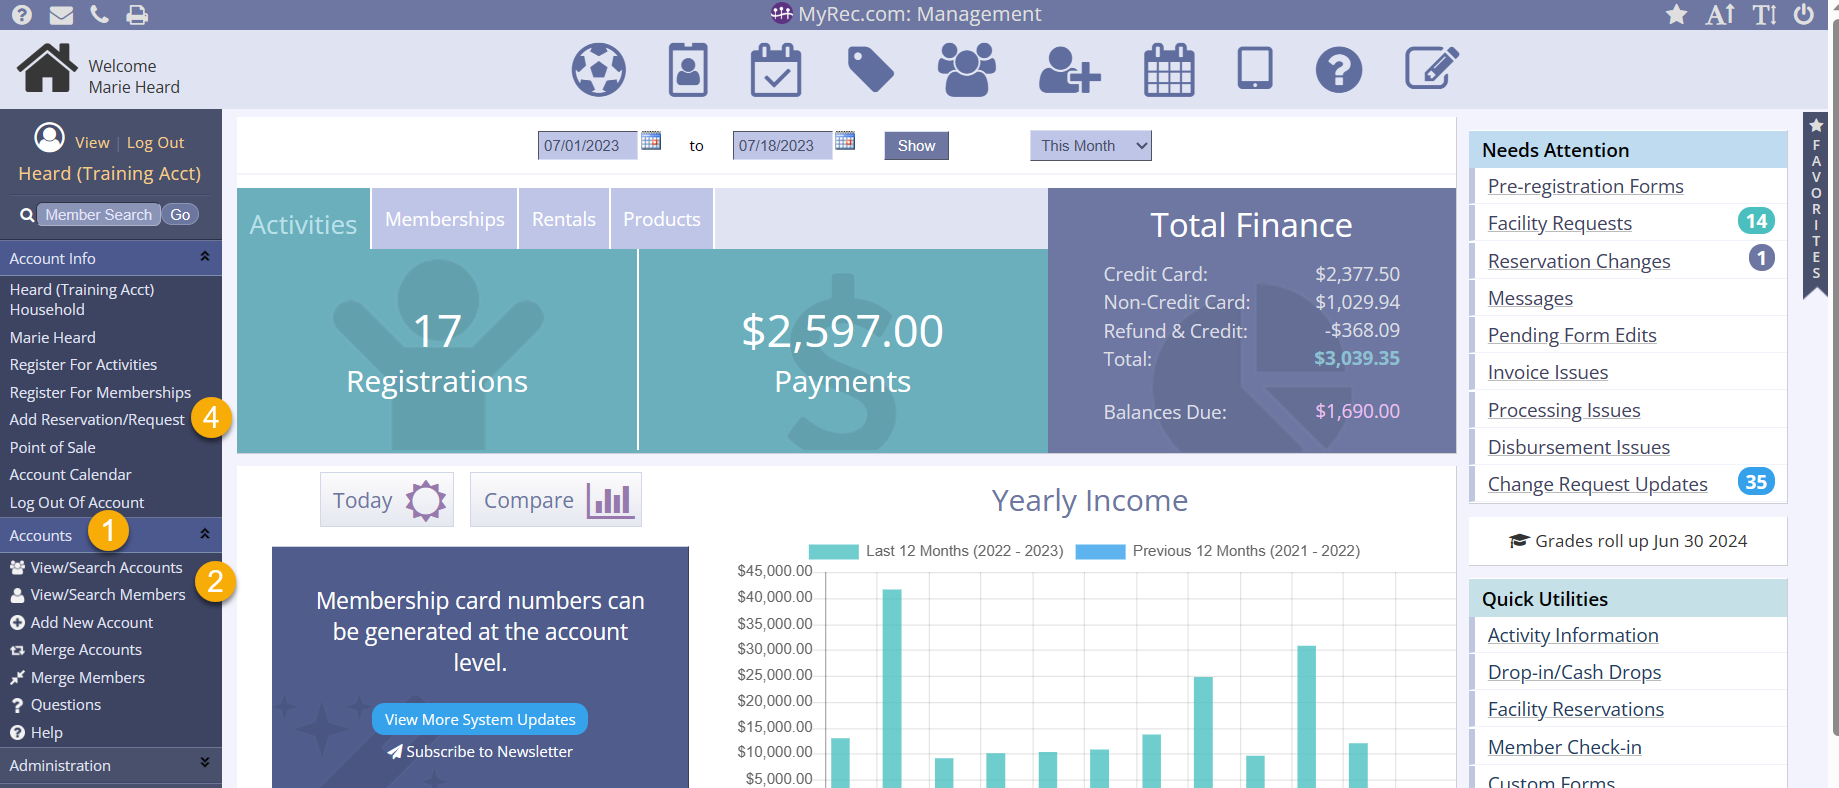
Starting a Reservation
There are 3 ways to begin a reservation from the management side. From the Accounts Tab, the Calendar or a Quick Add Reserve.
Accounts Tab
- Click Accounts in the lefthand navigation bar
- Click either Search Accounts or Search Members to search for the account that is making the reservation
- Click the account name
- Click Add Reservation / Request from the account navigation list
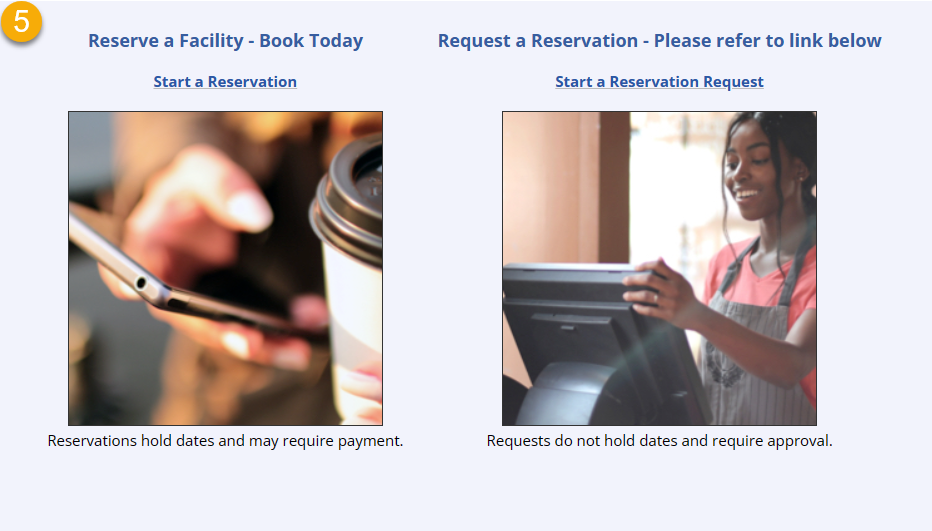
- Select Start a Reservation if choice appears

- Confirm the choices from the dropdowns
- Rental Contact selection
- Renter Type selection
- Click Next
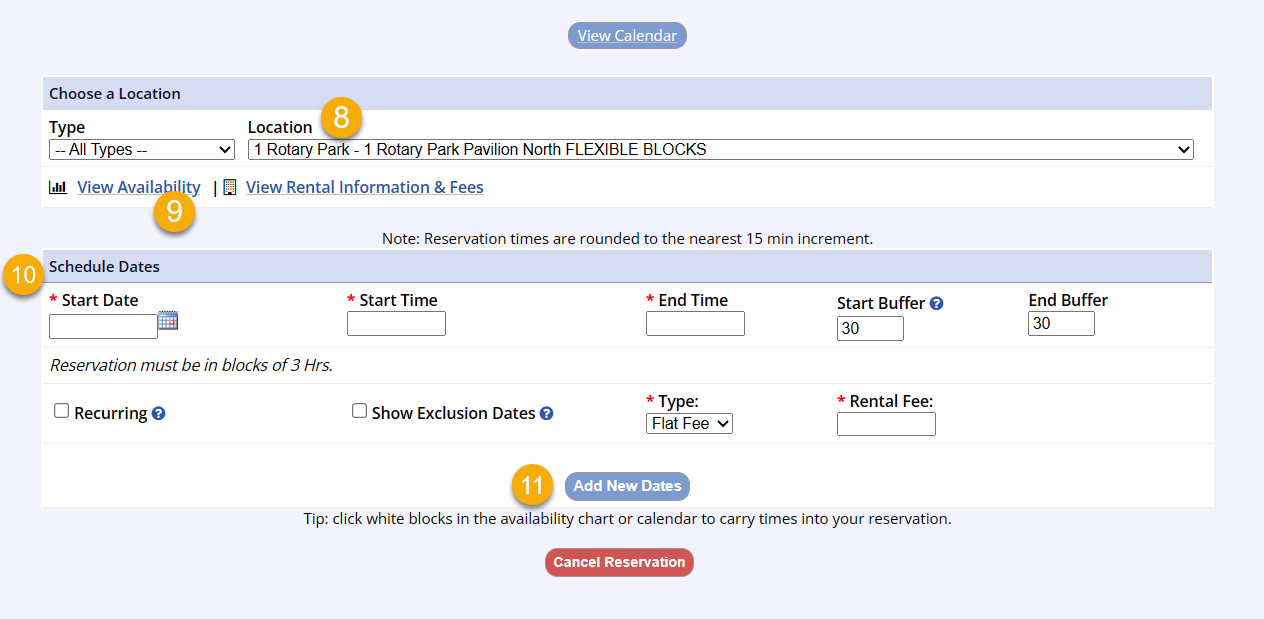
- Select a Location from the dropdown
- Once Location has been chosen, you can first check availability by clicking the View Availability link
- Choose the date you want to check and click Update
- Once you know your dates are available, you can enter the start and end dates as well as times you want to reserve the facility (see Entering Reservation Dates below)
View Calendar - Quick Add
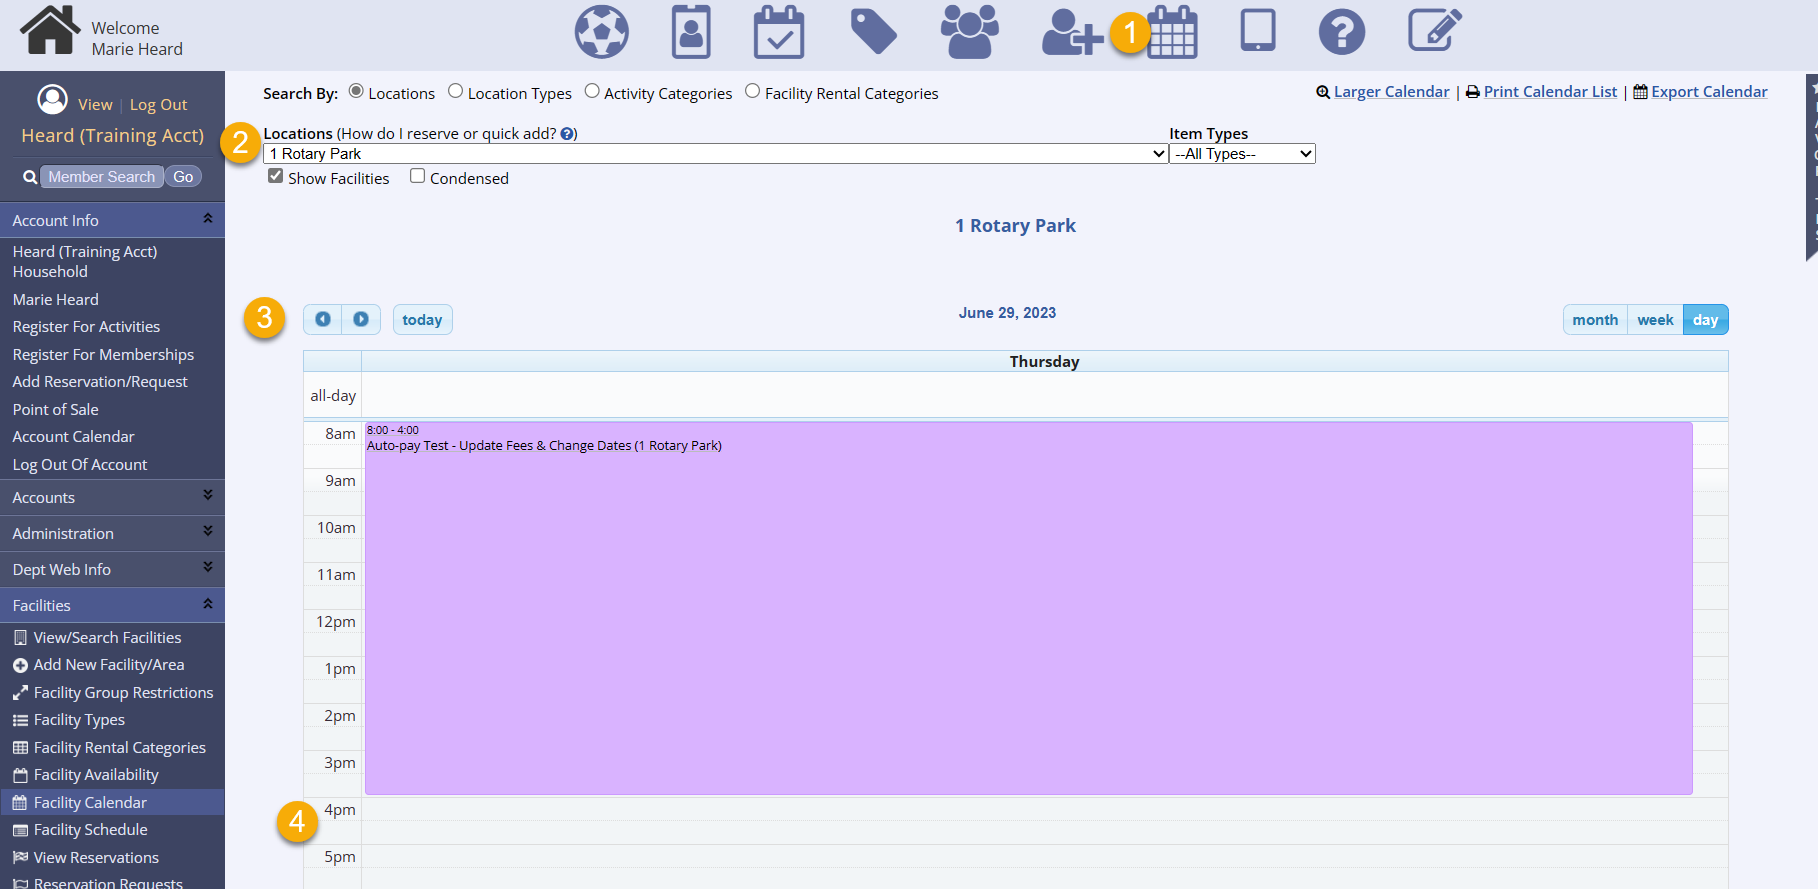
- Click View Calendar Icon
- Choose a location using the Locations dropdown
- Click the arrows to find the month of reserving
- Select a date in that month to begin your reservation
- Click on the start time and drag down to the end time (booked times are un-clickable)
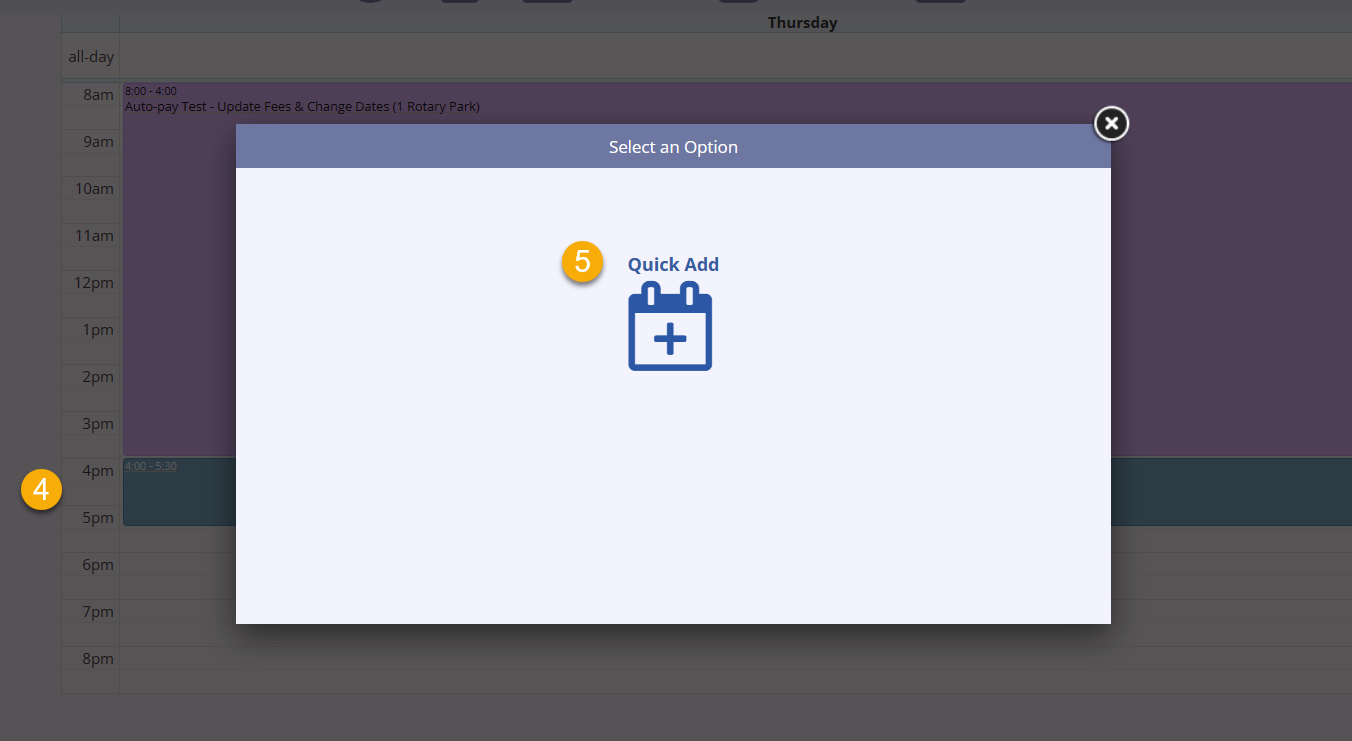
- Select the option to Quick Add
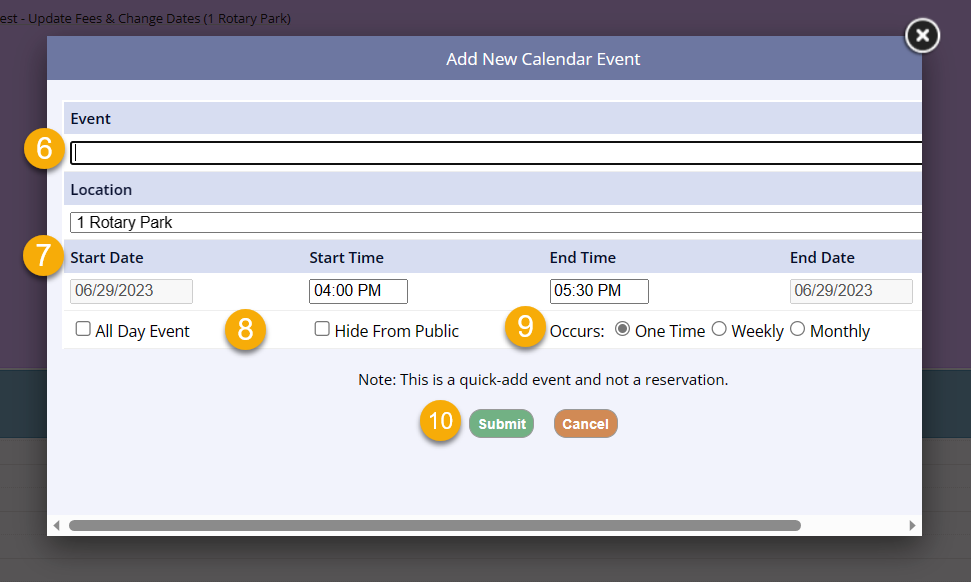
- Type in the Event title
- Confirm the location and start/end times
- Check the boxes for All Date Event and/or Hide from Public as applicable
- Choose the recurring setting from the radio buttons if necessary
- Click Submit
- Now the date and time has been added to the schedule
- This Quick Add method is best for department facility uses that do not need an account tied to the reservation
- For instance, if you block off two hours each weekday for the local elementary school soccer practices, which aren't a Rec Department activity, don't require fees, refunds, or disclaimers, the Quick Add option is very useful
- This Quick Add method is best for department facility uses that do not need an account tied to the reservation
Reserve Quick Icon

- Click the Reserve Facility Icon from your top navigation bar
- Now Search Members for the account member that is making the reservation
- Click the name
- Confirm the Rental Contact selection and Renter Type, then click Next
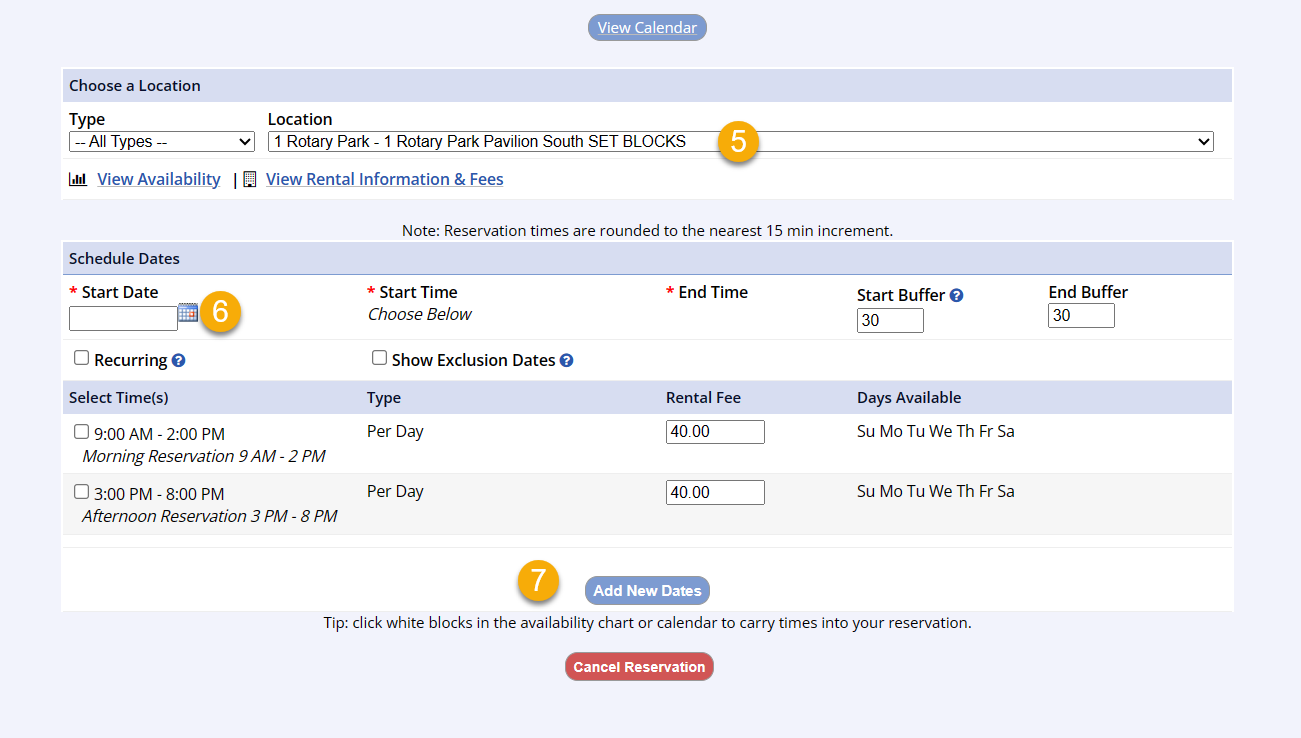
- Select a Location from the Locations dropdown
- Once Location has been chosen, the date can be selected from the Facility Availability Chart by clicking the View Availability link .
- Choose date and click available time will fill in the schedule below
- Click Add New Dates
- Continue with completing the reservation (see Completing the Reservation below)
Entering Reservation Dates
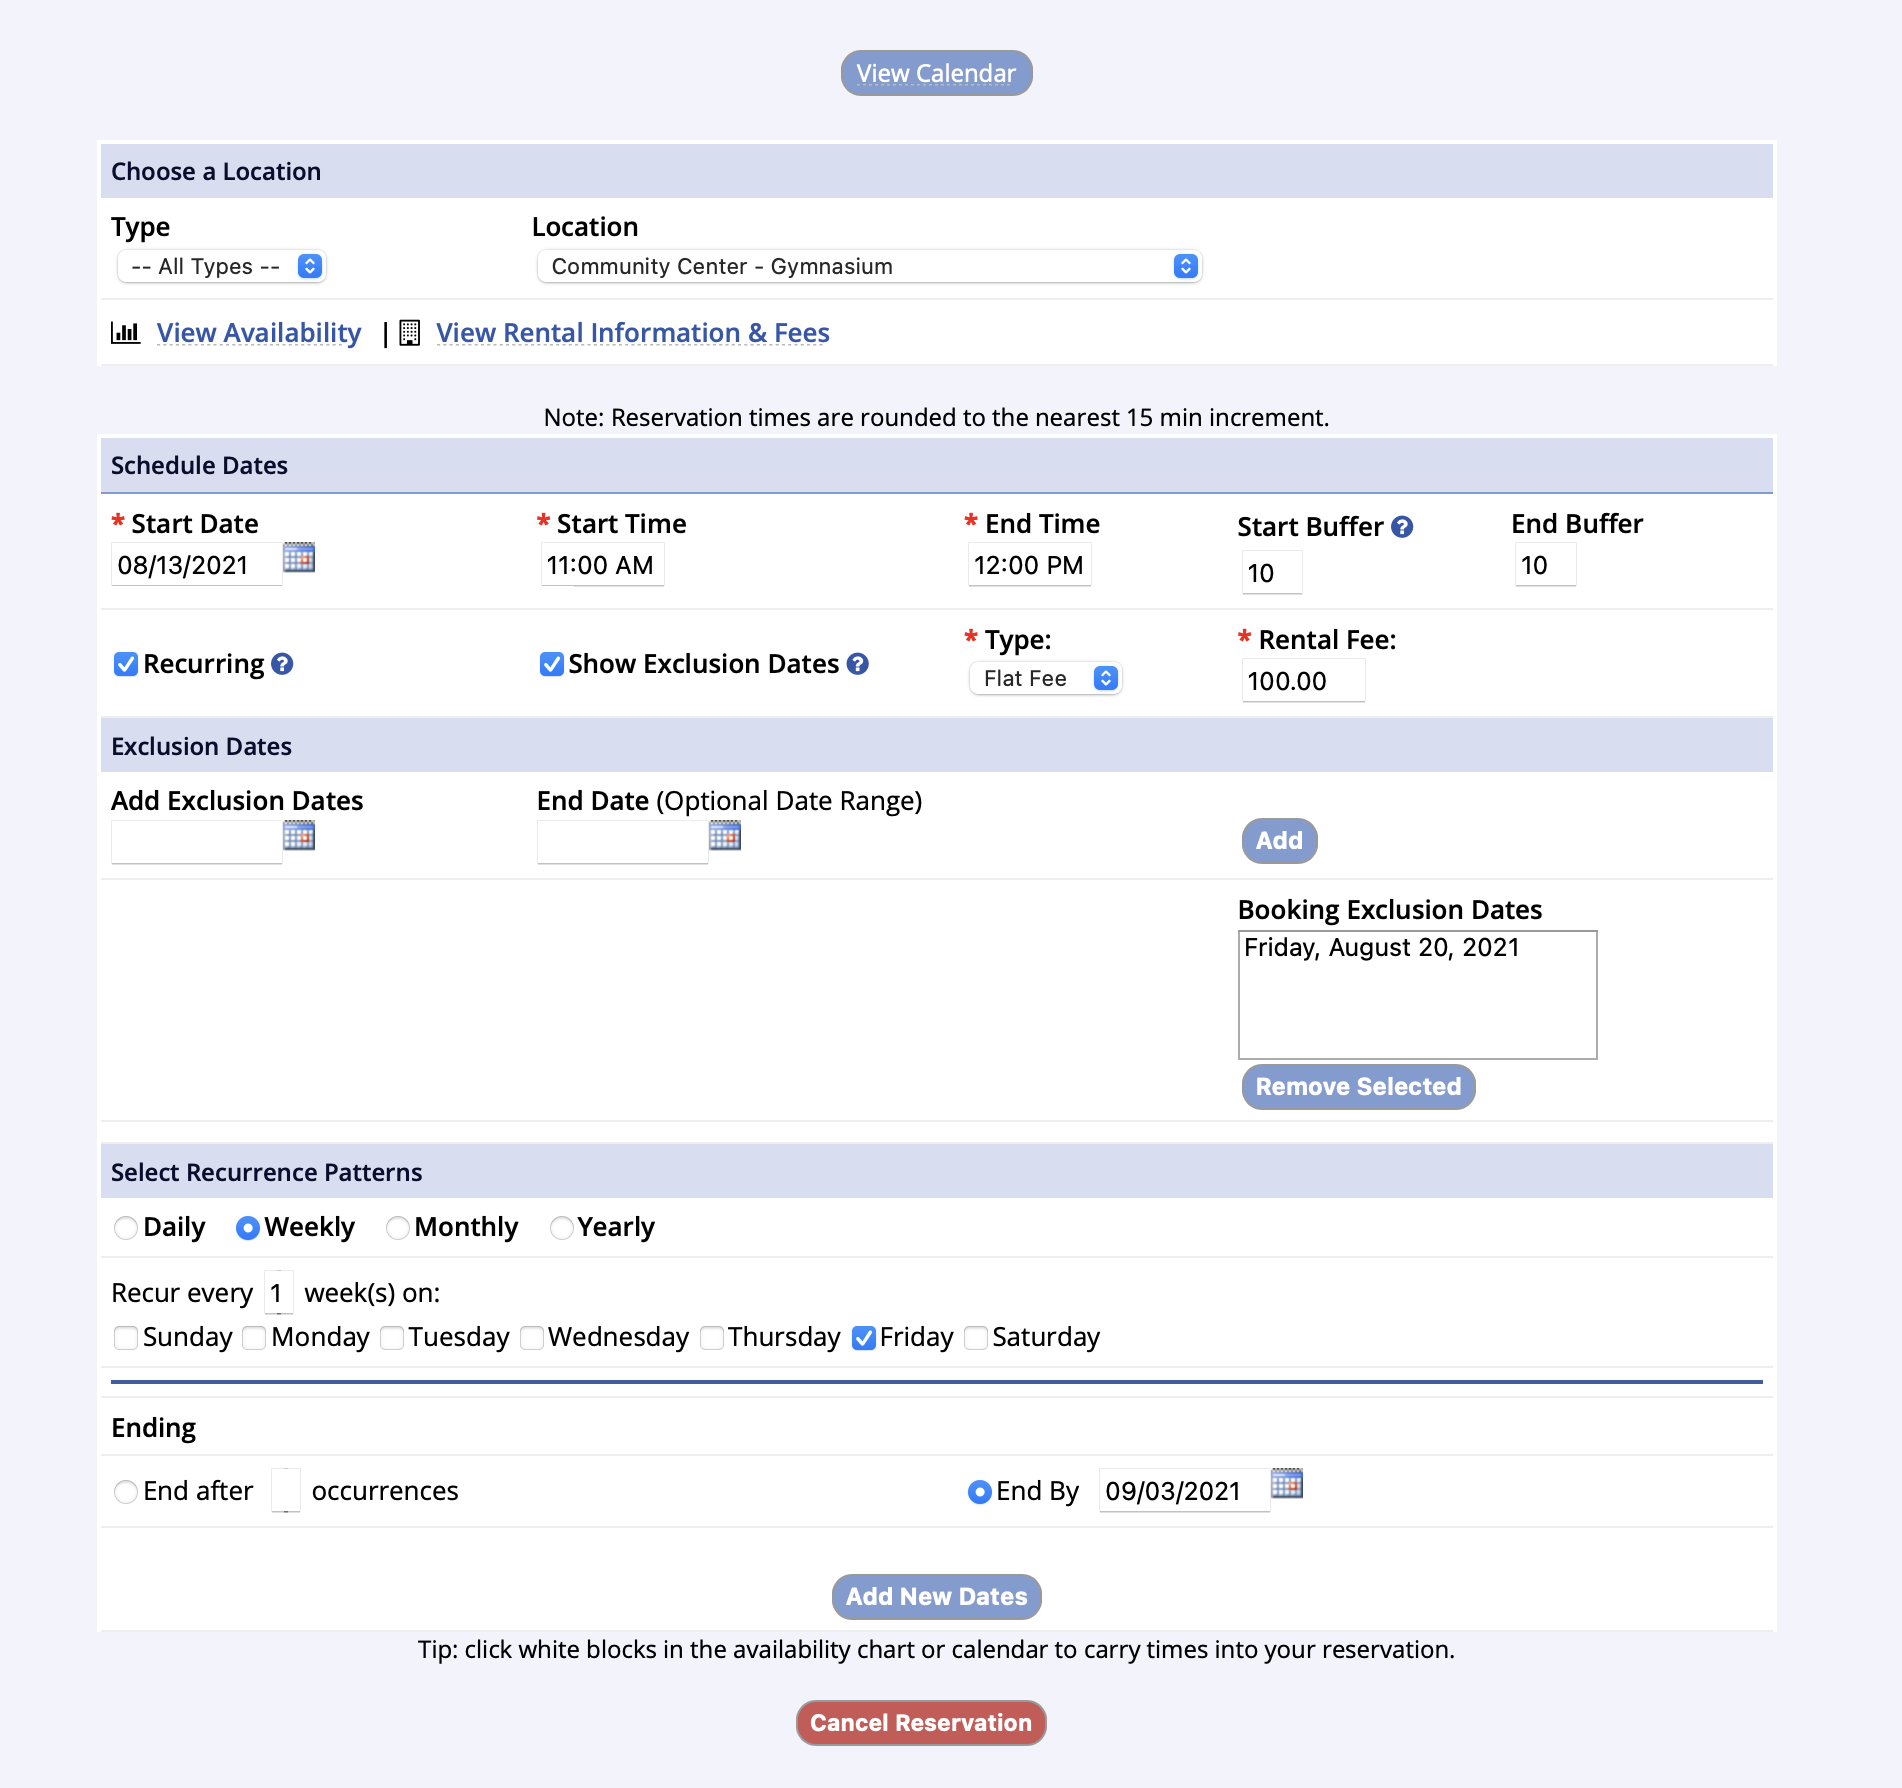
- If needed, enter Start Date, Start Time and End Time
- If needed, enter a number in the start buffer and end buffer fields to denote minutes needed for setup or breakdown outside of the times entered
- Note: Once a buffer is added to a reservation, changing it is not an option since it could either interfere with another reservation or facility usage
- If entering more than one date, click the Recurring checkbox and enter the End Date (lower right)
- Select the days of the week included between start date and end date
- If some of these days are excluded, click the Show Exclusion Dates checkbox
- Enter a single date or range of date and click Add to exclude given dates
- Select Rental Fee Type (Flat, Hourly, or Daily rate) from drop down and enter Rental Fee if matrix not populated (if no fee, enter 0)
- When ready to commit reservation dates, click Add New Dates (or Add More)
- If any dates/times are in conflict with another reservation or an activity, a message will appear
- Click the conflict message to view and resolve conflicting dates via date editing or removal
- Conflicts that are not resolved will be entered ‘as is’
- Click the conflict message to view and resolve conflicting dates via date editing or removal
- Repeat steps 1-7 for any additional locations or date patterns
- Then complete the reservation (see below)
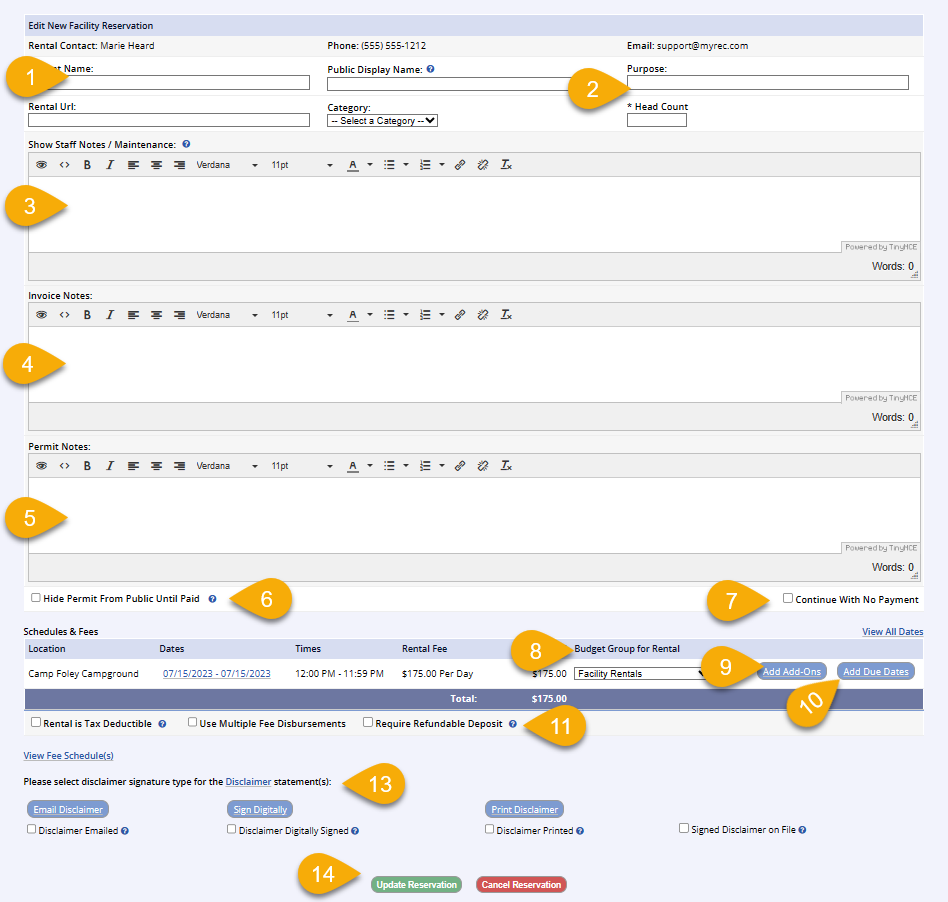
Completing the Reservation
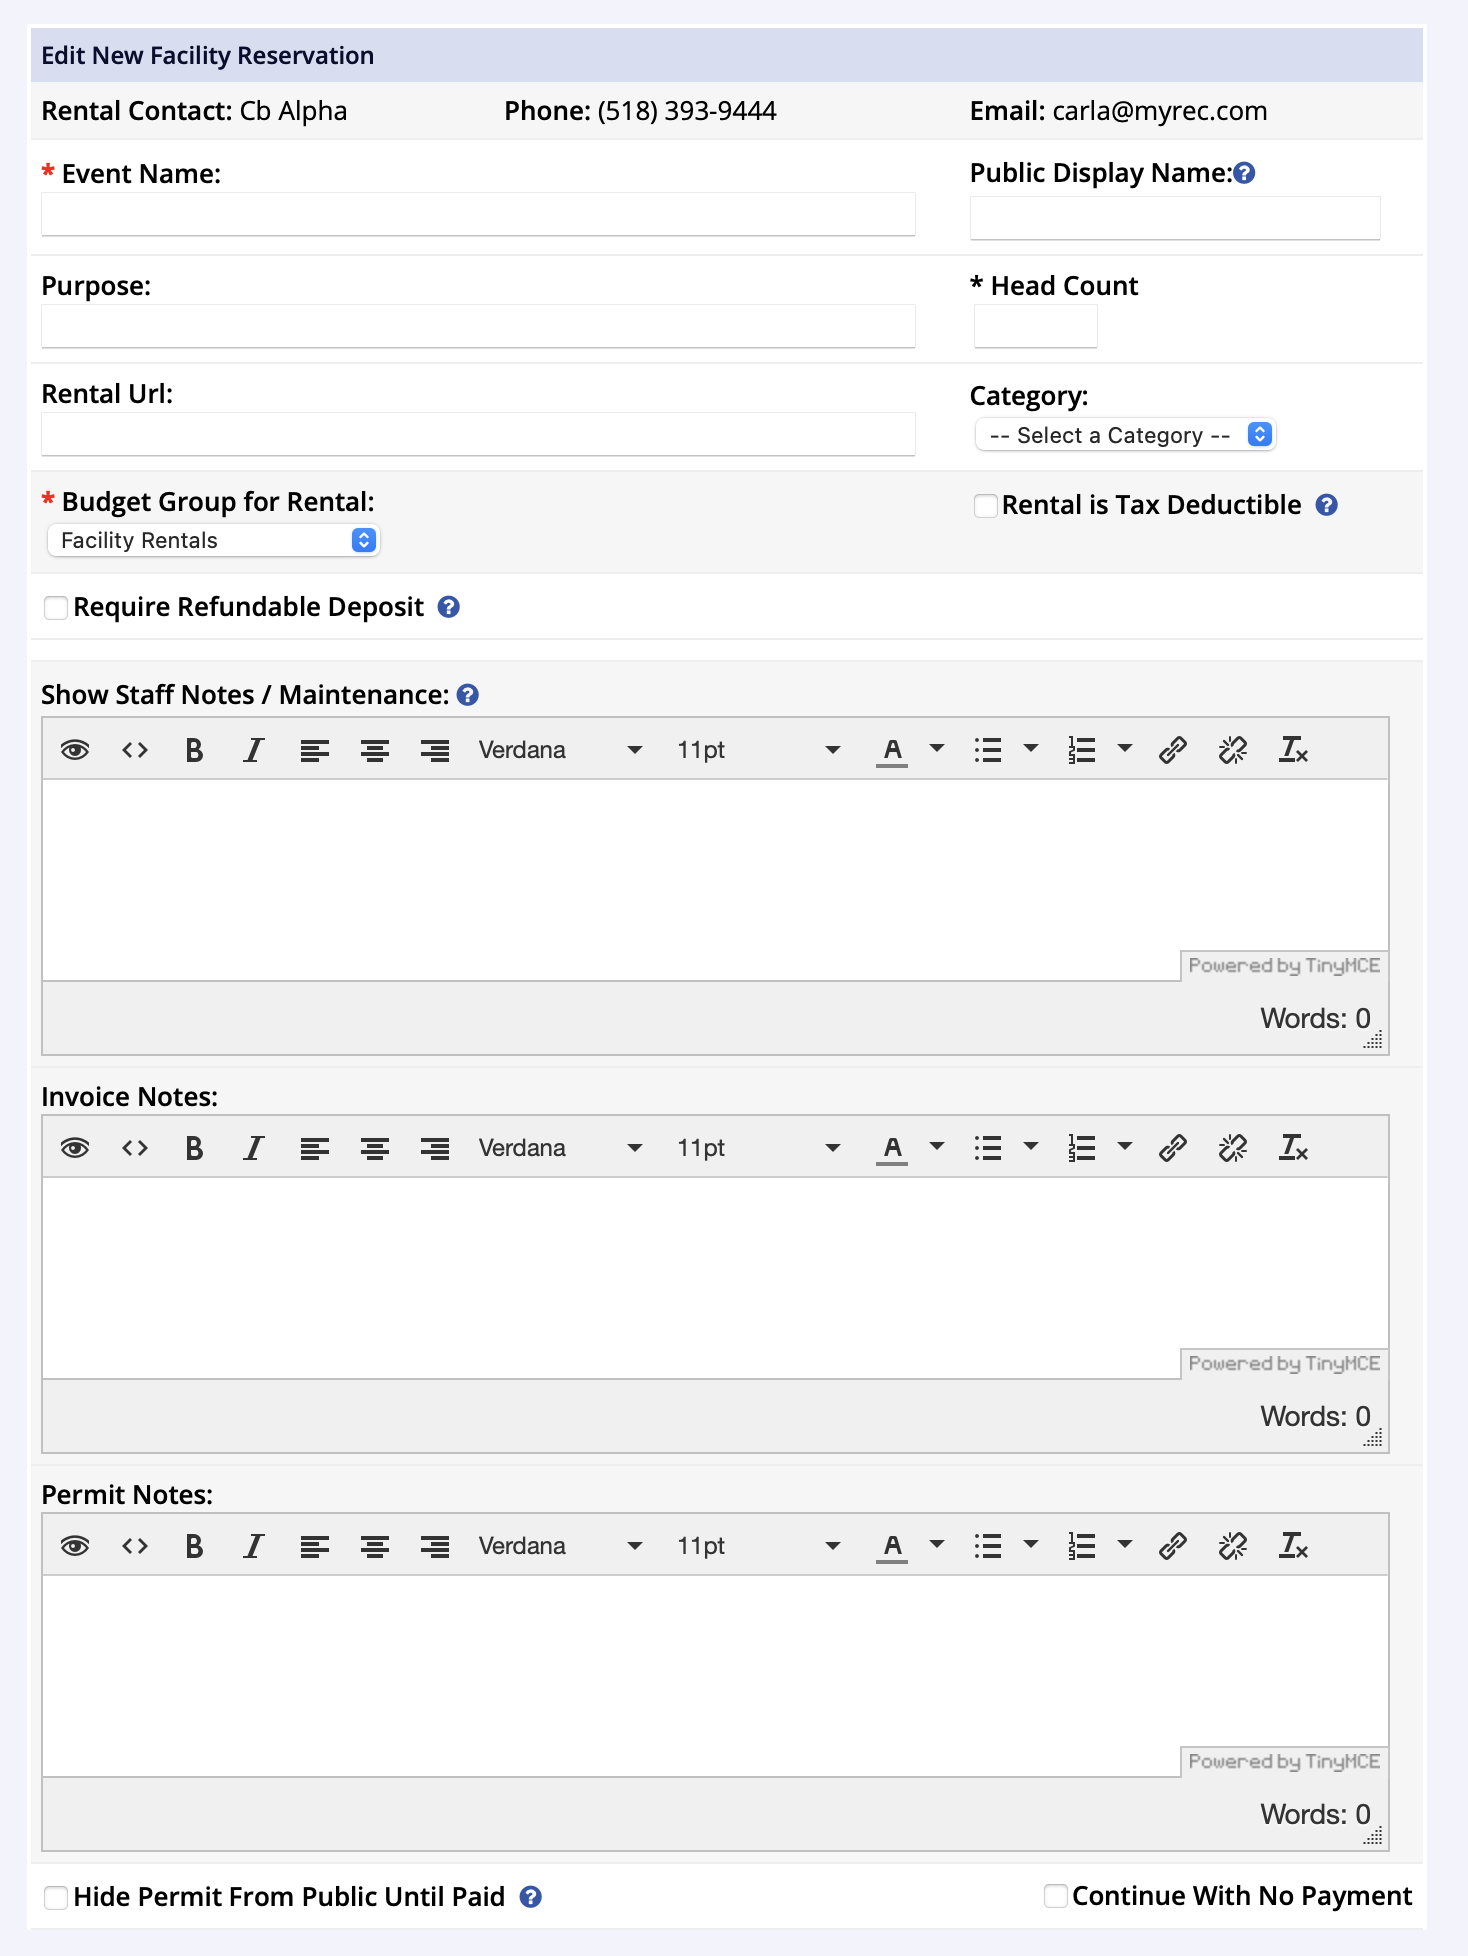
- Enter the Event Name (public display name is the event name for the public, defaults to event name)
- If applicable, enter reservation Purpose and Head Count (rental URL is for a calendar link)
- If applicable, enter any Staff/Maintenance Notes (will display in the Maintenance Report)
- If applicable, enter Invoice Notes (will appear on invoice emailed to customer)
- If applicable, enter Permit Notes (will appear on auto-generated permit)
- Checking the Hide Permit From Public Until Paid checkbox will hide the link to the permit on the customer account (public) until balance on permit has been paid
- If there is no fee or you are not collecting payment at this time, check the Continue with No Payment checkbox (this will skip the checkout process)
- Select a Budget Group where money would disburse if different from default
- Select Add Add-Ons if applicable
- Add Due Dates if needed
- Check the boxes on the following options if appropriate
- Rental is Tax Deductible
- Use Multiple Fee Disbursements
- Require Refundable Deposit
- Deposit Fee is Tax Deductible
- Enter the total of all deposits in the Deposit Fee Field. If the fee needs to be assigned to more than one budget group, check the Use Multiple Fee Disbursements box in Step 11
- Select the facility specific disclaimer signature type
- Click Update Reservation
- Budget Group Fee Disbursements page - appears only if Use Multiple Fee Disbursements is selected
- Select Percent of Fee or Fixed Dollar Amounts
- Select Budget Group from drop down menu
- Select the Plus Sign to the right of the dark gray bars if additional budget groups are needed.
- Repeat Step 2
- When all budget groups have been entered, click Submit to move to the Review Facility Reservation page
- Review Facility Reservation offers the opportunity to review and make changes to the reservation, including dates and fees
- Continue to Checkout
- Shopping Cart Items - another opportunity to edit the reservation
- Select the global disclaimer signature type
- Continue to Additional Reservation items, such as questions if there are any, then to the Payment Screen