
Facilities can be stand-alone locations, or they can be a parent facility for facility areas within them. For instance, the Community Center would be a parent facility and Classroom 1, Practice Gym, Pool, and Yoga Studio could all be facility areas within the Community Center. Decide if a location should be a facility or facility area within another facility prior to setup.
Facility Creation
This video will take you through the process of adding a facility to your facility list.
Setting Up a Facility
- Go to the Facilities menu on the left side of the screen
- Click Add New Facility/Area
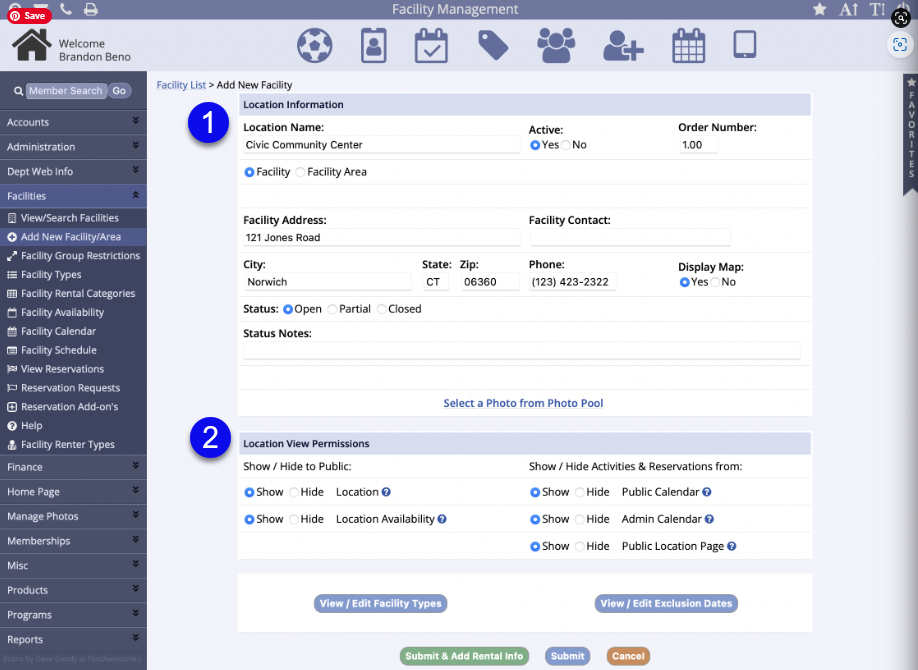
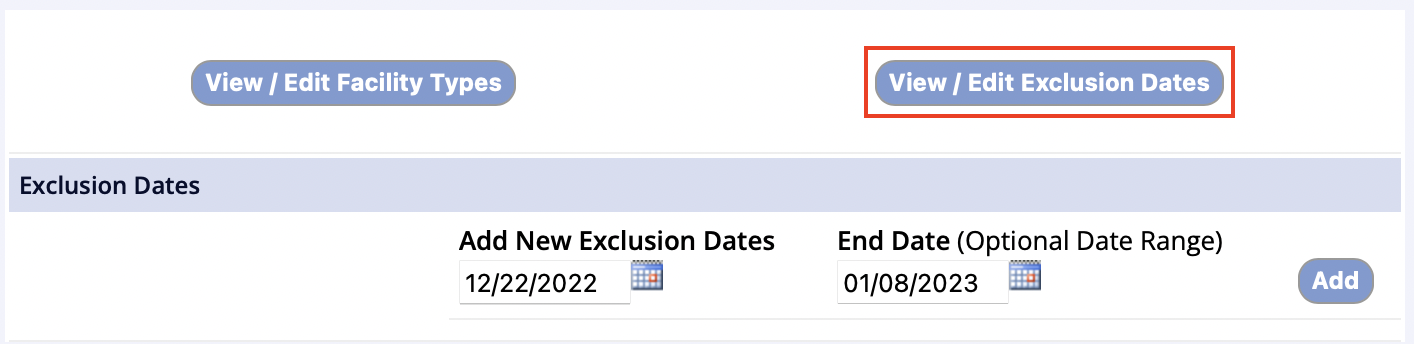
- Fill in the Location Information, Location View Permissions, View / Edit Facility Types and Exclusion Dates
-
Location Information (#1 in screenshot above):
- Facility Contact: if the facility contact is different than the main site contact enter name and contact number
- Display Map: you are able to select the radio dial for Display Map to yes the location will appear from Google maps for this facility
- Status: is defaulted to Open but can be changed at any time and notes can be entered to explain the status
- Status Notes: displays on public site facilities list
- Select a Photo from the Photo Pool: to choose an uploaded image or upload an image to appear on the public side facility listing
-
Location View Permissions (#2 in screenshot above):
-
Show/Hide to Public Location: show allows the location to be listed on the public side facility list
- Hide will hide this location from the public side facility list
-
Show/Hide to Public Location Availability: show allows this location's Availability chart link to be seen on the public side activity schedule
- Hide will hide this location's Availability chart link from the public side activity schedule
-
Show / Hide Activities & Reservations from Public Calendar: show allows this location's calendar to be seen on the public side
- Hide will hide this location's calendar from the public side
-
Show / Hide Activities & Reservations from Admin Calendar: show allows this location to be seen on the admin side calendar
- Hide will hide this location from the admin side calendar
-
Show / Hide Activities & Reservations from Public Location Page: show allows the location activities and registrations to be seen on the public side location page
- Hide will hide the location activities and registrations from the public side location page
-
Show/Hide to Public Location: show allows the location to be listed on the public side facility list
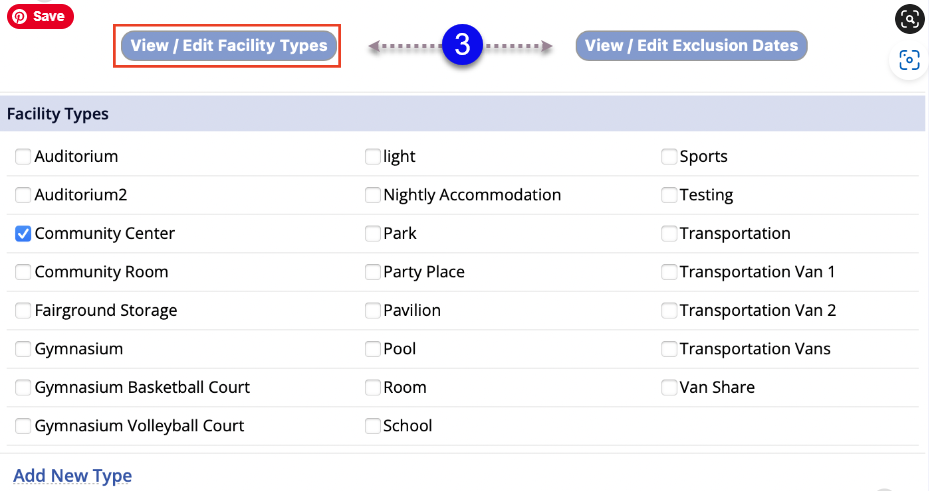
- View / Edit Facility Types (optional, #3 in screenshot above): provide the ability to further define the usage or purpose of a facility
-
View/Edit Exclusion Dates (optional, #3 in screenshot above): remove dates from the available schedule
- When a date is excluded, it cannot be booked or reserved
- Click Submit to create and move to the Facility Management screen or Submit & Add Rental Info to create and move to Rental Info Tab
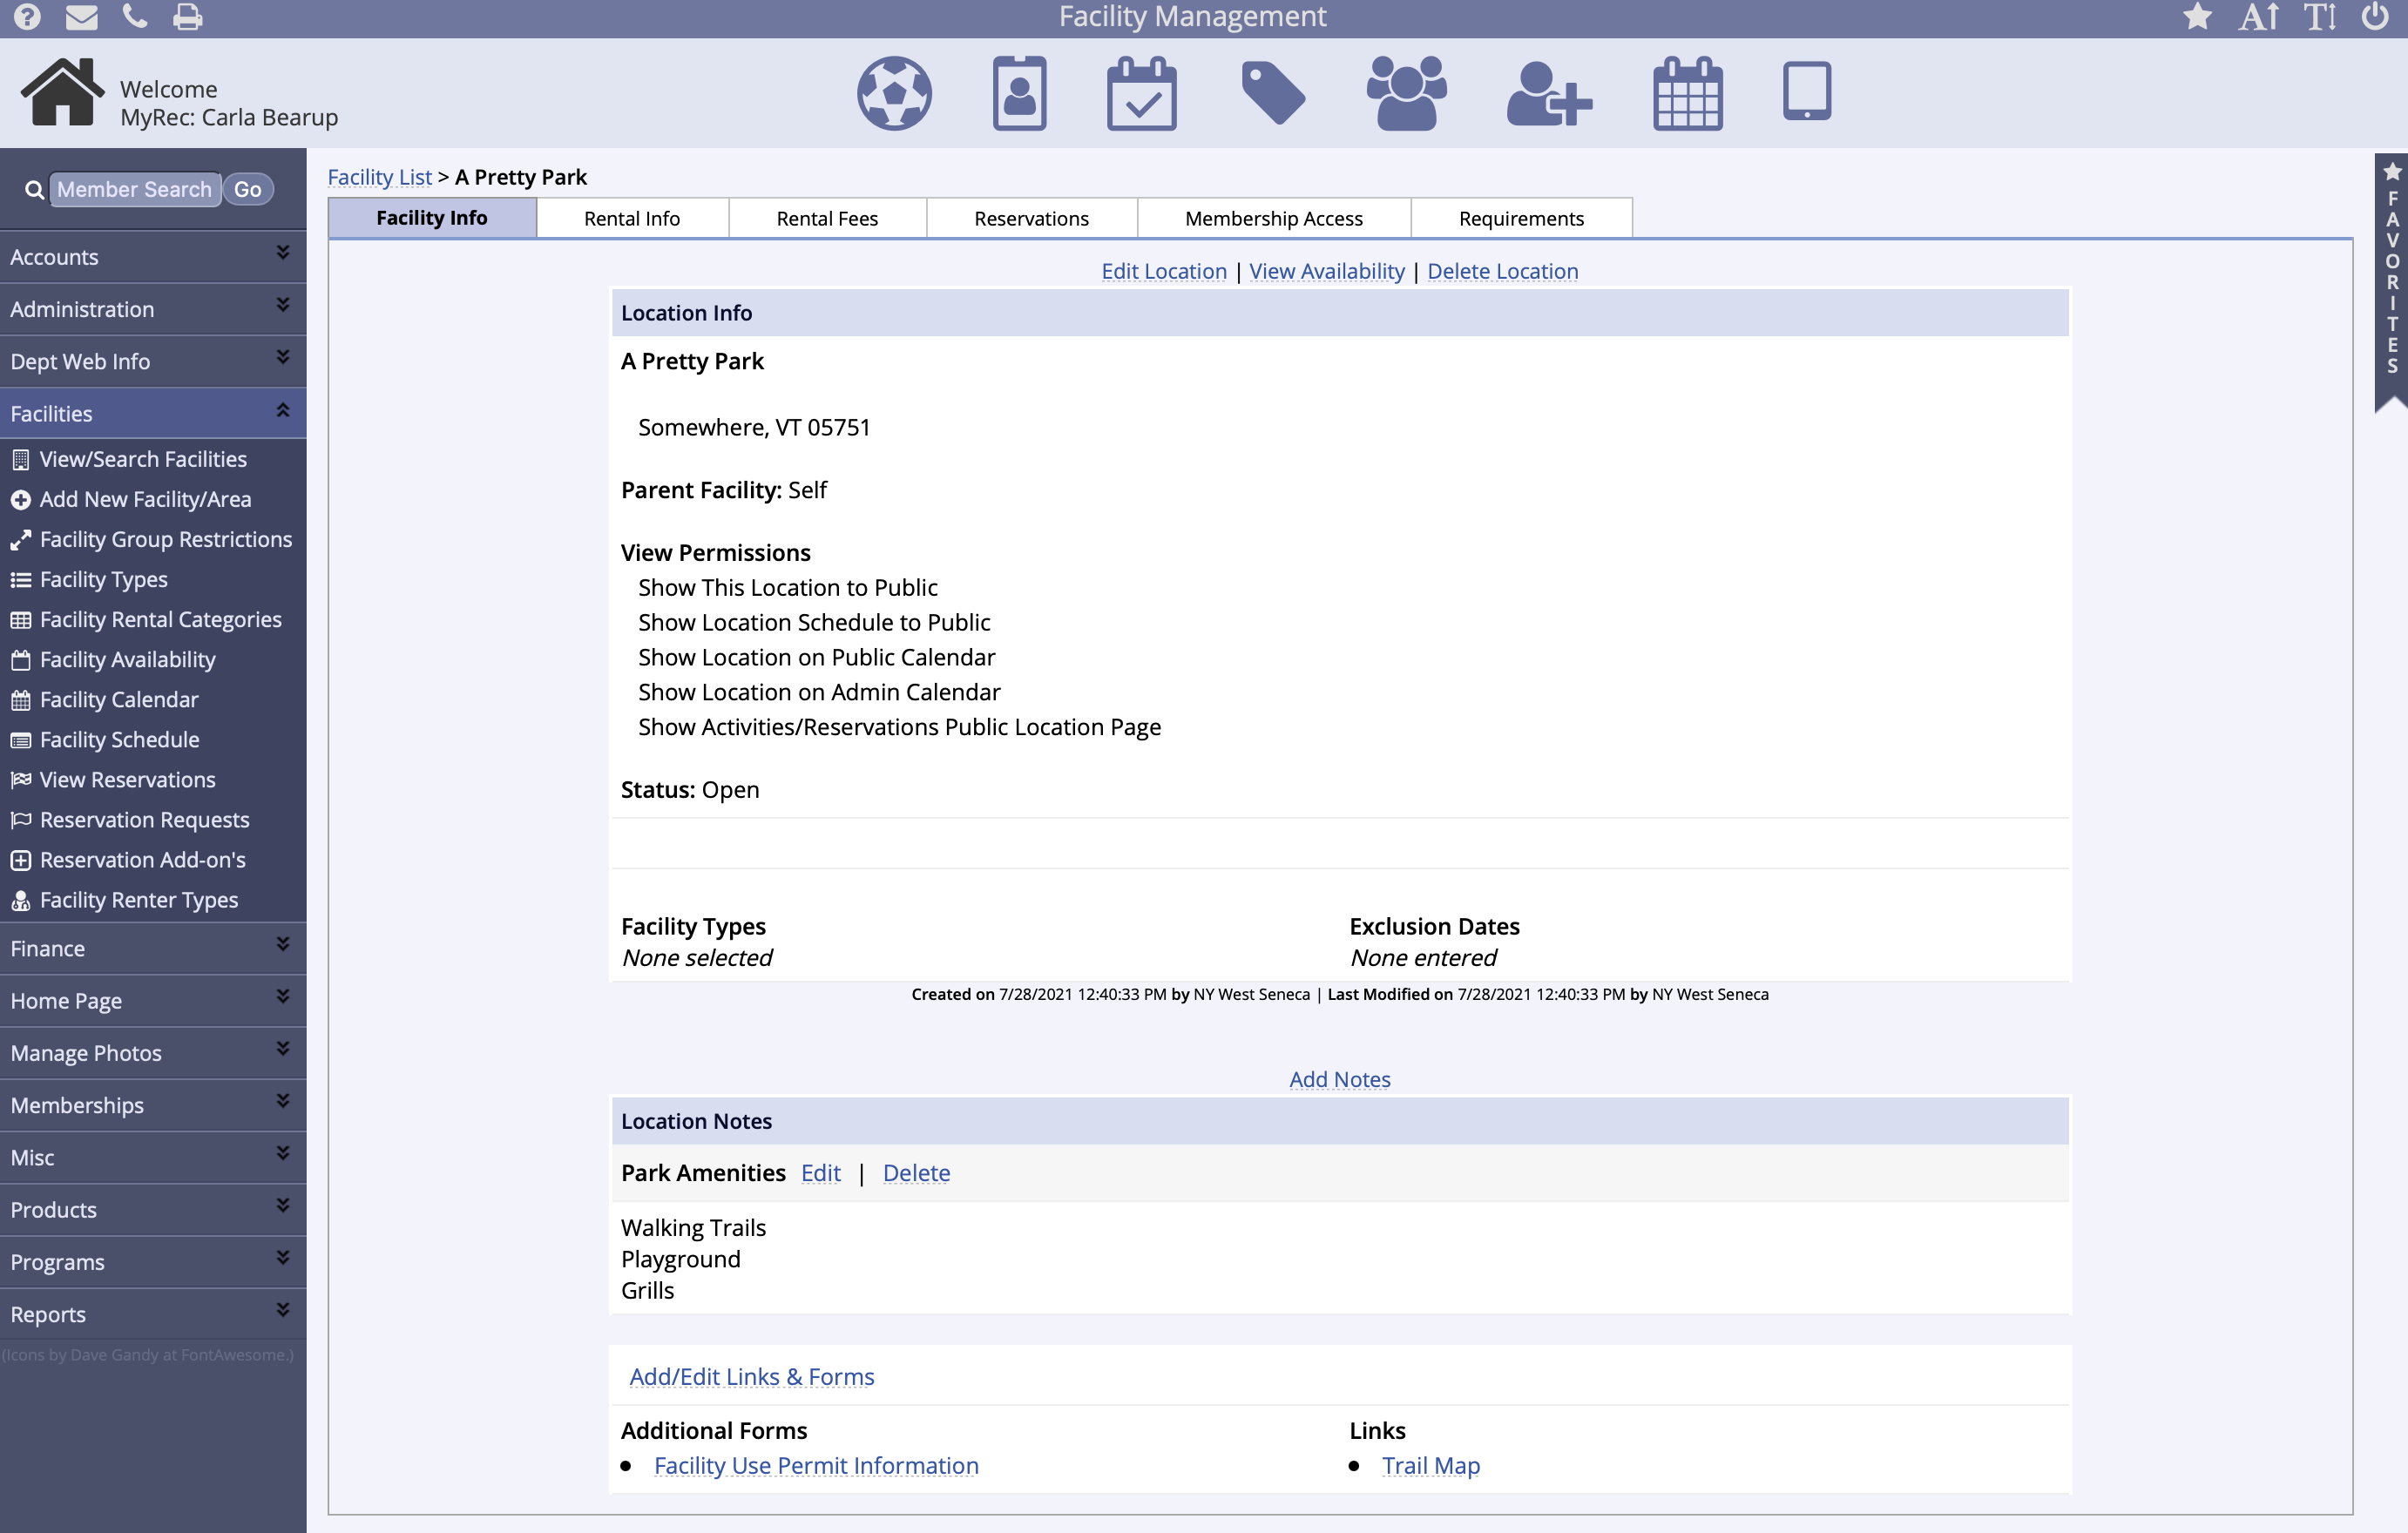
- Submit: on the Facility Management screen you can Add Notes for further information on the facility or Add/Edit Links & Forms to show during Reservations and Reservation Request
- Submit & Add Rental Info: a facility can be set to allow rental or requests using this option
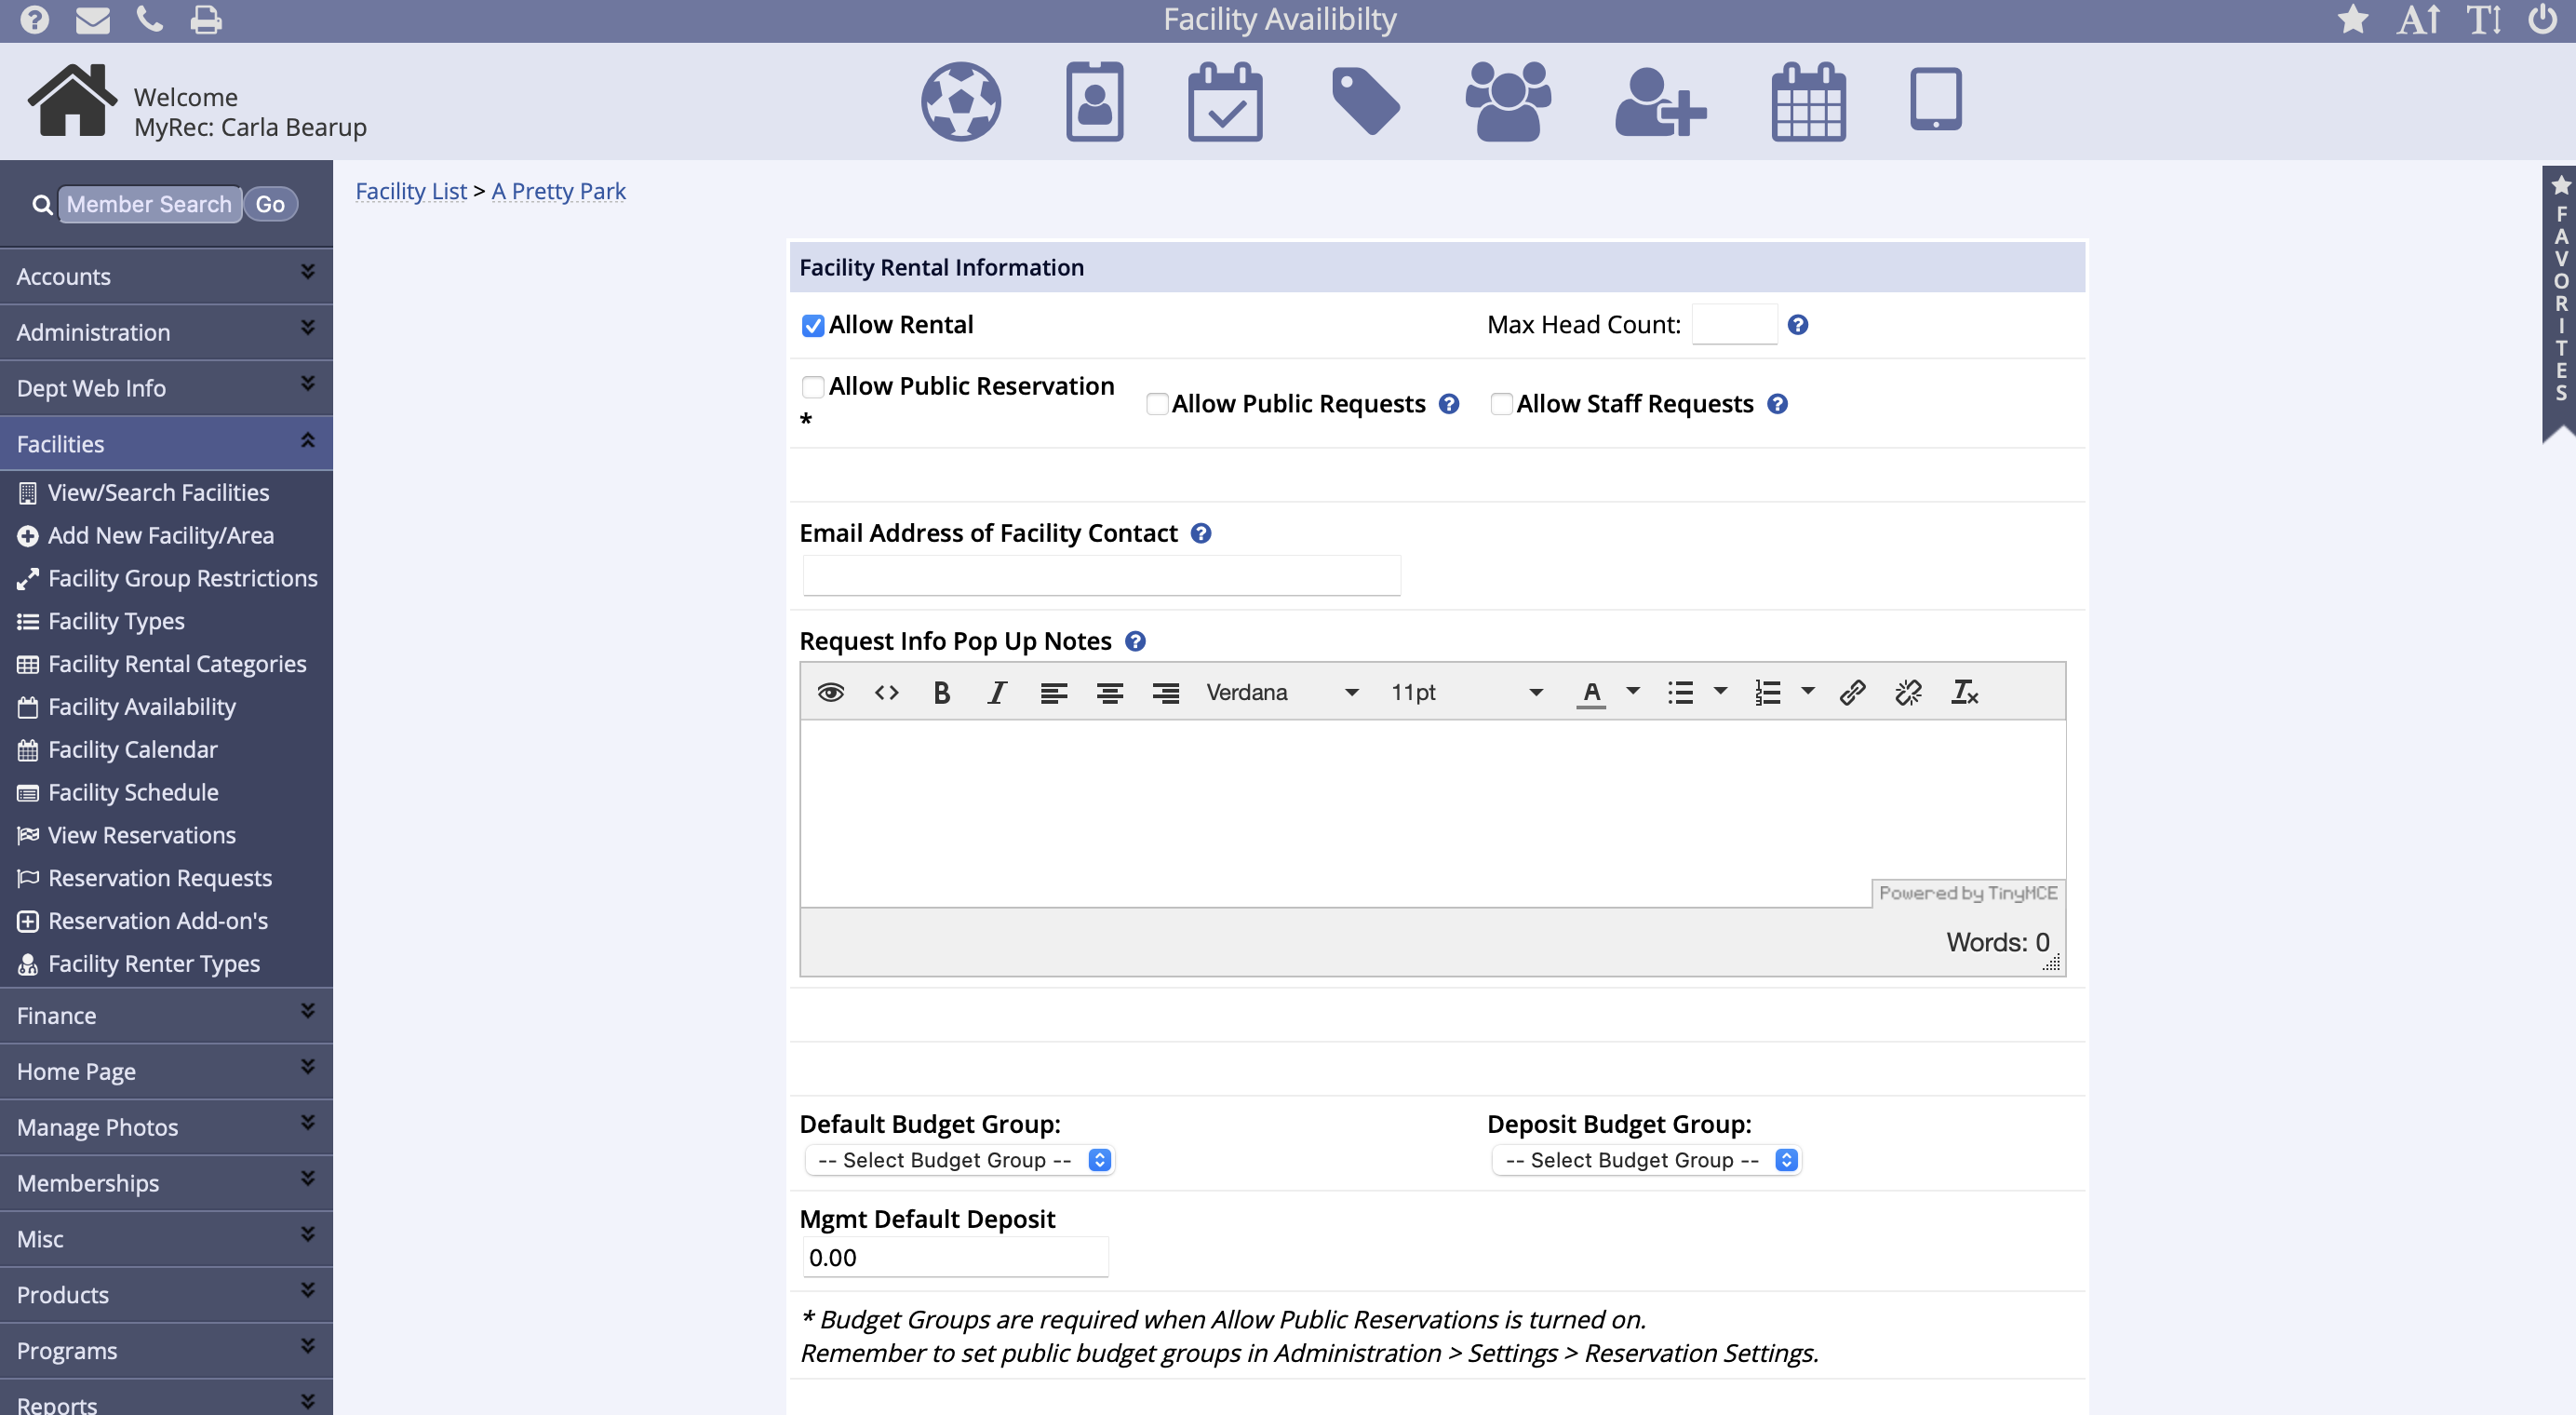
Add/Edit Facility Rental Information
Allow Facility Rentals
Settings to allow for facility reservations and availability can be found on the facility's Rental Info tab.
- Open the Facilities menu on the leftside menu of the mangement screen
- Click View/Search Facilities and search for the correct facility
- Select the facility
- Navigate to the Facility Info tab
- Check the Allow Rental box to enable the reservation ability
- If you have system settings enabled for Public Reservation or Reservation Requests, these can be activated after the Allow Rental box has been checked
Note: Contact MyRec.com to have the Public Reservation or Reservation Requests feature enabled for your facilities.
- Set up the facility for reservations or requests by checking the applicable boxes
- Allow Public Reservations allows your members to make reservations for facility rentals on the public side
-
Allow Public Requests will make this facility/area available to the public to place a reservation request that the managment side then can review
- Does not create a reservation
- Allow Staff Requests makes this function for this facility/area available for the management side to place a reservation request for the customer
- Complete the following optional settings to custom the facility
- Use Max Head Count to optionally set the maximum head count allowed for a reservation or request
- To see the headcount assigned to a facility, you can later return to the Facility Rental Info tab in the facility to view this maximum
- Leave blank to not use setting
-
Required Membership is used to restrict facility reservation to those with a certain membership and is not compatible with reservation requests
- Daily Membership Lengths are not compatible with Required Memberships. Yearly memberships with single scan options can be used in most situations
- Check the Show Advanced Required Membership Options box to set residency, date ranges, and membership validity options

Required Memberships
This function is intended for reservations and will not apply to reservation requests.
-
Email Address of Facility Contact: Email address listed here will show up on the customer side when hovering mouse over the facility availability chart
- This sends an email to the contact with a request or reservation as well
- Request Info Pop Up Notes: The text listed here will show up on the customer side during a facility request or reservation
- Set Budget Groups for disbursement reporting on reservations
- Budget Groups are required when Allow Public Reservations is turned on
- Remember to set public budget groups in Administration > Settings > Reservation Settings
Rental Availability

- Set the Facility Availability by entering the earliest time facility can be rented and the latest time
- If you fill in the start or end times at the top and click Apply All, it will fill in that time for all the days or you can do so manually to set different availabilities for different days of the week
- Rental Restrictions (Optional) choices are None, Flexible Blocks, or Set Blocks
- These determine if users have to schedule a block of time when creating reservations or requests, with Flexible blocks the start and stop times can be variable, and with set blocks, the start and stop times cannot be changed and the blocks will be checked off to reserve them
- For Flexible Blocks, a text box will come up to enter the number of minutes for the block
- There is also a checkbox to apply blocks to reservations as an option
- Selecting Set Blocks will lead to Facility Set Blocks Rental Times page
- Enter start times and end times for set blocks, Fee Type (per hour or per day), Resident / Non-Resident Fee and check the applicable days of the week
- Click Update to set blocks of time
- For Flexible Blocks, a text box will come up to enter the number of minutes for the block
Set Block Minimum Hours/Maximum Hours
If more hours are required for a rental than within a Set Block, the reservation will automatically require that more than one block is reserved.
If less hours are required for a rental than within a Set Block, the reservation will still require a full block for reservation if set up with Set Blocks.
If your number of Set Blocks exceeds the reservation max hours, you will need to remove a block to continue.
- Reservation minimum hours and maximum hours can be turned on and will apply to the entire reservation
- For instance, if you have a minimum of 2 hours, your reservation invoiced for two different dates can satisfy that minimum
- If you have a maximum of 6 hours, the user would be limited to no more than 6 hours regardless of the number of dates in the reservation, be it 6 hours in one day or one hour each for six dates
- Users would need to book an additional reservation on a new invoice if they have reached the maximum hours for the single reservation
- If you have a maximum of 6 hours, the user would be limited to no more than 6 hours regardless of the number of dates in the reservation, be it 6 hours in one day or one hour each for six dates
- For instance, if you have a minimum of 2 hours, your reservation invoiced for two different dates can satisfy that minimum
- Set Public Reservation/Reservation Request Date Restrictions by selecting the radial button for the correct option
-
Default uses settings from Administration > Settings > Reservation Settings tab
- In order to override the default date restrictions for reservations or requests you will first have to make sure your department has the Allow Public Reservations setting enabled
- If your department does not currently allow Public Reservations, Client Services representative can turn that on temporarily
- The setting only needs to be turned on initially to allow the facility specific date restriction information to be added and can be turned off after
- If your department already allows for Public Reservations, then you can follow the steps below and simply keep the setting on:
- Go into the facility that needs date restrictions
- Go to the Rental Info tab and click Edit Rental Info
- Turn on the Allow Public Reservation setting
- Scroll down to the Public Reservation Date Restrictions section
- Select either Relative or Exact Dates
- Relative dates means the reservation can start and end a certain number of days relative to the date it is being created
- Exact dates means the reservation must start and end on or between the given dates
- Put in the date restrictions for the facility
- Turn off the Apply to Public Requests setting
- Scroll down and click Submit
- If your department does not currently allow Public Reservations, Client Services representative can turn that on temporarily
- In order to override the default date restrictions for reservations or requests you will first have to make sure your department has the Allow Public Reservations setting enabled
-
Default uses settings from Administration > Settings > Reservation Settings tab
If you allow Public Reservations, then you can keep those settings turned on. If you are only allowing Public Requests, then you would go back into the facility and turn those off in the Rental Tab.
Note: If your department needs to make any changes to the facility specific date restrictions, you will need the Advanced Setting for Public Reservations turned back on every time, which requires calling Clients Services each time you want to turn it on or off.
Notes and Additional Info
- Invoice Notes data will appear on the printed/email invoice for this facility's reservations
- Permit Notes data will appear on the printed/emailed permit for reservations at this facility
- Fee Schedule data will appear when setting up a rental, allowing quick access to the rates
-
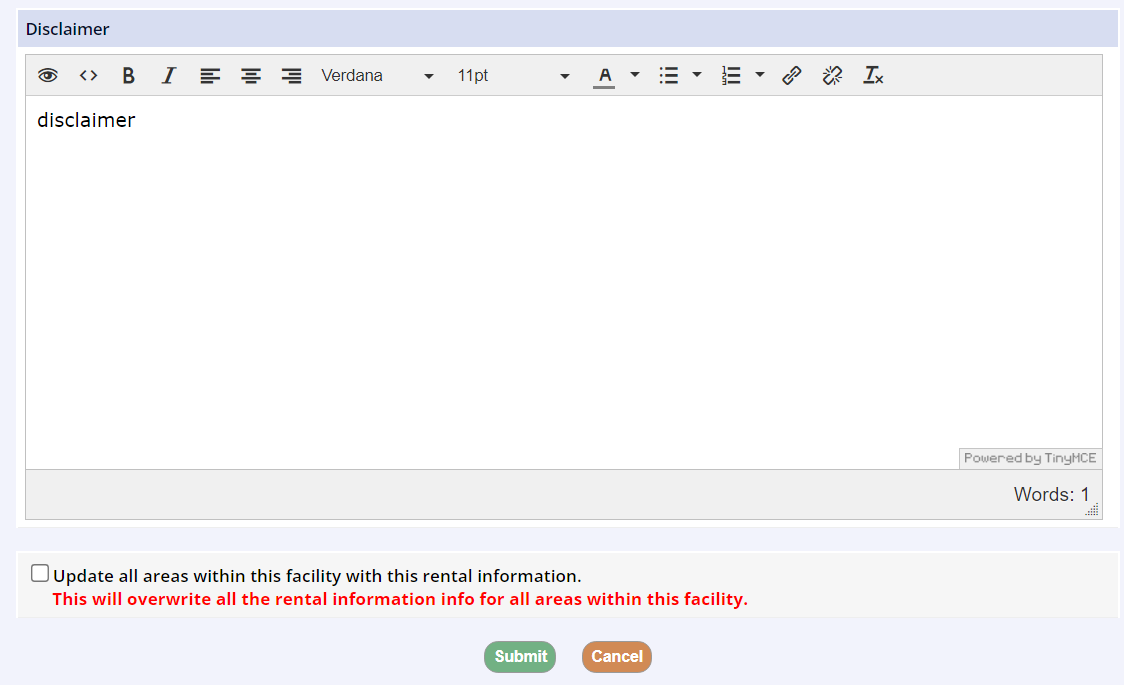
Disclaimer data here is specific to this facility, while your global disclaimer has already been entered at the system level
- The custom disclaimer on a parent facility will also carry over to all facility areas within it automatically, in addition to any facility area disclaimer you add to that area, so be sure you don't unnecessarily duplicate the disclaimer
- These will appear on the public side in the same disclaimer box with a single checkbox to indicate acceptance of the disclaimer
- The custom disclaimer on a parent facility will also carry over to all facility areas within it automatically, in addition to any facility area disclaimer you add to that area, so be sure you don't unnecessarily duplicate the disclaimer
- You can check the Update checkbox to carry the settings from a parent facility over to the facility areas within it
Adding Rental Fees
Using the Fee Matrix
After you have set the facility or facility area up to Allow Rental, if you want to allow public reservations, you will need to add Rental Fees. On the facility details page, there is a Rental Fees tab next to the Rental Info tab. This is where you will build your fee matrix. The rental fees will also calculate automatically for management reservations and requests, if they are present and selected.
To Add Fees
Resident and Non-Resident renter types are the default for setup, however, if you have added additional renter types manually, you can add those fees here as well.
Billable Hours vs. Usage Hours
Note that reservations may be booked in intervals down to a minute but will be calculated for billing in increments of 15 minutes. For example, a 2-hour and 20-minute (2.33hrs) reservation that has a fee of $10 per hour will be shown on the reservation as Total Hour 2:20 but will be billed as 2 hours and 30 minutes for a total of $25. Take this into consideration when reconciling facility usage hours with facility rental hours.