
Adding Files, Documents, and PDFs
Documents like pdfs, word files, image requirements, and more can be added as requirements to accounts, activities, membership, and facility within MyRec.com.
Create the Required Documents
- Open the Administration tab on the leftside navigation menu
- Select the Settings option
- Click the Account Settings tabs
- Scroll to the bottom of the page and click the Add Required Documents link
- Required Documents can be added to Accounts, to Activities, or to Memberships and are stored in the member's information page
- Only users who are listed as Administrators are able to Add Required Documents
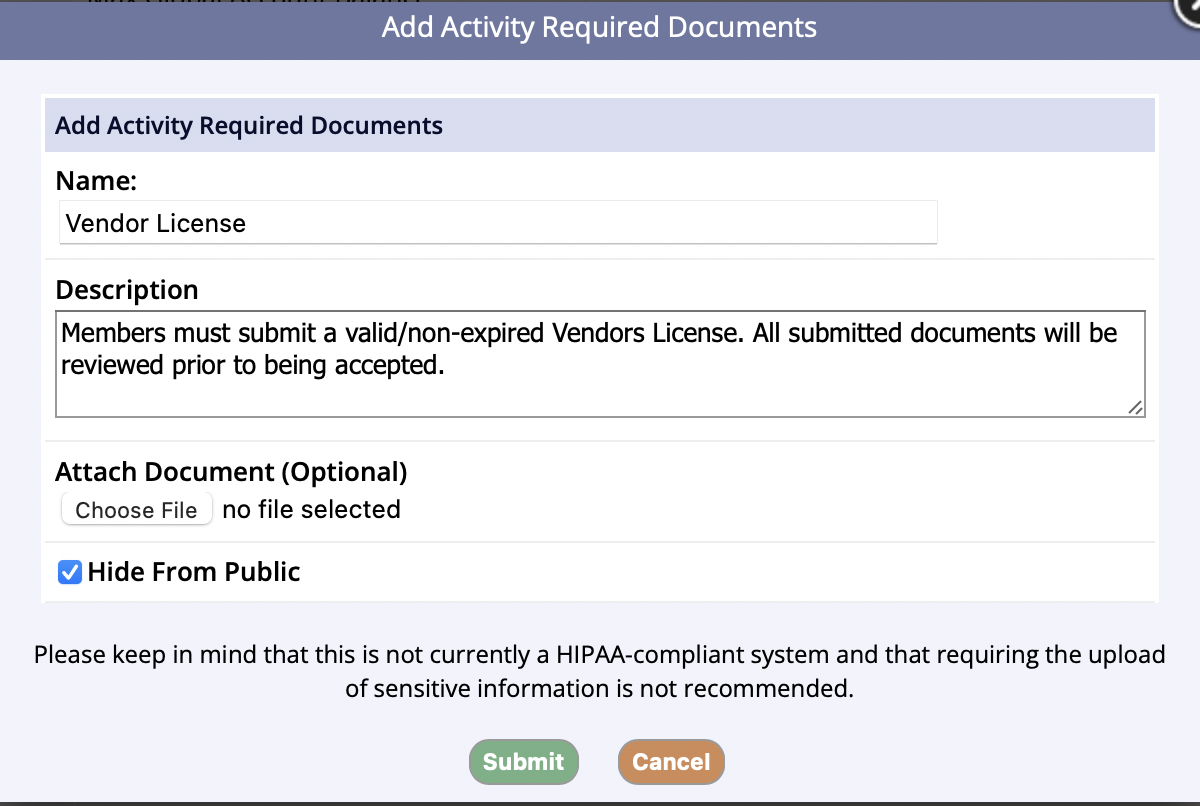
- You will be prompted to fill in the Add Activity Required Documents where you can enter the name of the Required Document, add a Description, attach an optional Document, and Hide from Public
- Required Documents that have attached documents will show up as a hyperlink; required documents without attached documents will not be hyperlinked
- Prior to clicking Submit, you are notified to ‘Please keep in mind that this is not currently a HIPPA-compliant system and that requiring the upload of sensitive information is not recommended’
Hide From Public and Upload Document
If you choose to hide the Required Document from the public, the document will be listed on the Member Info page only on the management side.
Staff will be able to upload the Required Document and set an Expiration Date.
Add the Required Documents
- Once the Required Document has been created, click the Submit button
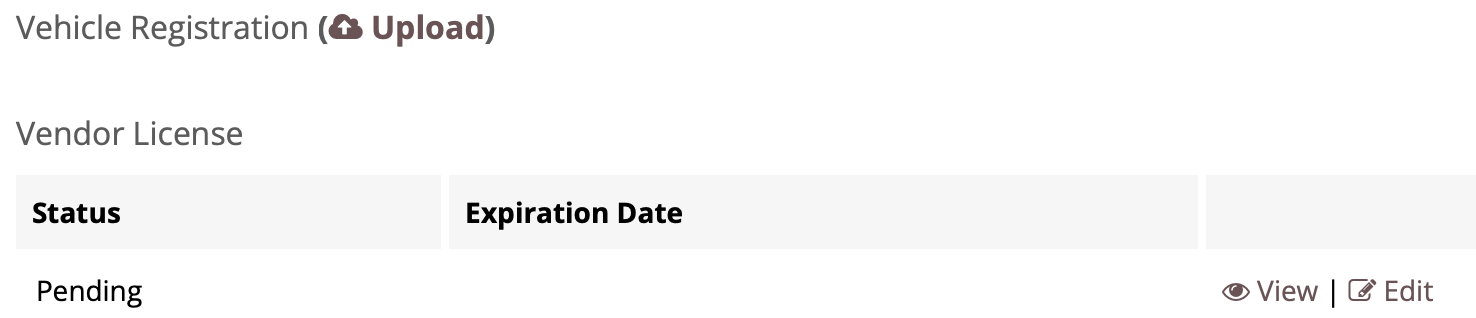
Account Required Document
- If Required Documents aren't hidden from the public, members are able to Upload Required Documents from the Account Member page on the public side
- When the member uploads the document it, will be listed as pending until the staff decides to Approve, Decline, or Delete the upload
- At the time of determining the status of the uploaded document, edits can be made
Require Proof of Residency

In the Account Settings tab of the Administration Setting screen, you can find the account Proof of Residency setting. This can be applied at the account or at the member level.
This is intended to be used in conjunction with the Pending Approval Account/Member process, but if you do not use the pending account approval process, your staff will need to manually review the uploaded image and then update the residency status manually within the account. If you are using this with the pending approval process, your staff will review the upload when the account/member is approved/declined.
Declining an account will also delete any required residency document uploads.
To access the Proof of Residency Required Documents, on the Account level, navigate to the homepage for the household. The document will be located just above the Account Details section.
To access the Proof of Residency Required Documents, on the Member level, navigate to the member page. The document will be located all the way at the bottom of the Member Info screen in the Member Proof of Residency documentation.
Activity Required Document
Overview:
- You are able to Add Required Documents to Activities
- If the Required Document is hidden from the public, and it is marked as Required for an Activity, it will be required to Upload from the public side during the activity registration
- If the Required Document is submitted during an activity registration from the management side, the staff will be prompted to enter an Expiration Date
To Add a Required Document to an Activity:
- Go to Programs
- Click View/Search Programs
- Select the Program, locate the Activity that needs to have the Required Document
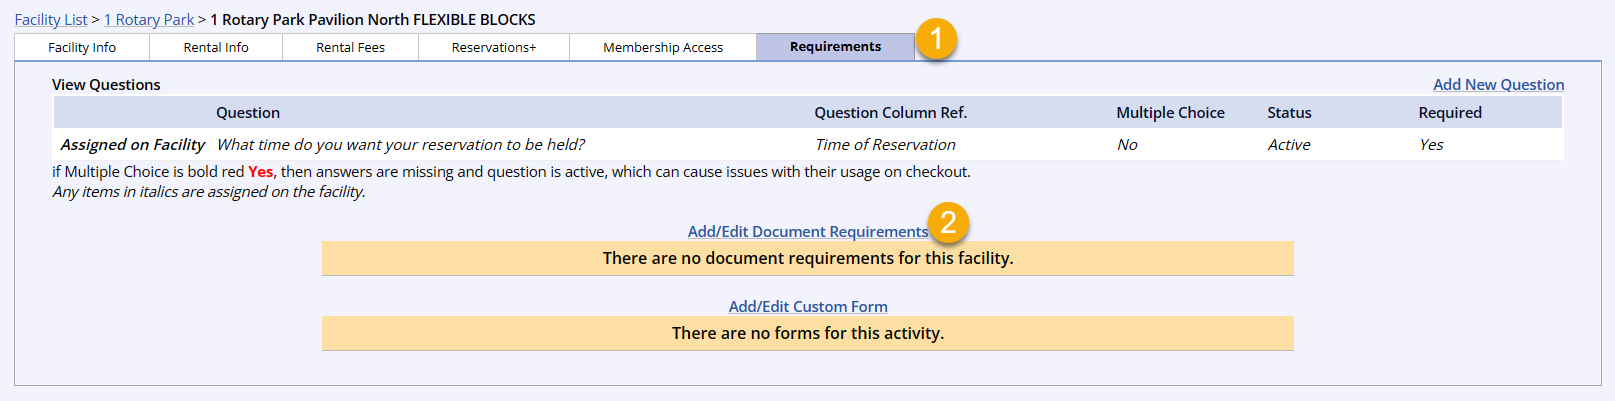
- Once in the selected Activity, click on the Requirements tab
- Click the Add/Edit Required Document link

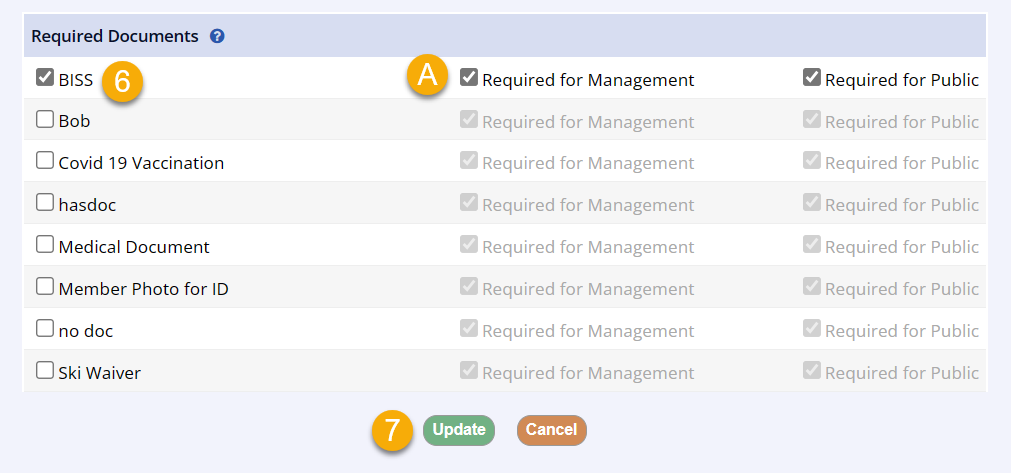
- Here, you have the option to select which Required Document to add to the activity
- It's optional to make the document Required
- If you uncheck Required for Management, then when a staff member completes a management registration, the document will be optional upon checkout
- The staff can let the user know to upload the document from their public-side account
- If you uncheck Required for Management, then when a staff member completes a management registration, the document will be optional upon checkout
- It's optional to make the document Required
- Click Update

Membership Required Document
Overview:
- You are able to Add Required Documents to Memberships
- If the Required Document is hidden from the public, and it is marked as Required for a Membership, it will be required to Upload from the public side during the membership registration
- If the Required Document is submitted during a membership registration from the management side, the staff will be prompted to enter an Expiration Date
To Add a Required Document to a Membership:
- Go to Memberships
- Click View Memberships
- Select the Membership where you want to add a Required Document
- Once in the selected Membership, click on the Requirements tab
- Click the Add/Edit Document Requirements link

- Here, you have the option to select which Required Document to add to the activity
- It's optional to make the document Required
- If you uncheck Required for Management, then when a staff member completes a management registration, the document will be optional upon checkout
- The staff can let the user know to upload the document from their public-side account
- If you uncheck Required for Management, then when a staff member completes a management registration, the document will be optional upon checkout
- It's optional to make the document Required
- Click Update
Facility Required Document
- Go to the Requirements tab for the facility or facility area
- Click Add/Edit Document Requirements
- Check the boxes for any documents you want to required on the reservation for that facility
- Use the checkboxes to require or not require the selected documents
- Click Update
Reports
Required Documents Report
Overview This report is for those activities (also available for Memberships) tha
Overview
This report is for activities, memberships and accounts that have Required Documents. When the activity / membership is selected, the results show the registrants with the required document name, date stamp of submission and update, as well as status. Results can be filtered by document, by status, and by type.
When the account is selected, results can be filtered from an expiration date range, document, and by status. You have the option to filter the report to show submissions by no expiration date or to view the summary and filter by status.
Document Status
There are many document statuses for Required Documents:
- Active (by Account only): Document has been uploaded and is in the members account
- Approved: Document has been uploaded via management or management has approved document uploaded by customer
- Declined: Document has been uploaded but declined by management
- Expiring Soon (by Account only): Document had been uploaded and an expiration date was determined upon approval and is going to expire soon
- Expired: Document had been uploaded and an expiration date was determined upon approval and it is now past
- Missing: Document is required for the activity but is not uploaded in the account
- Pending: Document has been uploaded via the public side and is awaiting management approval
Required Documents by Activity
- Go to Reports > Activity Reports > Select Required Documents in the Activity Reports section
- Select the activity name for the documents status you would like to check
- Filter by Document, Status, and/or Type
- Click the Submit button
- This report includes the:
- Account
- Member Name
- Document
- Submitted
- Status Update
- Status
- Required
- Expiration Date
Clicking the members name will bring you to the View Member Info page for that member within their account. This is where the document can be updated.

Required Documents by Membership
- Go to Reports > Membership Reports > Select Required Documents in the Requirements section > Select the membership name
- Filter by Document, Status and/or the date range when the Membership Expires Between
- This report is able to be filtered to Include memberships with no expiration dates
- Click the Submit button
- This report includes the:
- Account
- Member Name
- Document
- Submitted
- Status Update
- Status
- Required
- Expiration Date
Clicking the members name will bring you to the View Member Info page for that member within their account. This is where the document can be updated

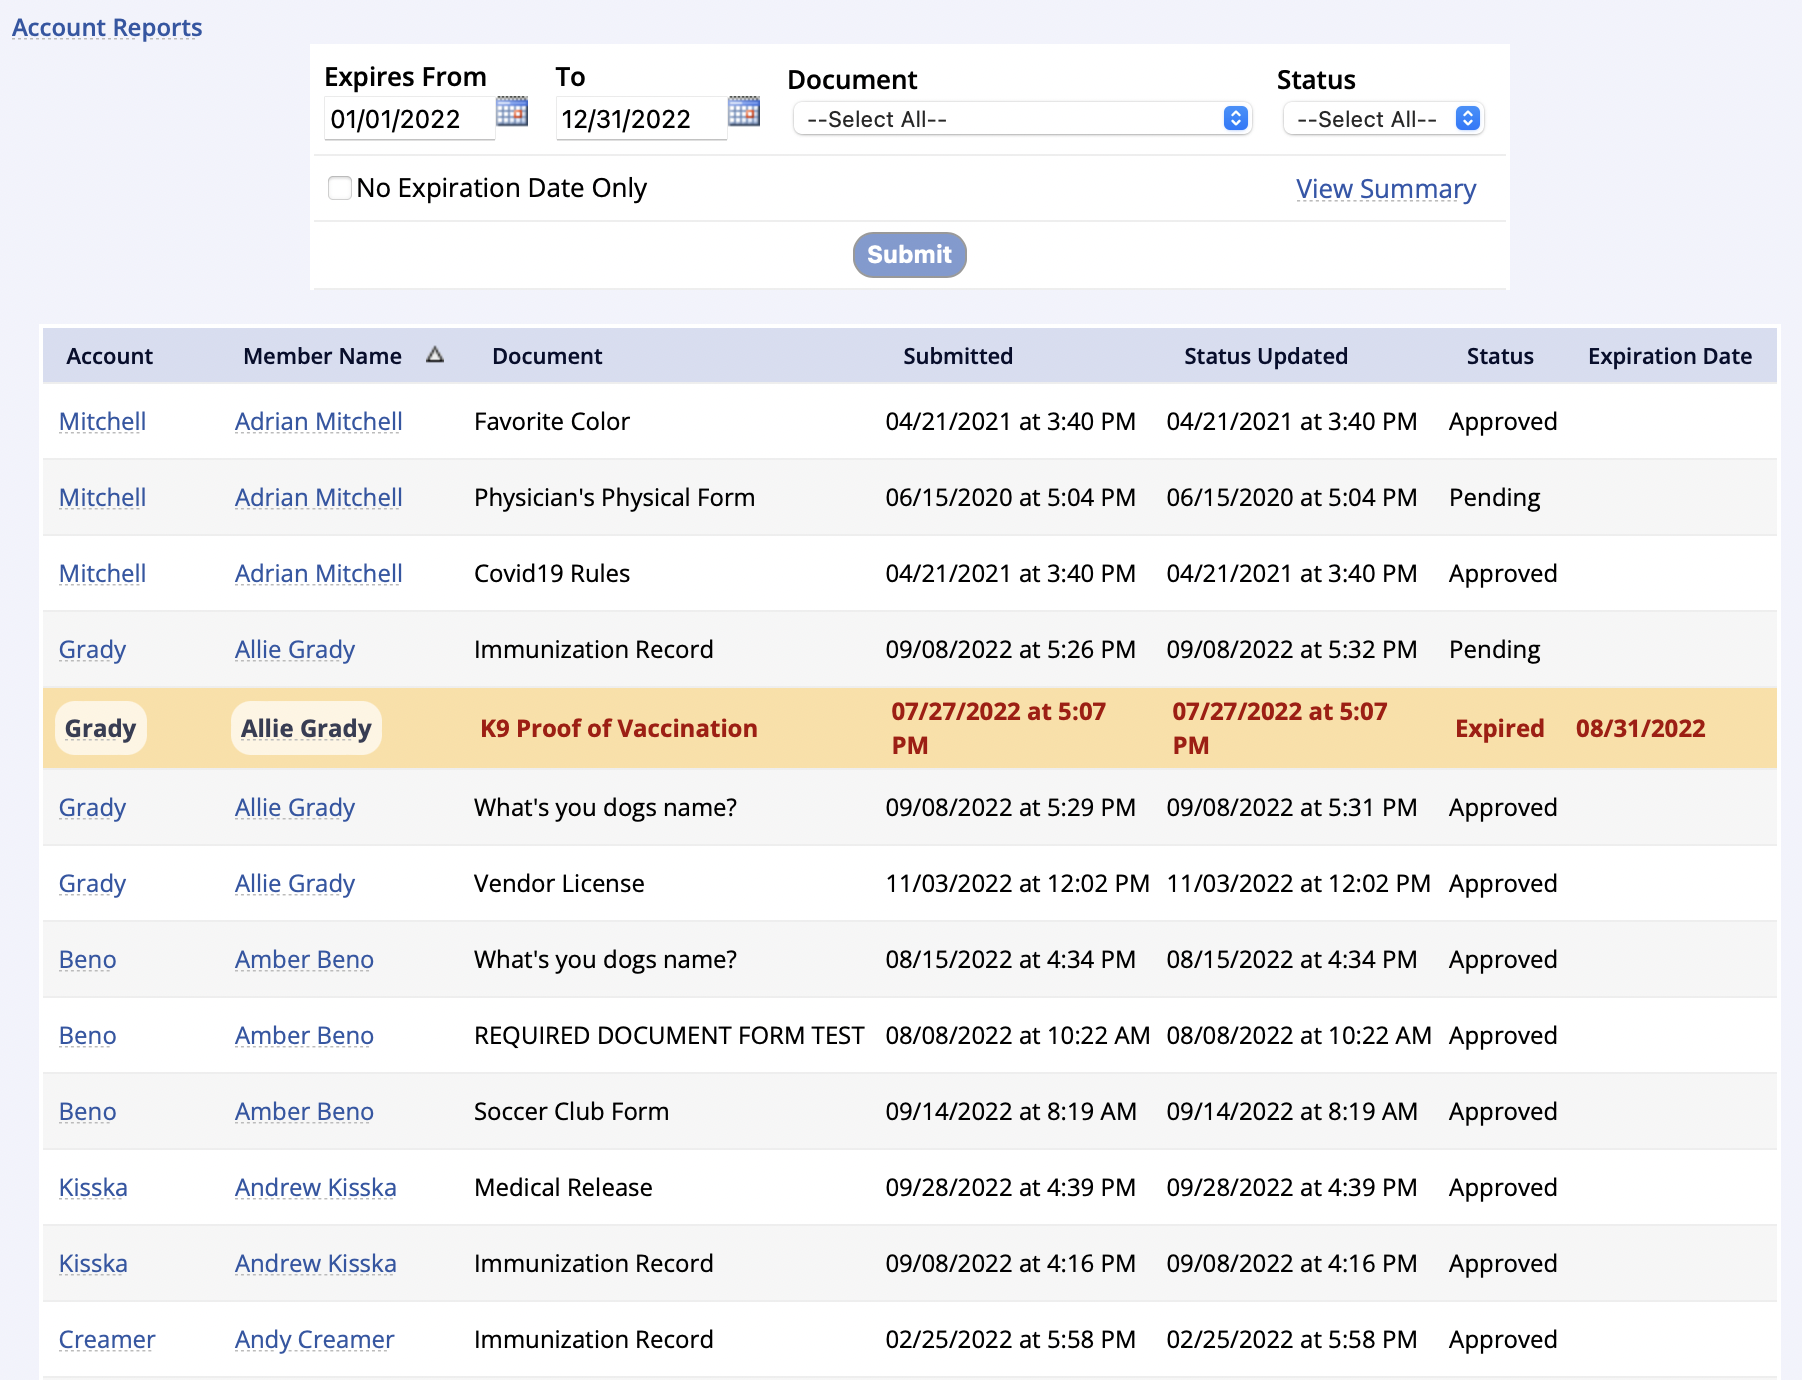
Required Documents by Account
- Go to Reports > Account Reports > Select the Required Documents in the Account Requirements section
- Filter the date range when the membership Expires From-To, Document and/or by Status
- This report is able to be filtered by No Expiration Date Only
- Click the Submit button
- This report includes the:
- Account
- Member Name
- Document
- Submitted
- Status Update
- Status
- Required
- Expiration Date
Clicking the Member Name will bring you to the View Member Info page of that member within their account. This is where the document can be updated.
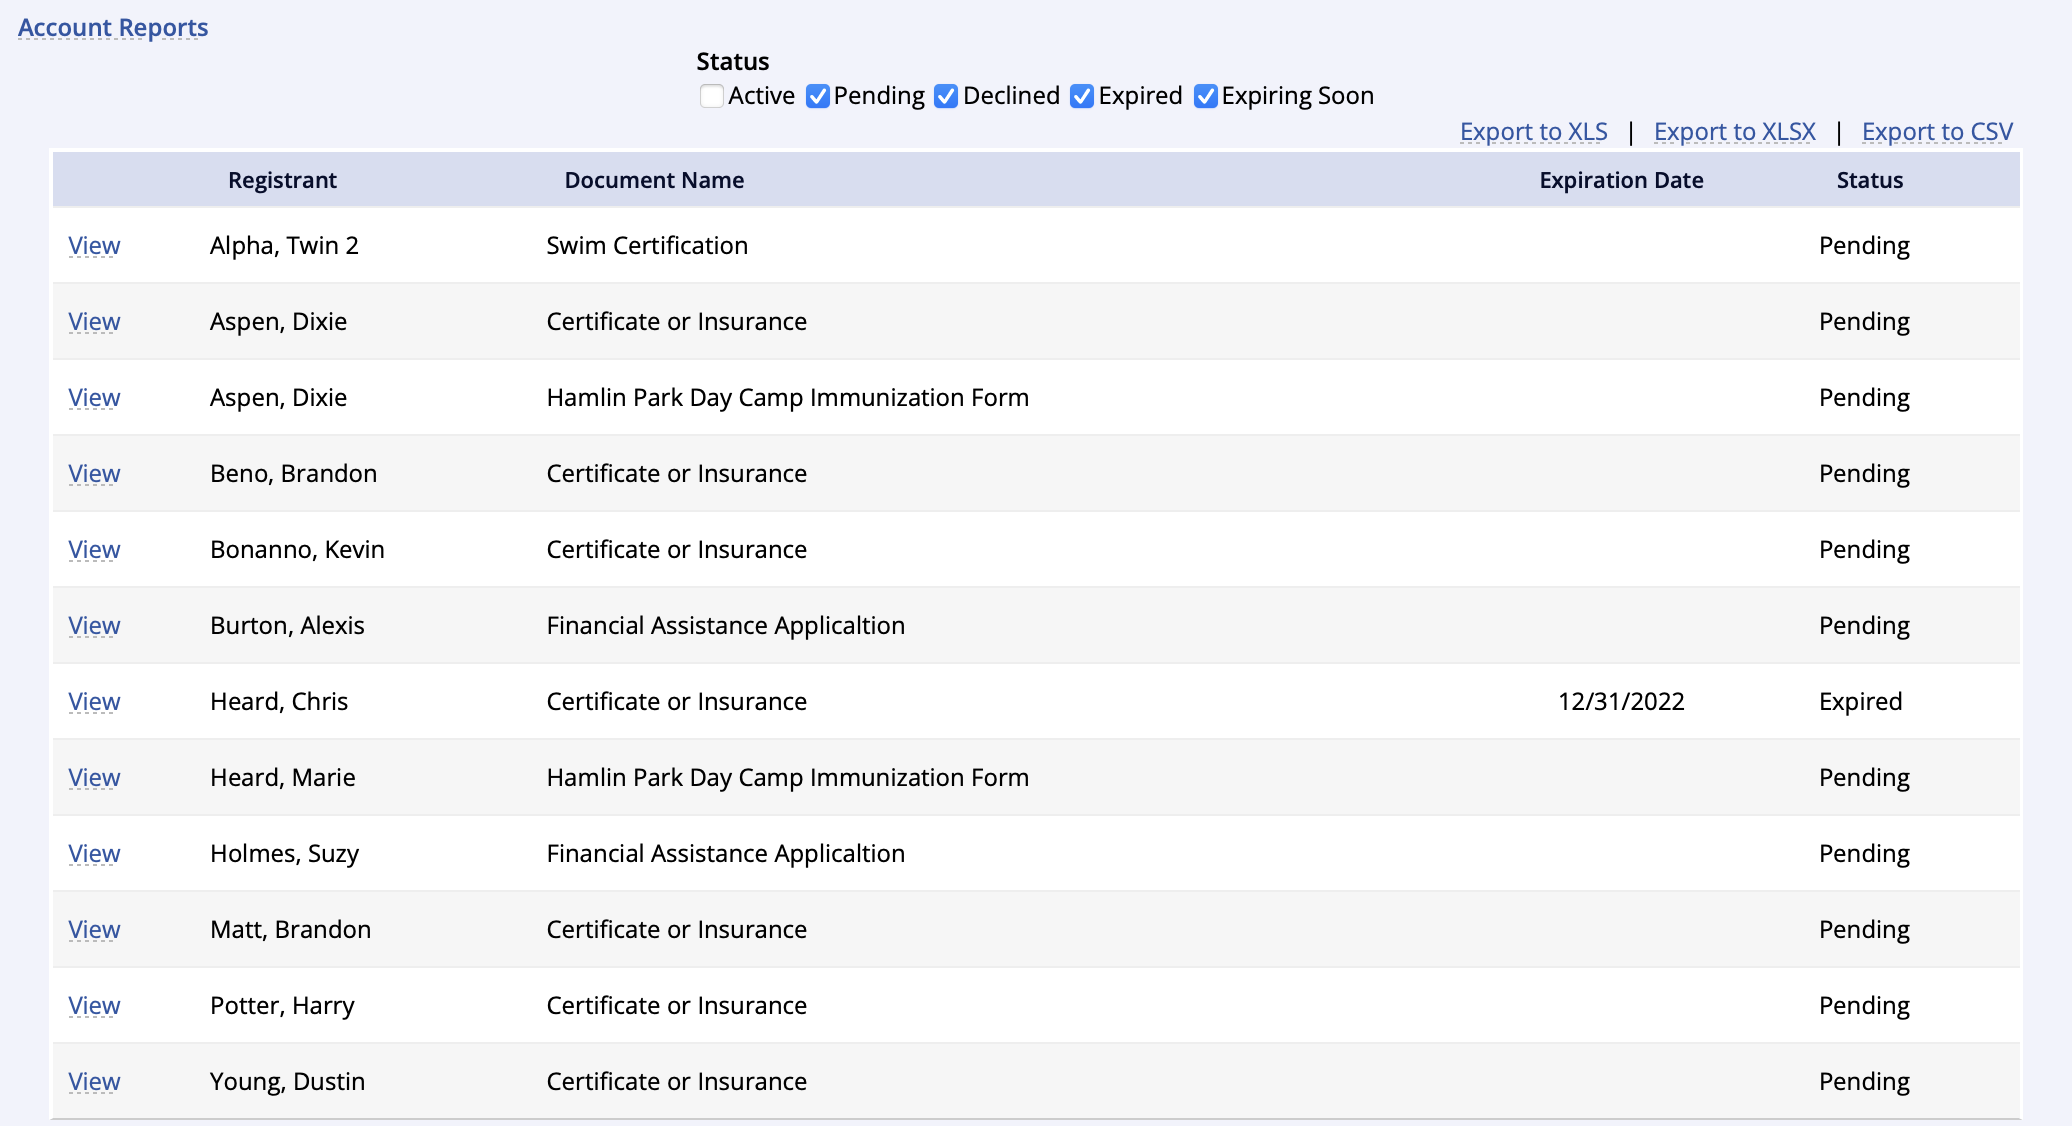
- Users are able to select:
- View Summary: gives the user the option to view the required documents by account and the option to filter by Status
View Summary Report
Selecting View Summary will allow the user to view the required documents by account and the option to view by their Status
- This report includes the:
- View, the submitted required document
- Registrant
- Document Name
- Expiration Date
- Status
- Clicking the View link will allow you to View Attached File, Edit, Approve, Decline or Delete the submitted document
- This filtered report is able to be exported
Uploading Documents from the Public Side
Your members may upload member documents through three processes
- Directly from the member profile
- During registrations or
- During account creation for proof of residency documents
During Account Creation - Proof of Residency Documents
Additional information on residency documents may be found in Account Residency Document (Proof of Residency).

- When setting up their account, the public user clicks Choose File, which allows them to select from their saved files
- From there, they simply select the file and upload it
- Documents are pending until approved or declined by staff
Direct from Member Profile
If Required Documents are not hidden from the public, members are able to Upload Required Documents from the Account Member page on the public side.

- Go to the account overview and click on the member's name

- At the bottom of the page, you will see any existing member documents and their status
- You may view or modify any existing document
- Click Add New Member Document to upload a new document to the member's profile

- Select which document you are uploading from the dropdown
- Click Next

- Click Choose File
- Find the file and select it
- Click Submit
During Checkout
Documents may be required for membership and activity registrations as well as for facility reservations and requests. The documents are set as required from the Requirements Tab within each of these setup screens. Customers will not be able to complete checkout until the document requirement is fulfilled. It is the responsibility of the department staff to review submitted documents for authenticity.

- When viewing the shopping cart, there is no option to continue if document requirements are not fulfilled
- Click Click Here to View/Upload these documents

- The pop up lists which document is required
- Click Upload to add your document

- Choose File allows you to select the file from your device
- Submit the document
- Checkout may now be completed
Reminders
The Required Document will not be listed on the Account Member page on the public side.
If the Required Document isn't hidden from the public, the member is able to upload the document, which will be listed as Pending until the staff approves the document.