
Starting from Account
- Log into an account.
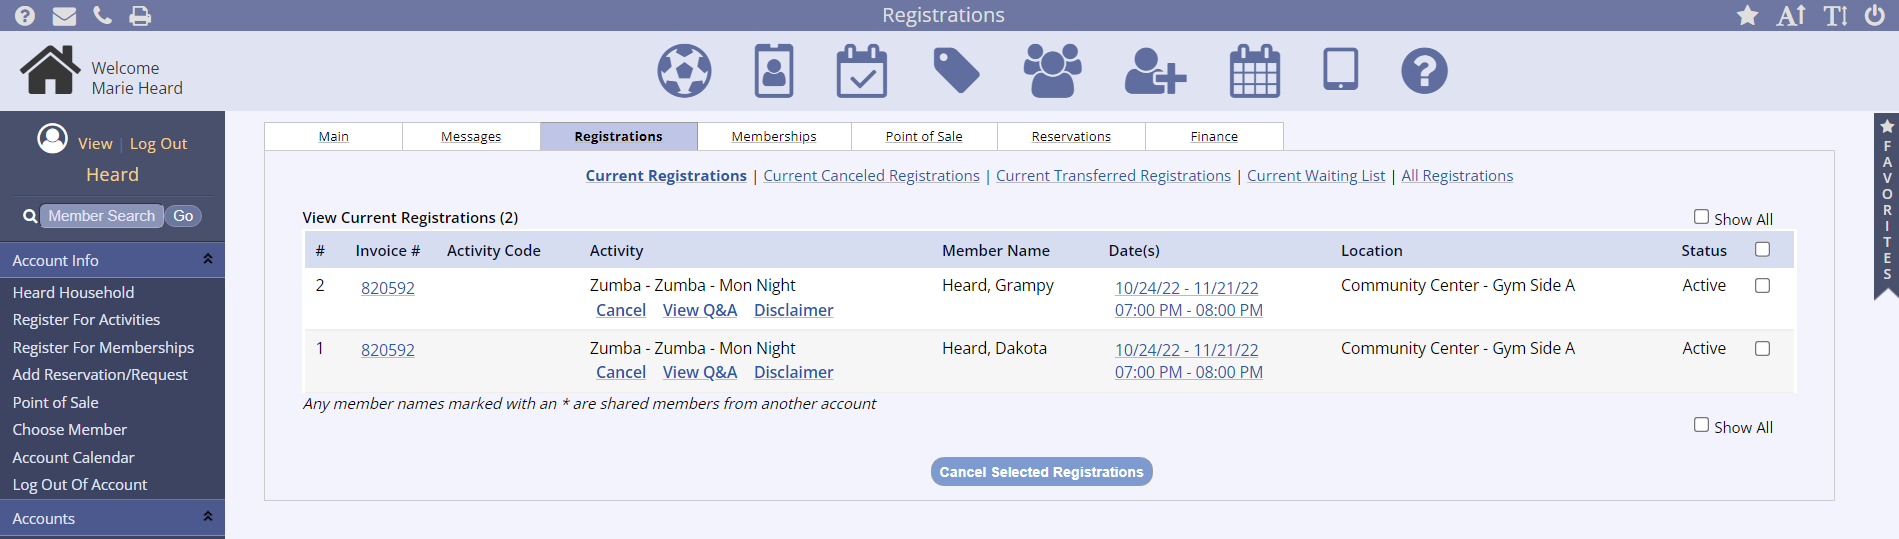
- In the Account Info click the Registrations tab.
- If single registration, click Cancel under the activity you wish to cancel.
- If multiple registrations, use the checkboxes on the right to select multiple activities at once. Then, click the Cancel Selected Registrations button at the bottom.
Starting from Program
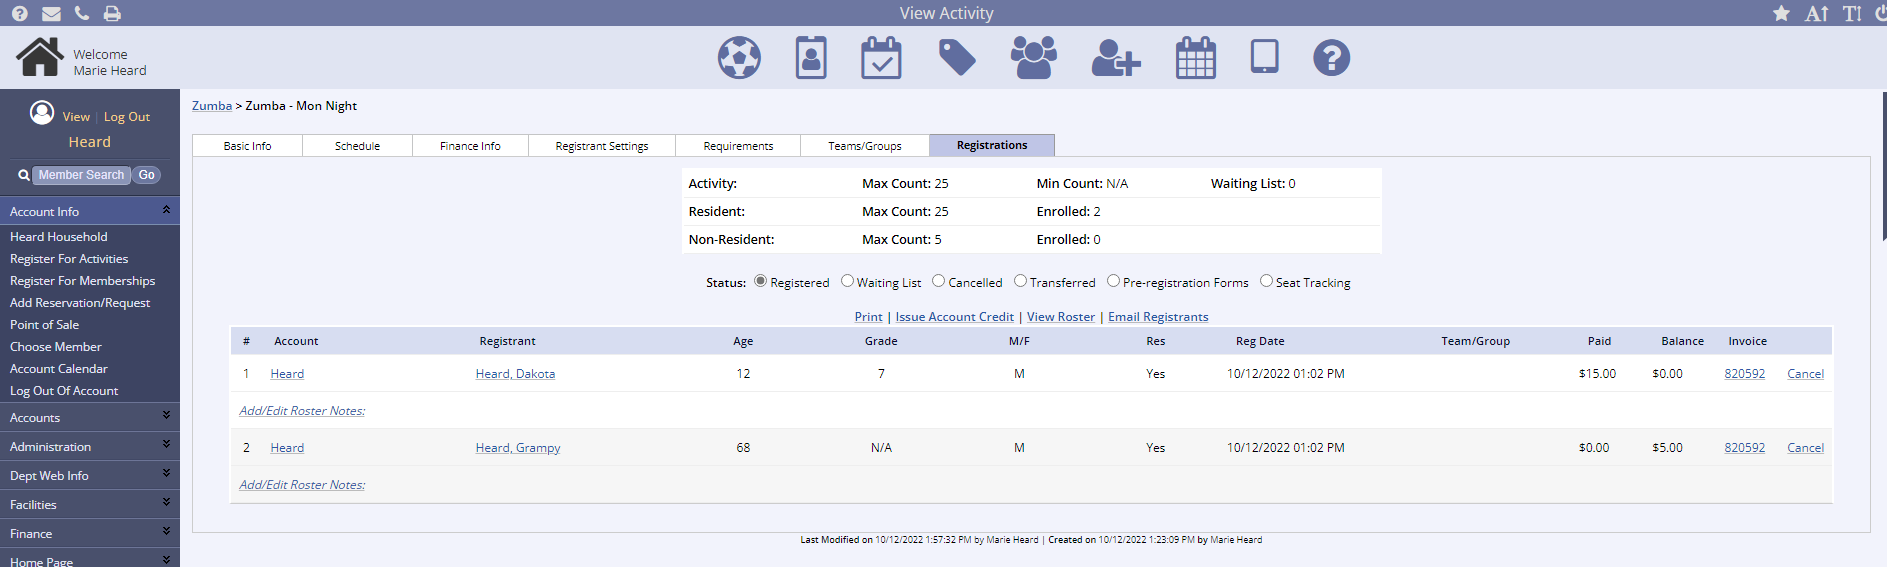
- Alternatively, you can click Programs then View/Search Programs.
- Locate and click on the Program from which you'll be canceling the registrant.
- Once inside the program, click on the relevant Activity Name.
- Click the Registrations tab.
- Locate the Registrant to cancel.
- Click Cancel next to their name.
Canceling
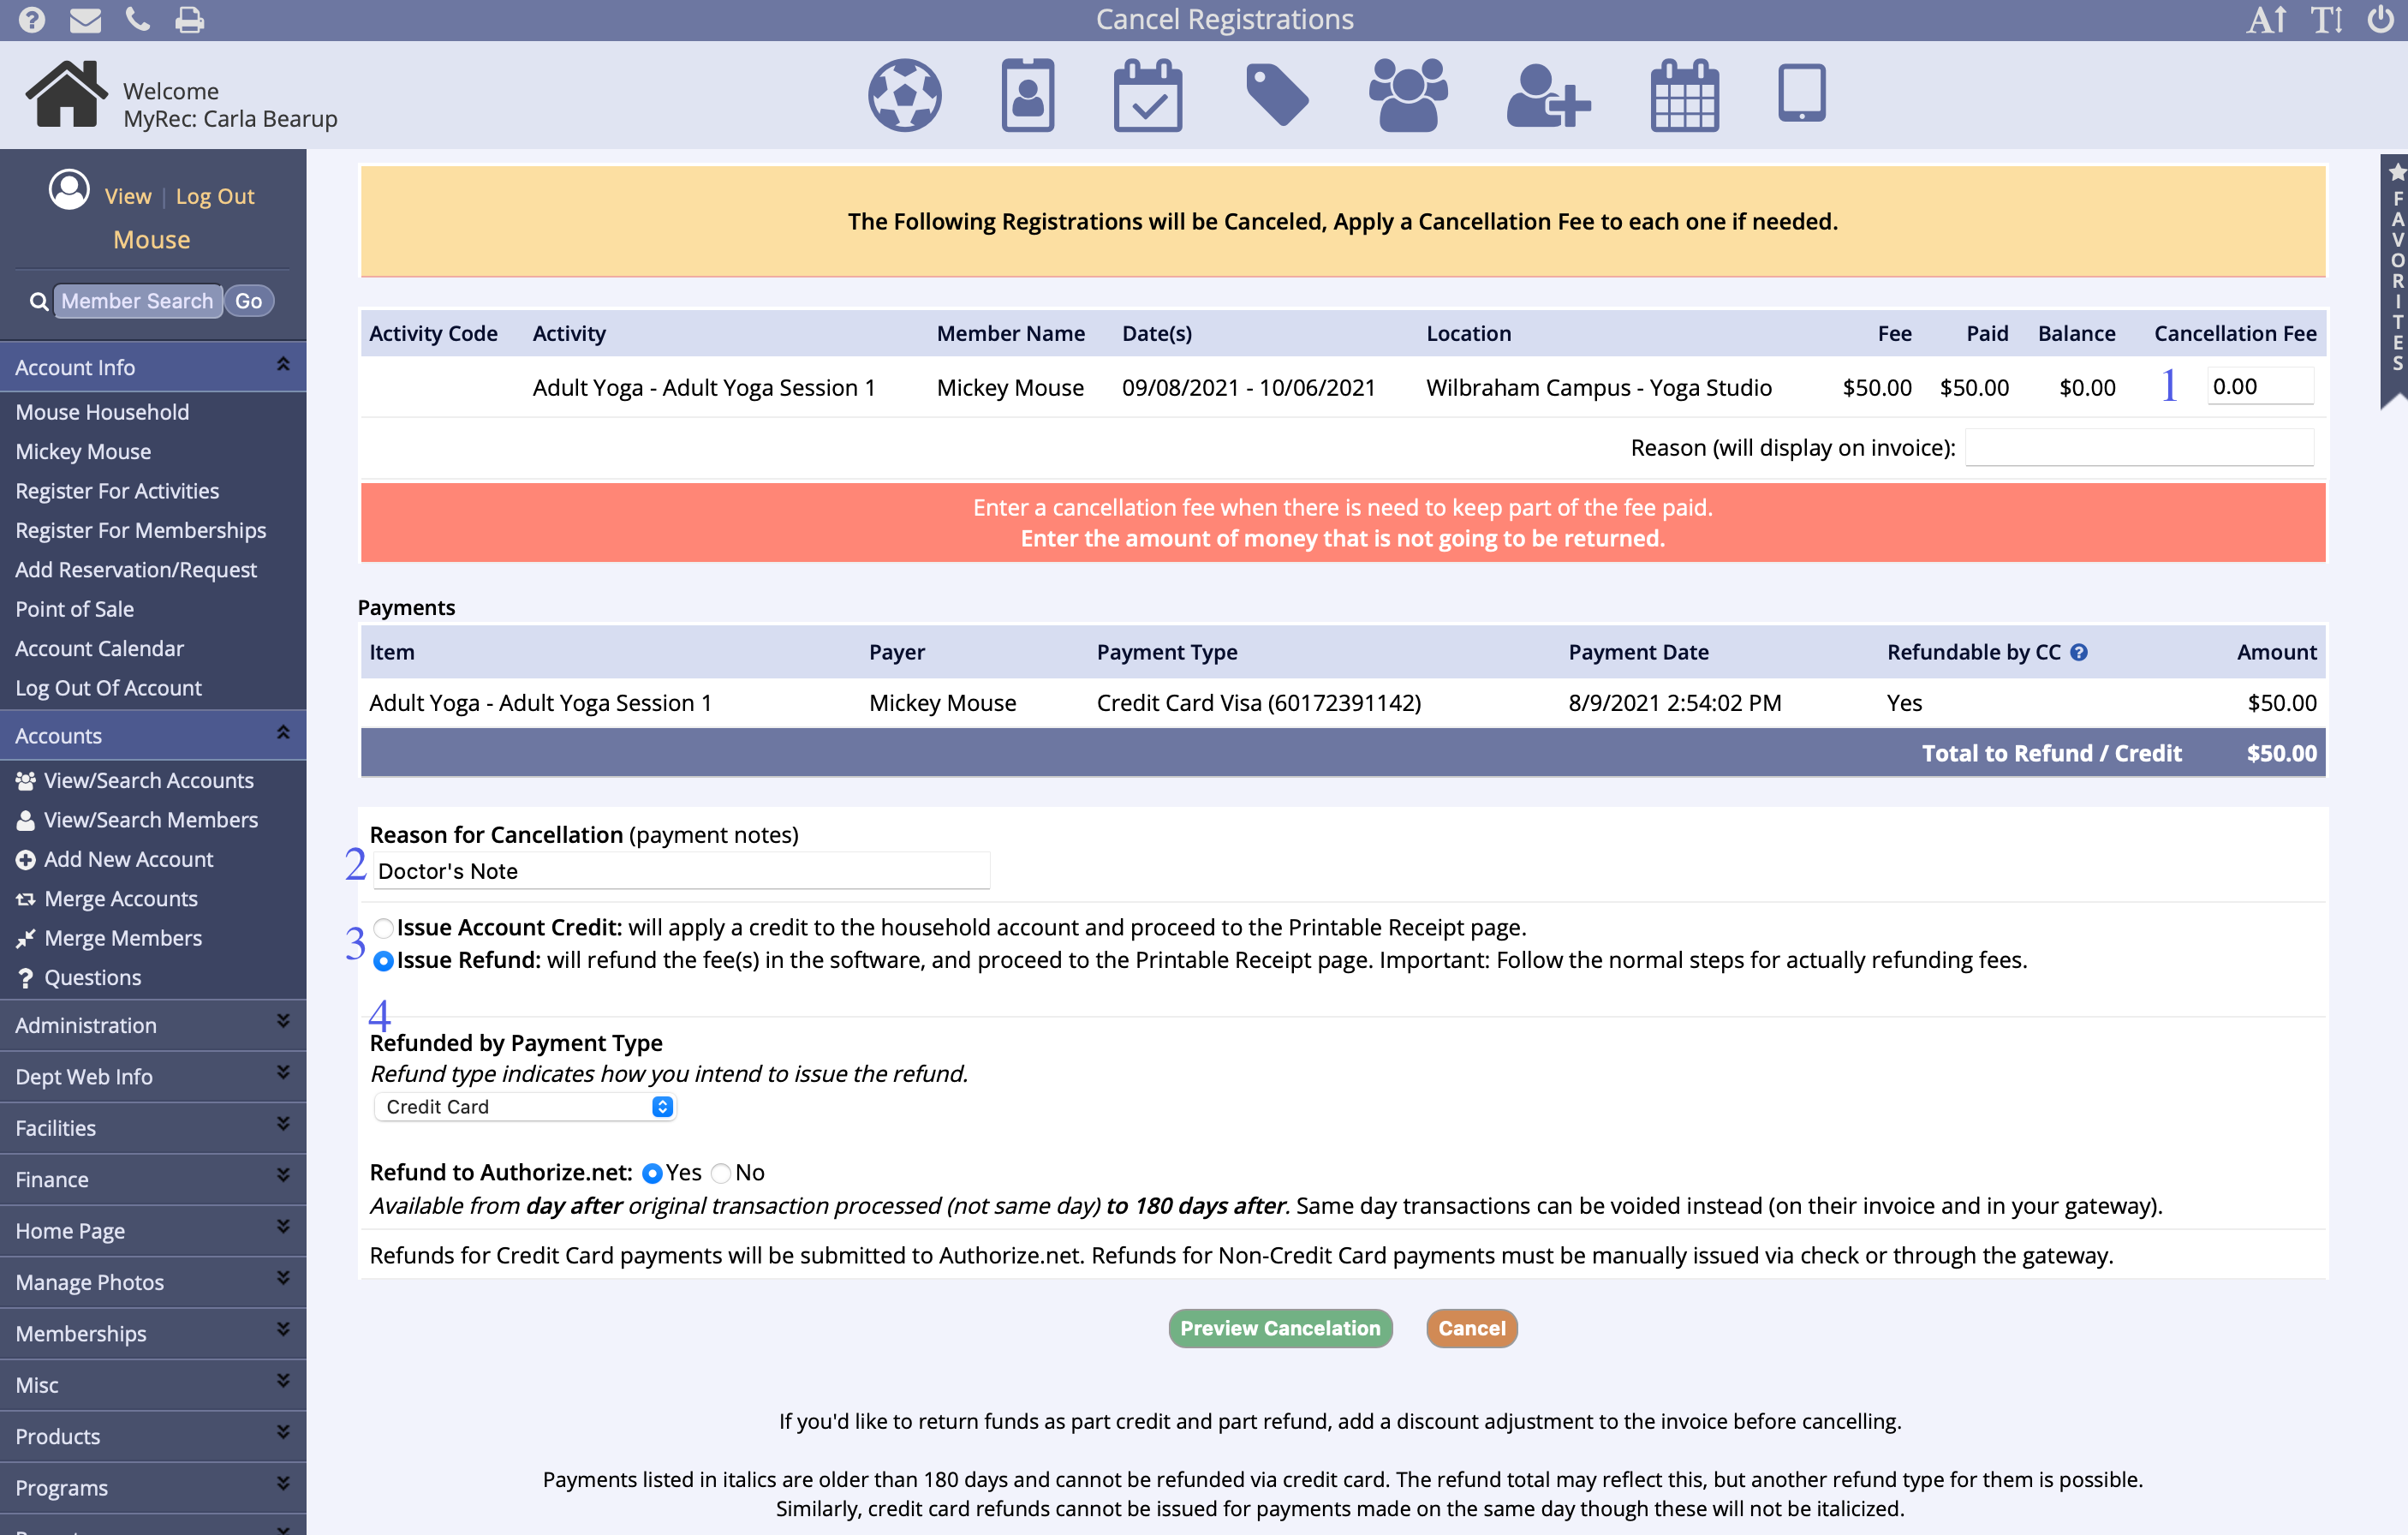
- Once into the cancellation screen, you may enter a Cancellation Fee.
- If there is a cancellation fee, enter it in the Cancellation Fee box for each activity you are canceling.
- Do not enter the amount to be returned to the registrant. Enter the amount you are keeping from the refund or credit.
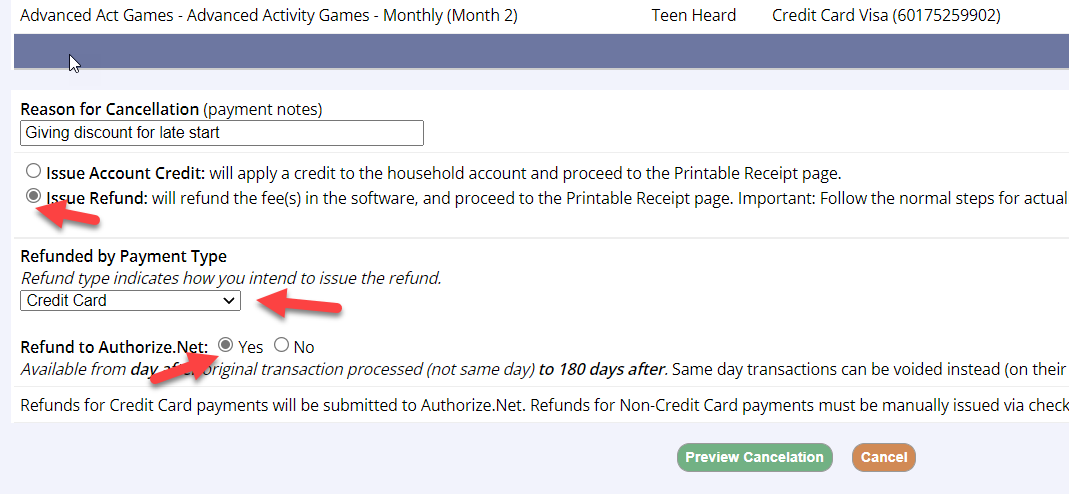
- Enter the reason for cancellation. This information remains on the invoice in the system for reference.
- Select either to Issue Credit to the household or to Issue Refund.
- Note: For split payment refunds, you must issue the credit card refund after any other payment form refunds have been issued. i.e. If the registrant paid $15 by check and $85 on credit card, issue the $15 refund by check first. This includes issuing an Account Credit prior to Issuing Refund by Credit Card.
- If you intend to transfer a registrant to another activity, Issue Credit will allow you to hold the payment funds within the system to use once the cancellation is complete to register the member for a new activity as an alternative to refunding the original payment and taking new payment once you submit the new registration.
- If the registration fees are the same amount, you can Issue Account Credit for the full amount of the original registration fee. This will be available in the member's account to use on the new registration purchase.
- If the registration fee for the new activity is less than the original registration fee, you can Issue Account Credit for the new amount, then Issue Refund and select the payment method from the dropdown for the remaining portion of the refund.
- If the registration fee for the new activity is more than the original registration fee, you can Issue Account Credit for the full amount of the original fee. Once you complete the cancellation and register the member for the new activity using the household's available Account Credit, a balance will be due on the account.
How to Issue a Refund
How to Process a Refund
How you refund an item depends on why you are refunding it. If the item (either a...
How you refund an item depends on why you are refunding it. If the item (either a registration, membership, or a reservation) is to be canceled, then you must start by finding that item in the appropriate tab in their household account and process the refund by first canceling that item (see Canceling and Refunding an Item.) If you do not need to cancel the item but want to refund some or all of the money, you would do that by adjusting the original invoice found in the finance tab of their account (see Adjusting and Refunding an Invoice below)
Cancelling and Refunding an Item
- Go to the household account
- If you are cancelling a registration, go to the registrations tab. If you are cancelling a membership go to the memberships tab, and if it is a reservation, go to the reservations tab. Find the registration/membership/reservation you wish to cancel. Note: If you do not see the registration, membership or reservation, it may be that it has passed or expired already. You can find it by going to the past reservations/registrations or expired memberships links. You may have to adjust the date range to bring up the item you need to cancel
- Once you find the item you want to cancel click the checkbox next to it and then click Cancel Selected Registrations/Reservations
- If you need to keep a cancelation fee or do not wish to refund the entire amount back, then put the amount you wish to keep in the Cancelation Fee field. This will display on the invoice.
- Put a reason for the refund in the Reason for Cancelation field (payment notes)
- Then, select to either Issue Account Credit (this will be visible on their account and they can use it anytime to pay for any other items) or to Issue Refund (this can be by cash, check or credit card)
- Please note: If you are issuing a split refund, you must issue the Account Credit portion of the refund before completing the credit card portion of the refund.
- If you choose to issue a refund, choose what payment type you want to refund by in the Refunded by Payment Type drop down
- If you are refunding the money back on their credit card, first make sure they originally did pay by credit card and that the item was not purchased more than 180 days ago. Then select credit card.
- If your department uses Authorize.net, you will be able to directly refund their card here by choosing Yes to Refund to Authorize.Net
- If you are refunding by check or cash, simply choose one of those types from the drop down menu
- Click Preview Cancelation
- This will show you a preview of the amount and type to be refunded
- If everything looks correct, click Continue Cancelation
Adjusting and Refunding an Invoice (giving money back without canceling the item)
- Go to the household account
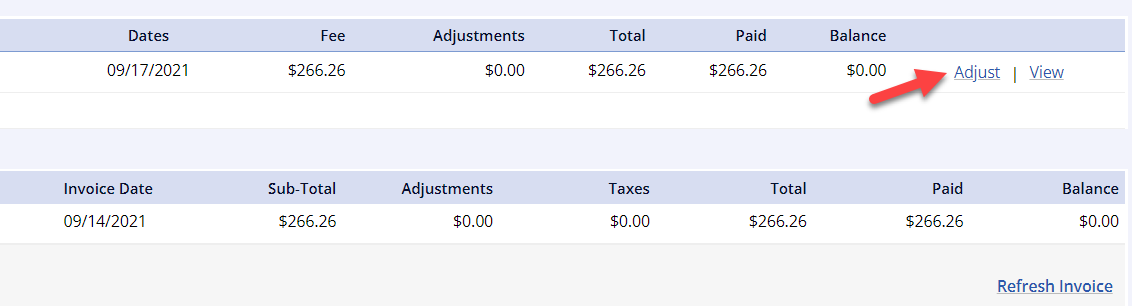
- Go to the Finance Tab
- Click on View/Edit next to the invoice you want to put the refund on. This would be the invoice from the original payment.
- Click Adjust to the right of the item you are refunding
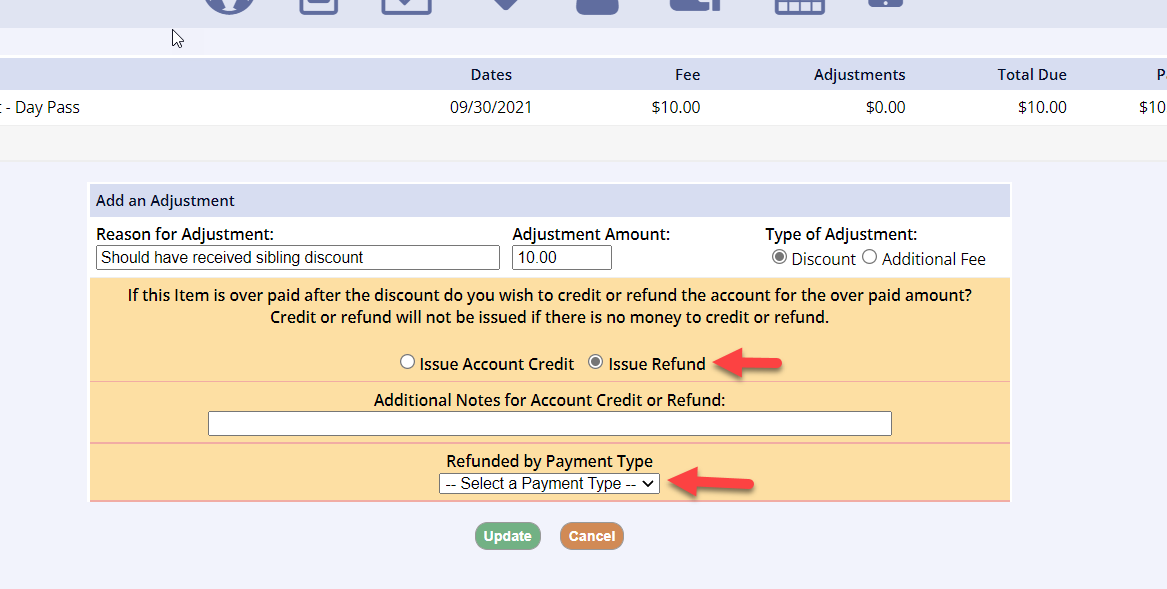
- Put the reason for the refund and/or discount in the Reason for Adjustment field
- Put the amount you want to refund in the Adjustment Amount field. If you want to refund the entire amount back to them you would put the whole amount originally paid here. If you only want to refund a partial amount, put the amount you wish to refund back.
- Choose Discount for Type of Adjustment
- To issue an account credit choose Issue Account Credit and then click Update
- Please note: If you are issuing a split refund, you must issue the Account Credit portion of the refund before completing the credit card portion of the refund.
- To issue a refund by cash, check or credit card choose Issue Refund
- Choose what payment type you want to refund by in the Refunded by Payment Type drop down.
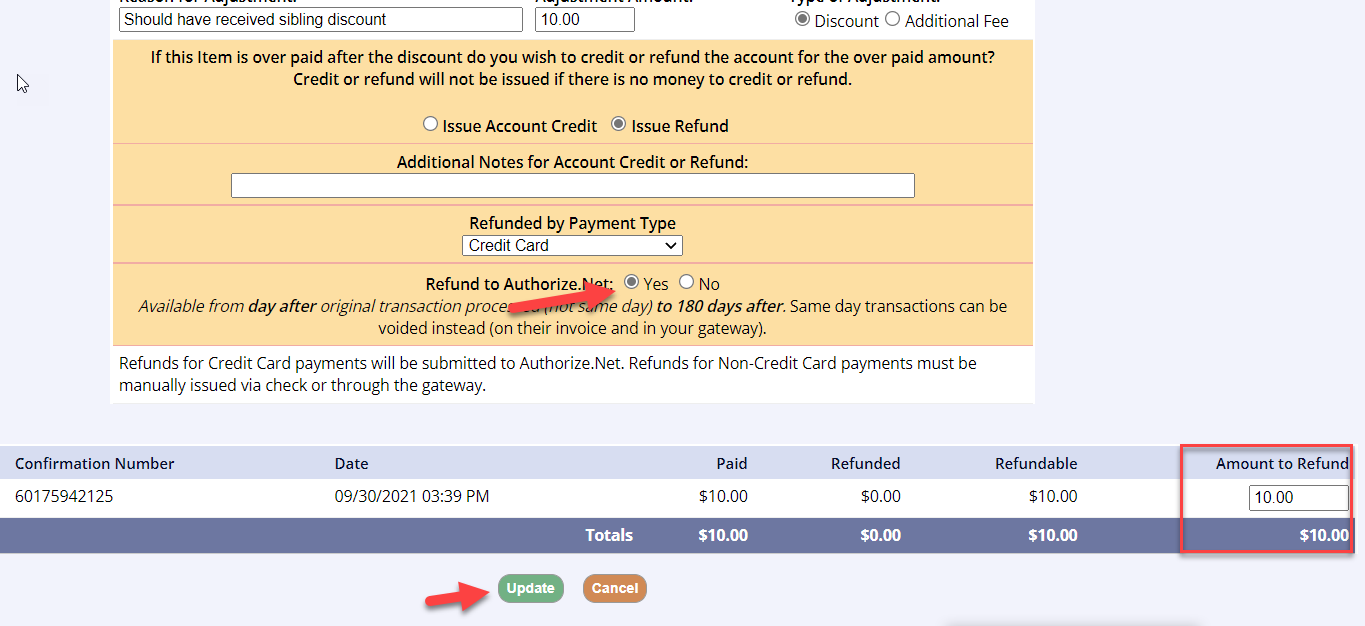
- If you want to refund the money back on their credit card, first make sure they originally paid by credit card and that not more than 180 days has passed since the original transaction.
- Select credit card from the drop down
- If your department uses Authorize.net, you will be able to directly credit their card here by choosing yes for Refund to Authorize.Net. Once you choose yes, you will be shown a review of what will be credit to the card at the bottom of the screen
- If you want to refund by cash or check simply choose that payment type in the drop down
- Click Update.
- Click Preview Cancelation to continue.
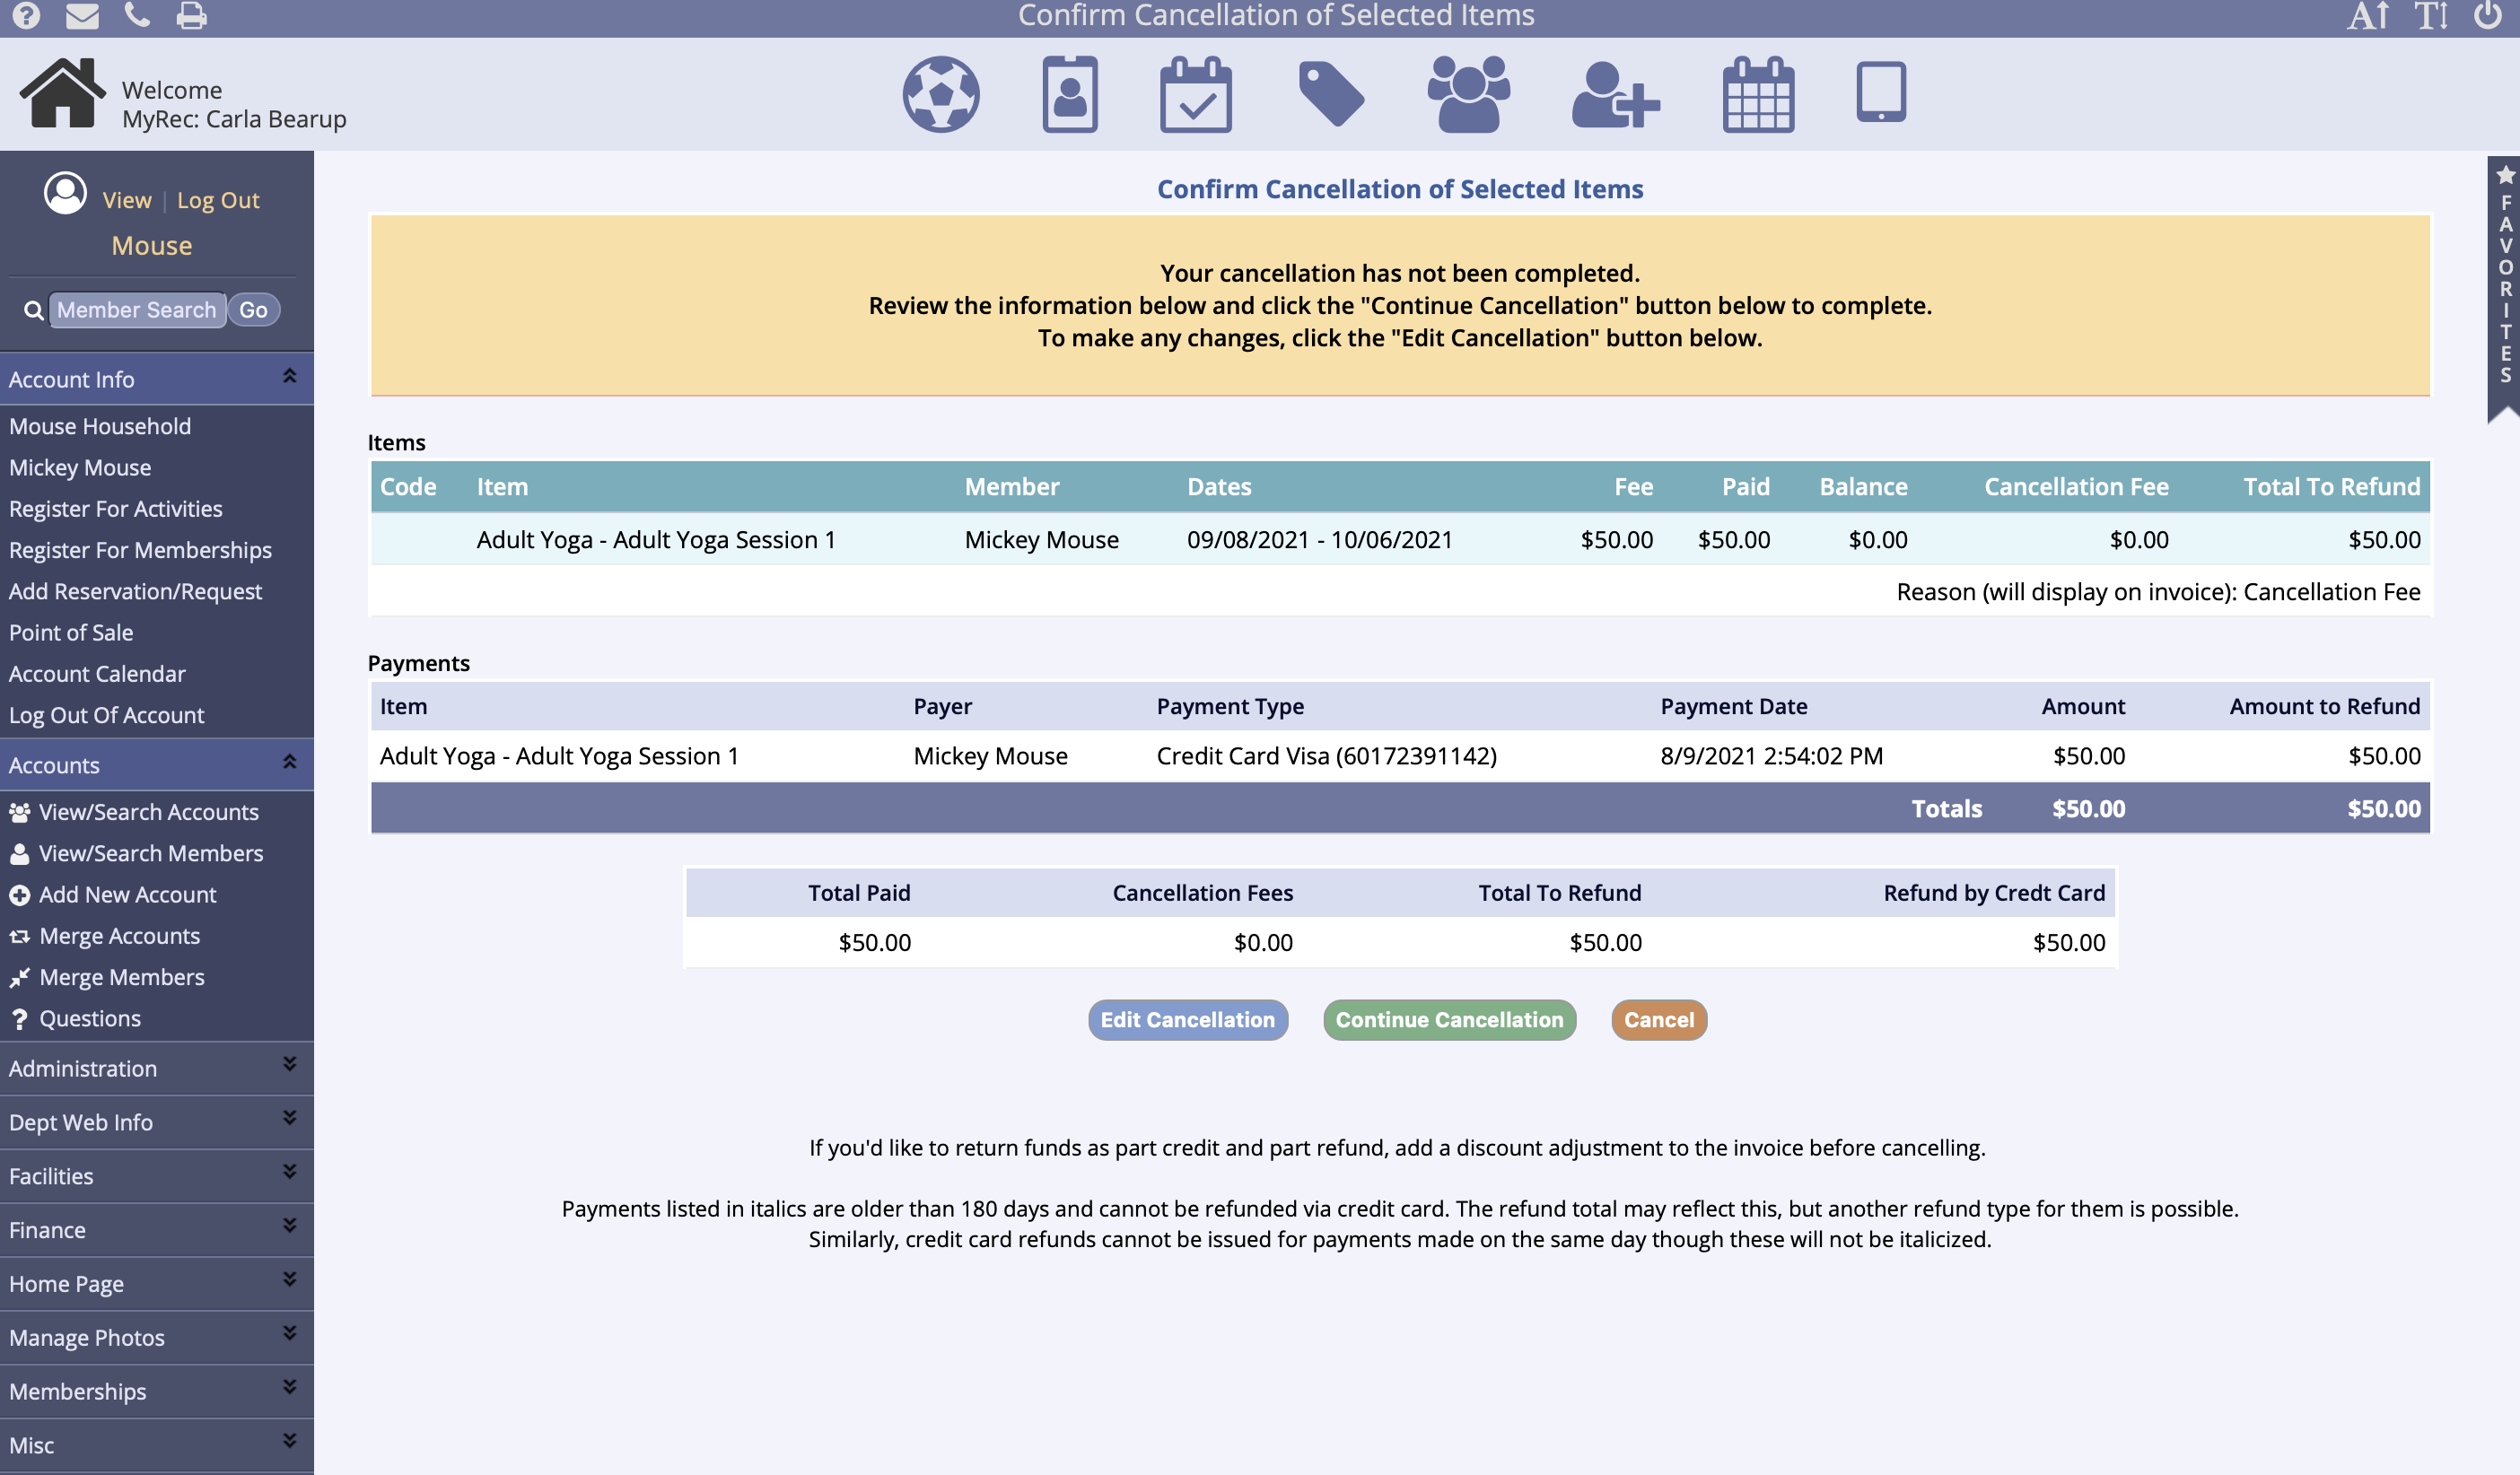
- On the Confirm Cancellation of Selected Items screen review the cancelation and amounts to be refunded.
- Select Edit Cancellation to revise or Continue Cancellation to submit.
Cancelation Video
Cancel a Registration Video
...
This video tutorial will help you with the correct steps to cancel a registration for a public user.
Note: The Transfer button visible in the video has been removed from the cancellation process. The steps to use Account Credit to transfer a registration can be found in the article above. Please see Canceling #3.