
Overview
Account credits represent monies on an account that have not been disbursed to a budget group and can be used for account purchases within your recreation department's site. They can be applied as partial or full payments. These credits may originate from a variety of sources, including:
- Staff-issued credit
- Refunds processed as account credit
- Gift certificate redemptions
- Fund account purchases
Account credits have no expiration date and will remain on an account until spent or alternative actions are taken by your department to remove the credits.
This article will review how management and public users can view existing credits, how to issue credits, refund credits, spend credits, view credit history of an account, and understand credits within financial reports.
Management View of Credits
There are various ways in which your department can view available account credits.
Account View
From within an account, credit information is displayed on both the Main tab and the Finance tab in a gold call out box.

- To Refund Account Credits
- Click Refund Account Credits
- Enter in the amount to refund
- Select the payment type for the refund
- Enter a reason for the refund, this is optional
- Click Issue Refund
Refund to Credit Card
Credit refunds need to be manually processed in your merchant gateway. This step tracks the refund within MyRec.com but does not initiate the actual refund to the credit card. For more information visit this article, Refund an Account Credit to Credit Card - MyRec.com
- To Issue Account Credits
- Click Issue Account Credits
- Enter in the amount of funds you are crediting and a reason for the account credit
- There is the option to select a budget group that the funds are coming from
- Click Issue Account Credit
- To View Account Credit History
- Click View Account Credits Issued History
- This shows credits that have been issued manually to an account, as well as credits issued through gift card/fund account redemptions
- Credits issued due to cancellations and refunds are not found in this section
- Click View Account Credits Issued History
- To Redeem Gift Certificates
- Click Redeem Gift Certificate
- Enter in the gift certificate code
- This is on the public gift certificate copy and also can be found on the purchaser's POS purchase history within the household account
- Click Submit
Details of all credits issued and used can be found in the Finance tab of the account.

- Go to the account's Finance tab
- Click Account Credit History
- Credits issued are indicated through a money icon
- Credits used are indicated through a tag icon
Public View of Credits
Public users can view their available credits when logged into their account. Available credits are displayed in multiple locations including the Finance card of the account overview as well as the bottom of the finance page. During checkout, available credits are displayed if any are available.

Using Account Credits
To apply account credits to an open balance or a registration, process payment as you normally would, and select Account Credits as the payment type.
Applying Payment - Management
Check out - Management
Processing Transactions on the Management Side
We recommend having the user present or at least on the phone to complete the checkout process since there are likely disclaimers that need to be accepted and possibly questions, forms, or documents that are required.
- Confirm that your customer has seen and agreed to any applicable disclaimers
- Click Continue
- Review any additional questions, disclaimer, or other required documents with the customer
- Select Payment Type
- Confirm Billing Contact and Billing Email is correct
- Enter Payment Amount
- A receipt will be automatically sent to the billing email unless the checkbox is deselected prior to submitting payment
- Receipts can be located from the management and public side after creation; to learn more see our article on Receipts
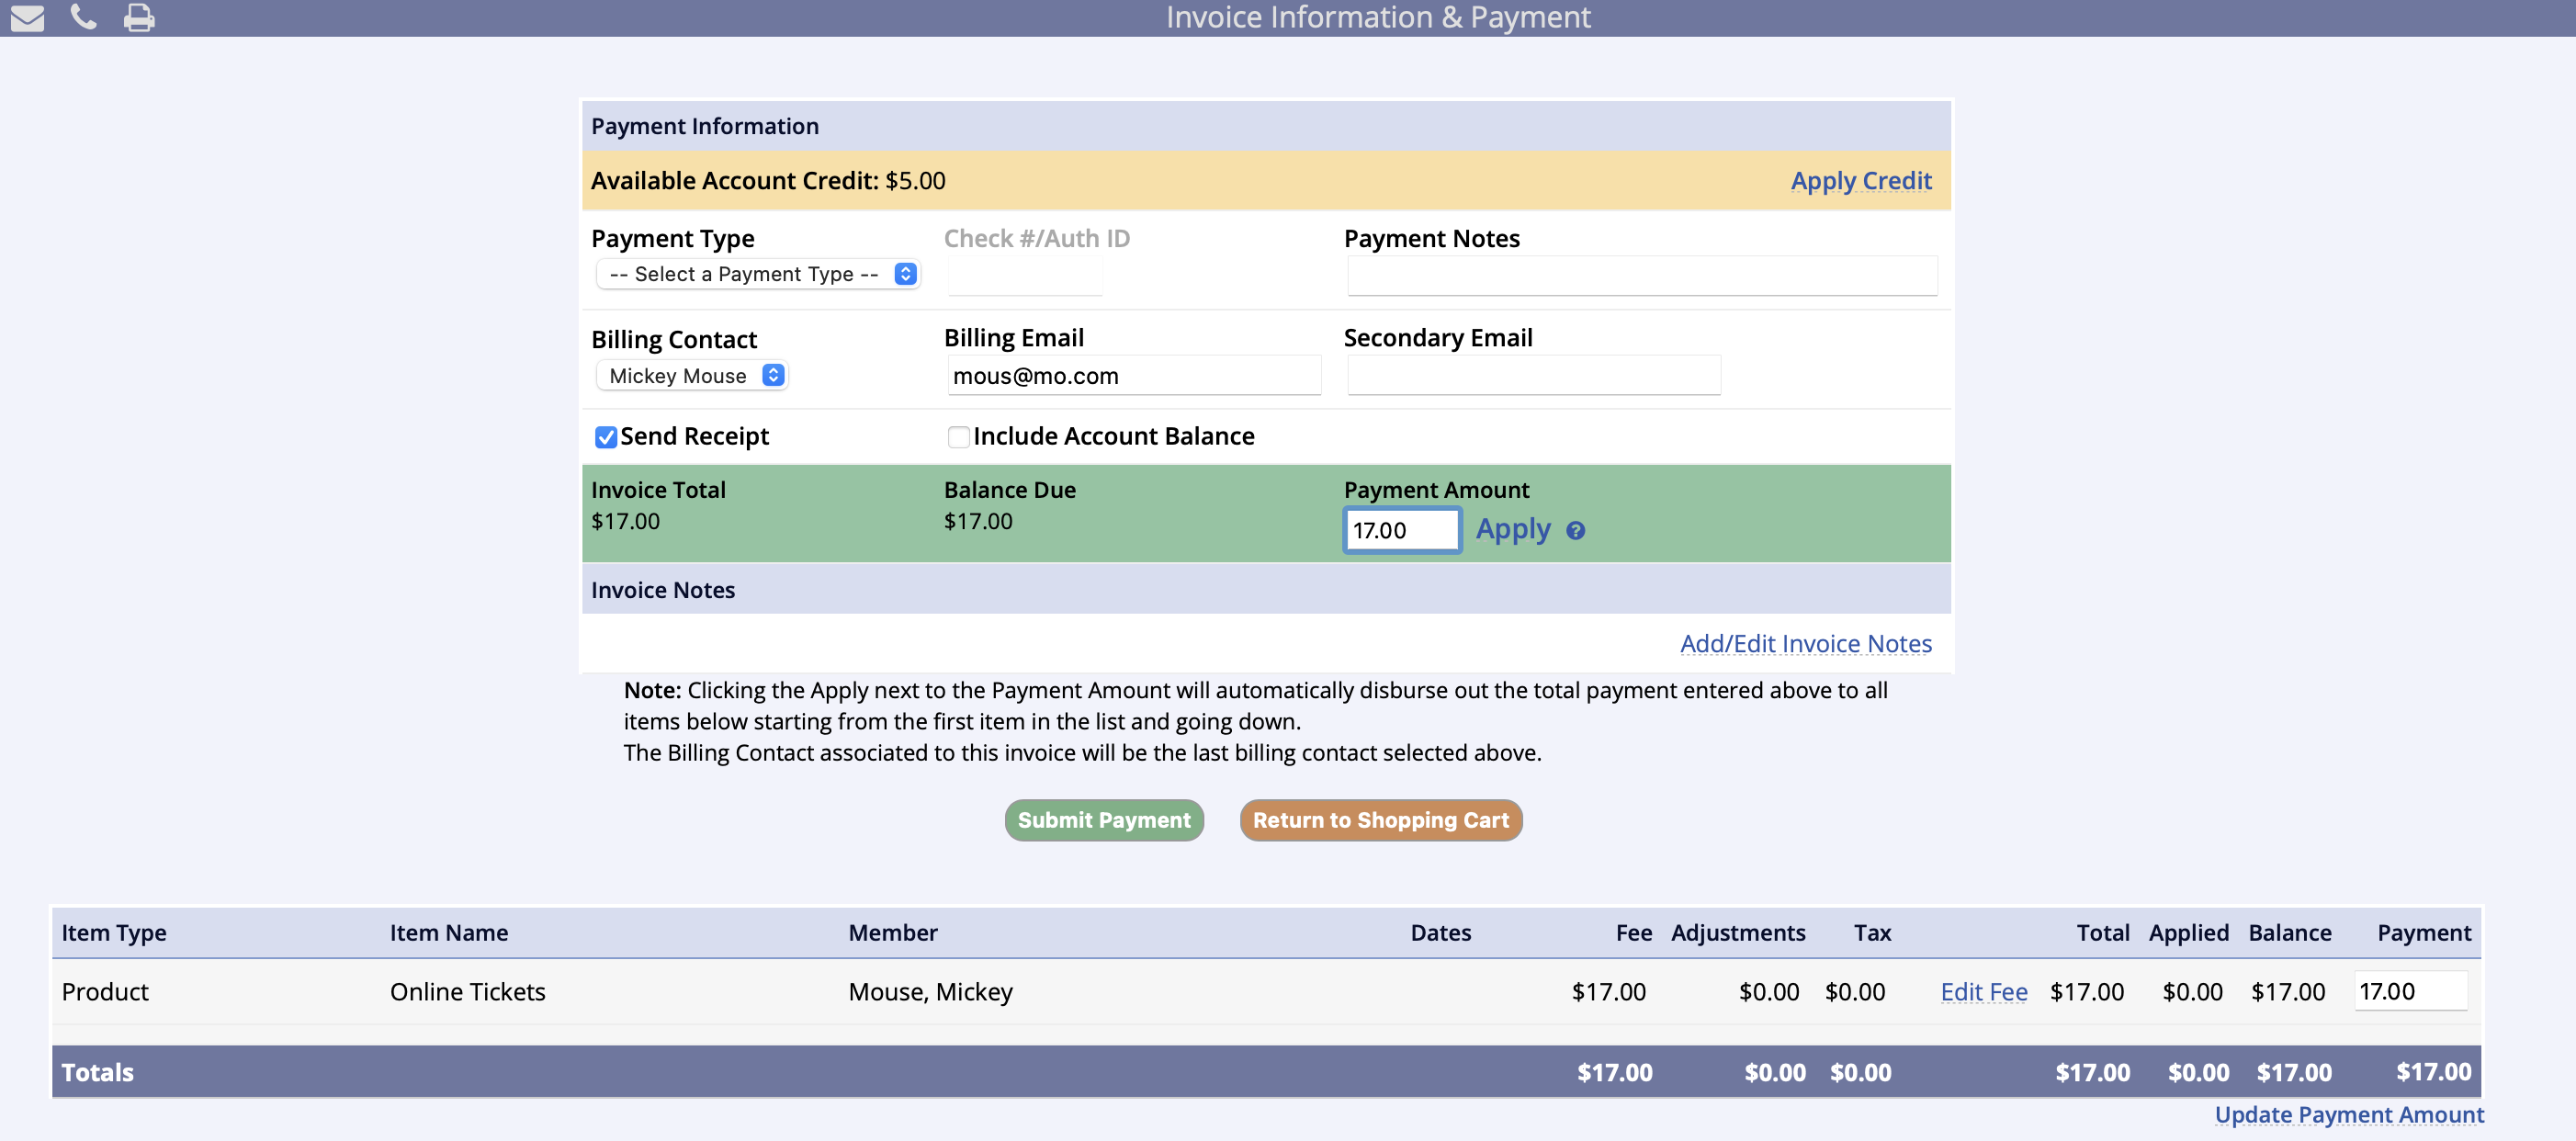
Full Payment
- Choose payment type
- Click Submit Payment *
- Click Process Invoice
* For credit cards, Submit Payment is Continue to Online Payment Form
Partial Payment
- Choose payment type
- Set payment amount
- Click Apply
- Review payment distribution
- Click Submit Payment*
- Click Process Invoice
* For credit cards, Submit Payment is Continue to Online Payment Form
Split Payment
- Choose payment type (credit cards last)
- Set payment amount
- Click Apply
- Review payment distribution
- Click Submit Payment *
- Repeat steps 1-5 for each payment
- Click Process Invoice
* For credit cards, Submit Payment is Continue to Online Payment Form
Credit Card Payment
Swipe Devices
Credit card readers that utilize swipe-technology are being deprecated within MyRec.com due to new security measures in the credit card industry. These devices are no longer recommended by MyRec.com for new setup purchases. More information can be found in our EMV Quick Reference Guide.
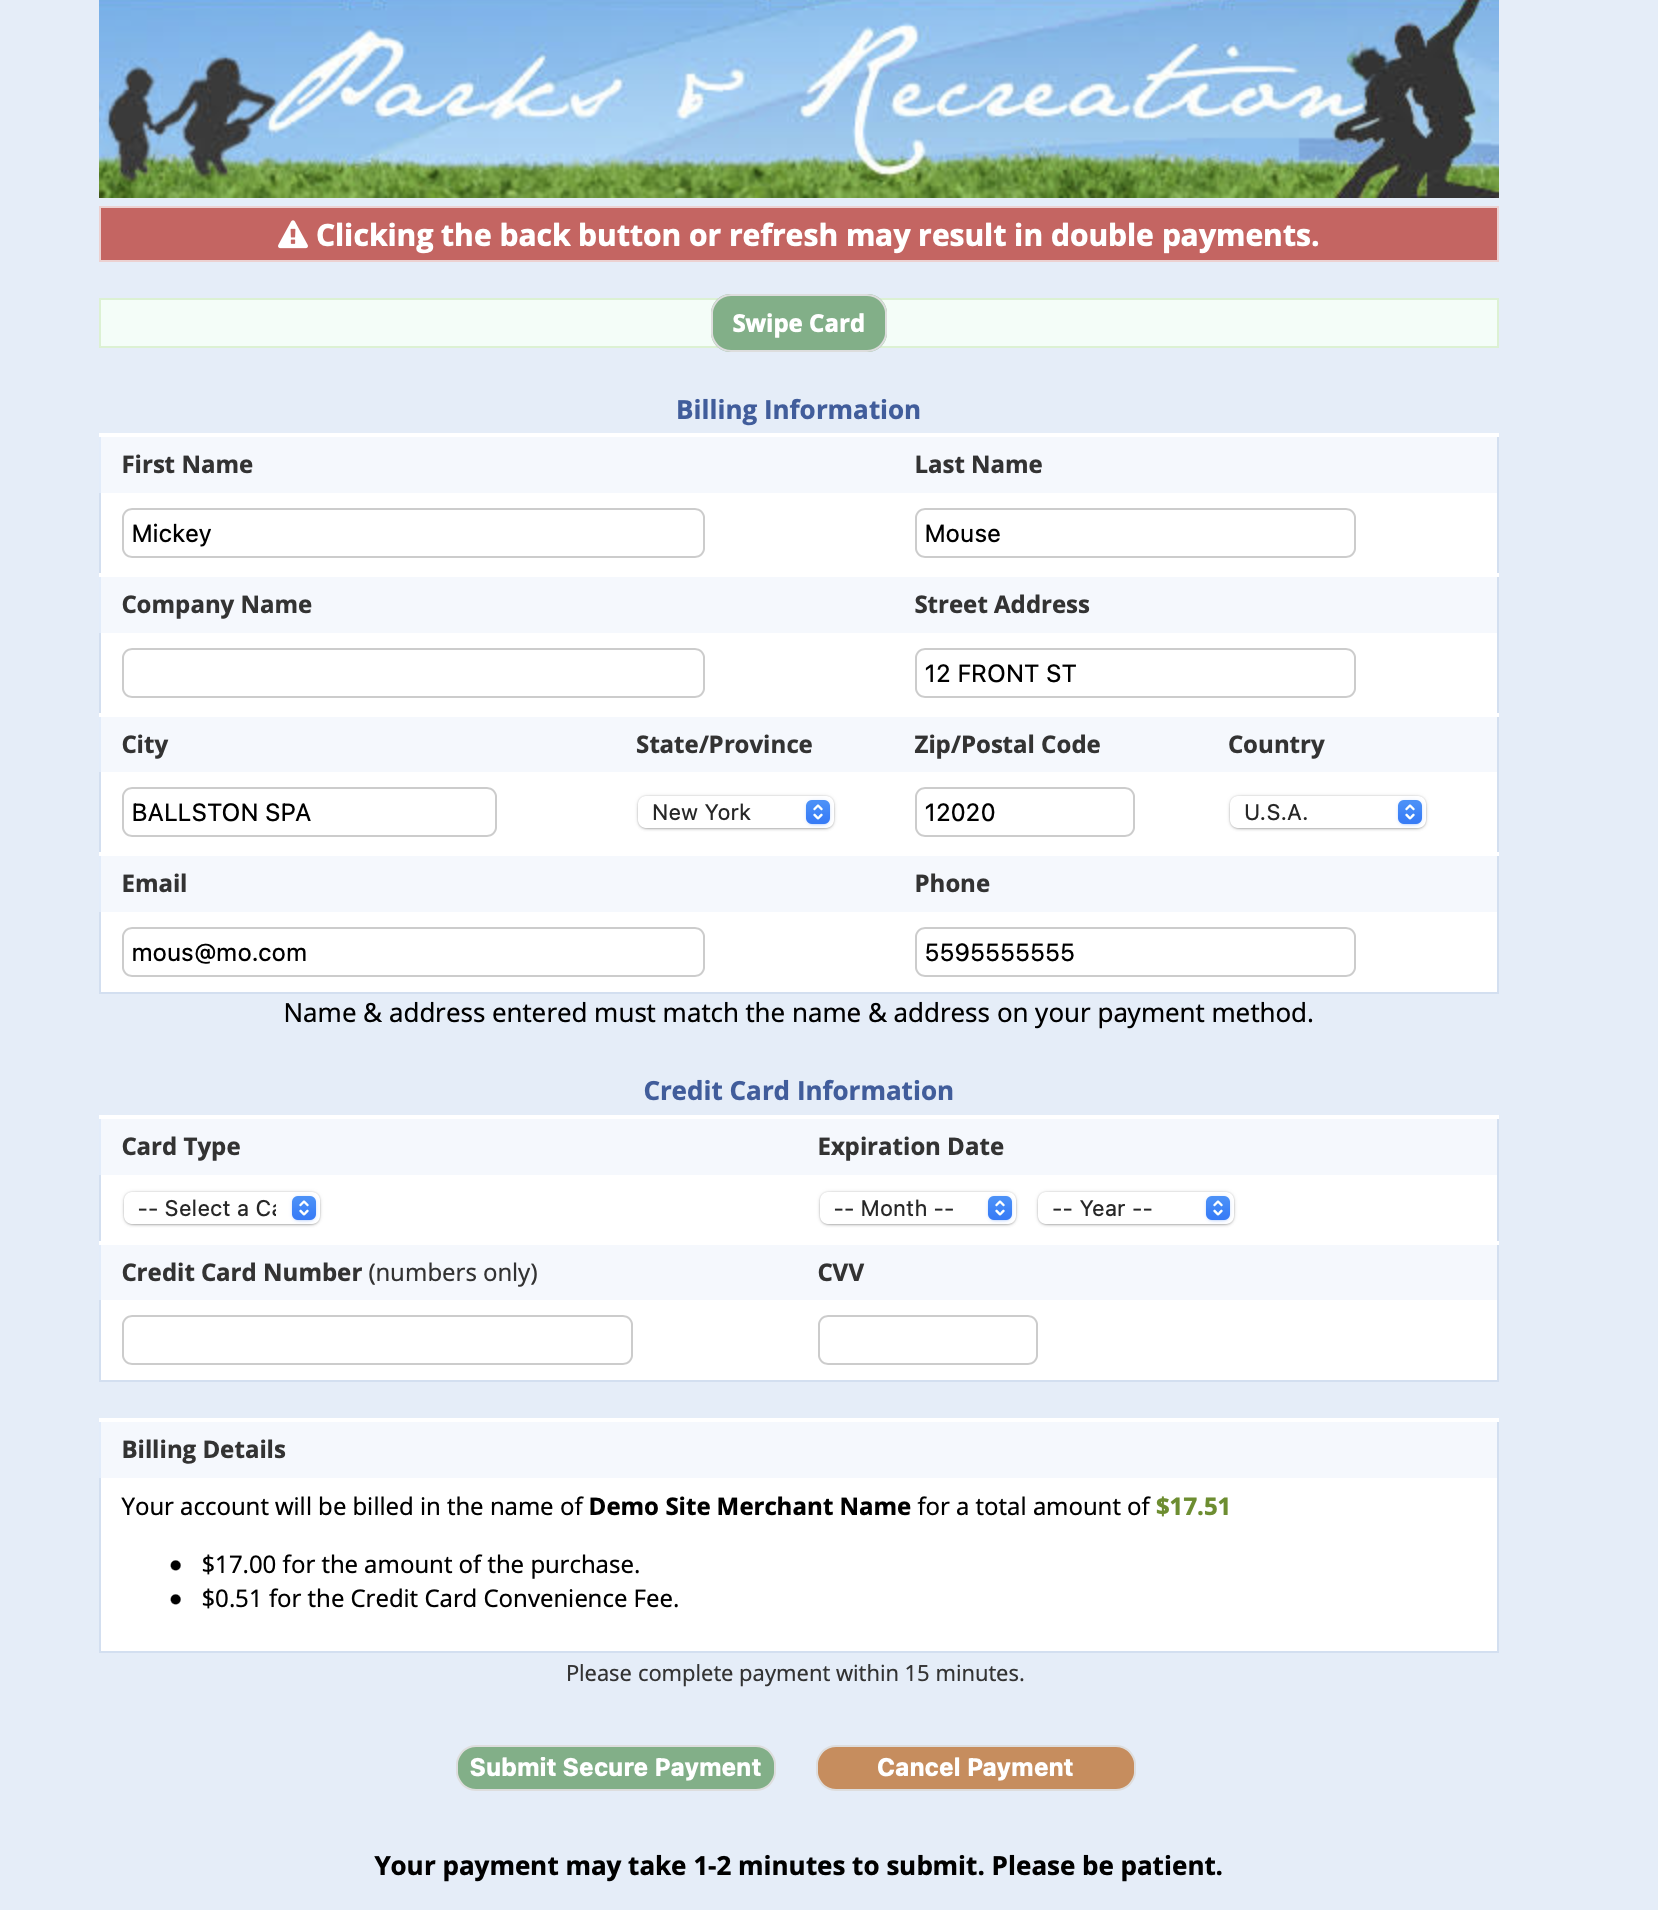
- Select payment type and proceed
- If this was a credit card payment,
- Select Credit Card as the payment type
- if your department has EMV readers, select from the location dropdown
- E-Com transactions will allow you to select a stored card or to enter new payment information, so move to step b
- EMV transactions will be completed on the EMV device
- Select the device from the dropdown
- Click the Pay on Device button
- Follow the on-screen instructions on the card reader
- if your department has EMV readers, select from the location dropdown
- Select Credit Card as the payment type
- If this was a credit card payment,

- if your department does NOT have EMV readers, you will simply proceed to the credit card screen*
- Confirm name and address match the name and address for the credit card
- Choose Card Type
- Enter Expiration Date
- Enter Credit Card Number
- Enter CVV code from back of card
- Or if using a card reader**, click the Swipe Card button at top of screen, and run the card through the reader to populate into the form
- Click Submit Secure Payment and wait for approval
- If declined, you'll return to the credit card screen
- If approved, you'll proceed to the confirmation screen
- Once on the confirmation screen, you may view/print the receipt and/or disclaimer
- Unless you unchecked Send Receipt or there is no email address entered, your customer will receive a copy of this transaction in their email in full, and you will proceed to the confirmation screen
*Payment page shown is for those with Authorize.net and Mx Merchant gateways
Tap to Pay and Similar Options
Google Pay and Apple Pay are only available to specific gateway users and is not available for management-side checkout. Contact Merchant Services to find out more about these options for your department.
**Credit card readers/swipe devices are being deprecated due to security updates by credit card merchants.
Applying Payment - Public
Public User Guide to Spending Account Credits
Copy and Paste, do not Link
This guide is designed for the public customer to use when using their account credits. Please provide a printed copy or copy & paste the content into an email for your customer. You should not send the customer a URL or link to this article.
If you have account credits for your recreation department's site in your household account, these can be used on account purchases as partial or full payment.
These account credits can be the result of
- staff-issued credit
- refund by account credit
- gift certificate redemption
- fund account purchases
Account credits do not have an expiration date in the system; however, your recreation department may have specific policies regarding account credit expiration, account credit forfeiture, moving, etc… so it's best to contact them for more details.
Using My Account Credits as Payment

- Add an item to your shopping cart and process to checkout
- Agree to the disclaimer and complete any purchase requirements
- Click Continue
- Select Check Out Online
- If you select a Pre-registration option, you will need the department to apply the account credit during checkout
- You will need to contact the recreation department directly to have this applied
- If you select a Pre-registration option, you will need the department to apply the account credit during checkout

- On the Review Invoice screen, click the Spend Credit link in the middle of the page
- Edit the credit amount, if needed
- Click Apply Credit
- If the amount of the credit pays the balance due in full, you will see a Process button

- Click Process
- Your purchase is complete and a receipt of the transaction is in your Account (you may also receive confirmation via email)
- If the amount of the credit does not pay the balance due in full and there is still a payment required, you will see a Continue to Credit Card Form button

- Click Continue to Credit Card Form to pay the difference between the account credit being spent and the total due
- Finish the payment process by entering and submitting the payment details
- Your purchase is complete and a receipt of the transaction is in your Account (you may also receive confirmation via email)
- If the amount of the credit pays the balance due in full, you will see a Process button

Removing Account Credits
Account credits represent money that you have retained as income. Therefore, account credits do not expire. Credits are only removed from accounts through three actions.
- Spending credits
- Credits will reduce as customers spend them on open balances and new purchases
- Voiding the transaction that originally issued the credits
- If credits were issued in error, you may locate the transaction via the Account Credit History Report on the account's finance tab and void this transaction
- Note that if this credit was issued as a refund, you may need to balance the associated invoice
- If credits were issued in error, you may locate the transaction via the Account Credit History Report on the account's finance tab and void this transaction

- Go to the Account
- Navigate to the Finance tab
- Click Account credit History
- There are other ways to access the transaction you would like to void, this is just one suggestion
- Click on the transaction ID

- Enter a reason for the void
- If you need to balance the invoice check the box to remove balance and enter a reason
- Click Void Transaction
- Refunding credits
- This returns the money to the customer via cash, check, or credit card
- Note that credit card refunds require a manual refund to be performed in your merchant gateway
- This returns the money to the customer via cash, check, or credit card

- From the account's main tab or finance tab click Refund Account Credit

- Enter the amount to refund
- Choose the payment type
- Please note that is credit card it chosen the refund must be done manually within the merchant gateway
- Enter a reason for the refund
- Click Issue Refund
If your department wishes to expire account credits, please contact support (support@myrec.com or 802-465-9732 option 1) to determine the best method for your department.
Transferring Credits to Different Account
Sometimes families with unused credits may wish to give their credits to different account. The best way to achieve this is through the use of a Gift Certificate.
- The household with credit will purchase a gift certificate using their available account credit
- The household receiving the credits redeems the certificate when logged into their account
To find more details on creating and using gift certificates please read, Using Gift Certificates (POS).
Reports
Account Credit Report
This exportable report provides you with a list of all accounts with available credits.
- Open the Reports tab
- Open Financial Reports
- Under Other Reports click Account Credits

The Account Credit Report includes
- An option to export the report
- Direct links to the household account
- The total available account credits within a household account
How credits impact income and disbursement reports
Credits on an account represent undisbursed funds that your department has taken in as income. Money that was previously taken in can become credits. This action removes the monies from the budget group it was previously disbursed to but does not issue a refund to the customer. When the customer later spends their credits, the monies become disbursed once more, however you are not receiving income at the time the credit is spent.
Both the Income Summary Report and the Budget Group Income Summary Report can be viewed with or without credits. Various financial reports allow you to filter by payment type allowing you to exclude credits in the report if desired.
The Income Summary Report is recommended for your regular reconciling practices. This reports the money that was received and refunded during the date range in review. Account credits issued and account credits used are both within this report, however for reconciling purposes you may choose to look at this report without credits as credits issued and used do not impact the monies received by your department during that date range. Or you may keep the credits in the picture and reconcile each payment type with what was received at the department.
The Budget Group Income Summary Report shows which budget group funds should be placed in based on the purchases and refunds during the date range. The totals of this report can differ from the income summary report. This is because credits may represent money which was brought in during an earlier date range.