
Use MyRec.com's membership feature with digital membership cards and facility access scans to keep a record of worker arrivals and departures at specific facilities and facility areas within your system. This is not tied to your third-party payroll, but it functions as a timecard punch system to report hours and locations. This is great for tracking volunteer hours, staff shifts, and even tutoring sessions for after-care.
Creating a Scannable Worker Timecard
Creating the Template
Membership cards can be printed for users or can be accessed digitally through the user account. You must add one or more card templates to create membership cards before they can be used.
How to Create a Card Template
- Go to Administration tab in lefthand navigation, then Settings
- Click on the Membership Card Settings tab
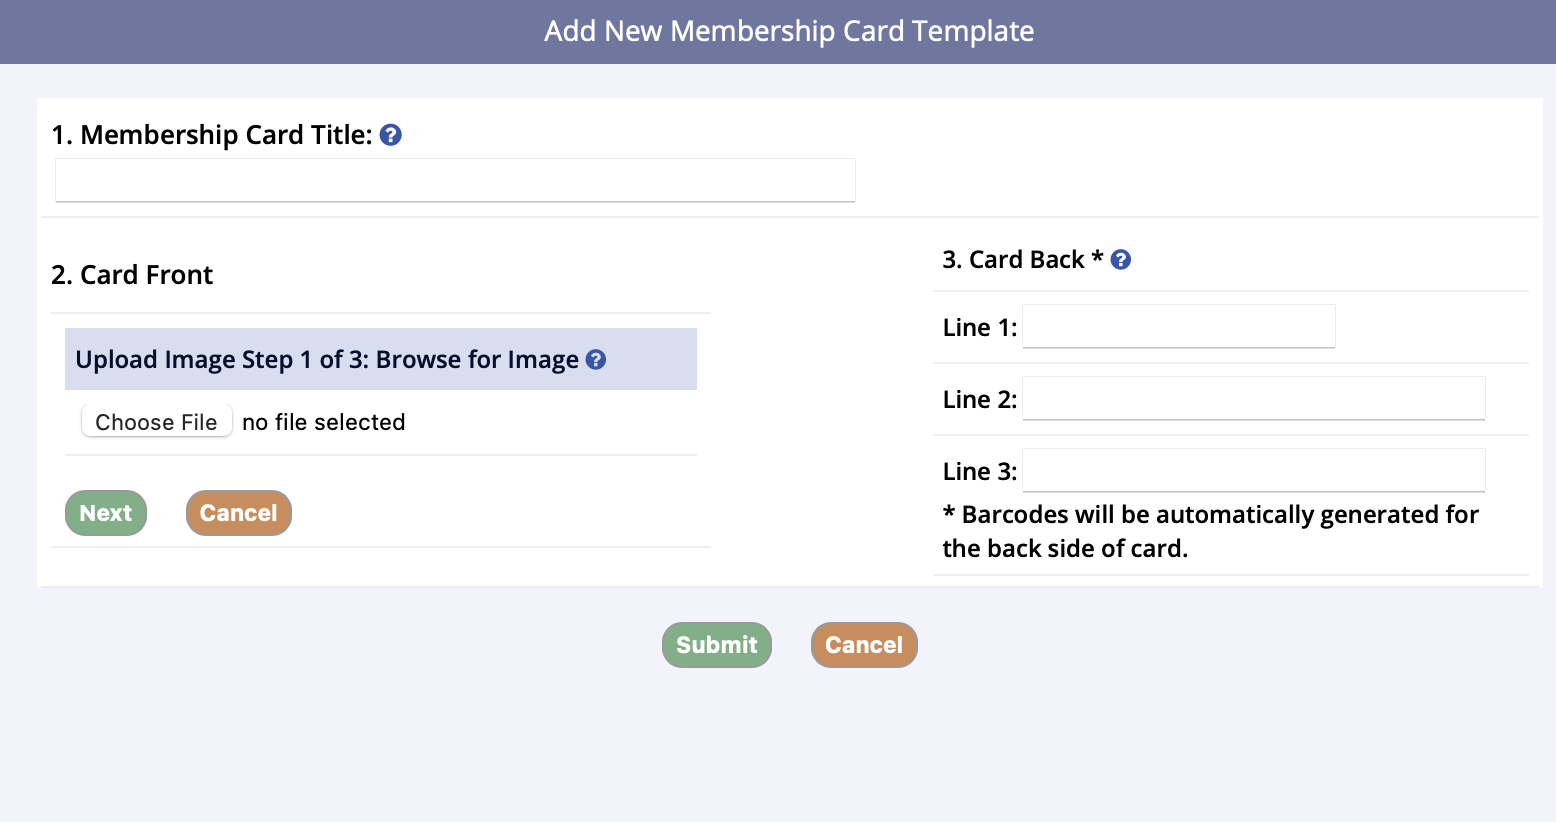
- Click Add New Membership Card Template
- Enter a title for the card
- For the Card Front, you must upload an image
- There are three steps to this.
- The first step is to upload an image
- Under Upload Image, click Choose File, then Next
- The second step is to crop the image if you wish, or you can leave it as is
- Click next.
- The final step is Save Image
- You can either save the image, re-crop the image, or cancel
- The first step is to upload an image
- There are three steps to this.
- Next, enter the information on the Card Back
- You need to enter at least one line of text
- There will be three lines to enter
- The first one can have 25 characters, while the second and third are 50 characters
- Also, barcodes will be automatically printed under this text based on the account member’s membership card id
- When you are finished entering the information, click Submit
This is an example of a simple staff/volunteer membership card with the Member's Name on the Card, an image, and all three lines of text. This card is digital and can be saved to a mobile device or even printed out on paper or cardstock and scanned at the barcode reader station. Read this article for more info about Digital Membership Cards.

Create the Staff/Volunteer Membership
To create a membership, there are some basic setup components.
This example shows specifics for a timecard membership setup.

- The Membership Length for this Time Clock membership is a lifetime length
- If a staff member or volunteer leaves the organization, you can expire their membership when they leave
- With a lifetime membership length, you will not have to renew their time clock membership every year or more often
- The Membership Type for this membership is an individual type for one member and is called Worker/Volunteer for simplicity
- The Membership can be built once the type and length are created, and there is a description to explain the membership's purpose
- This membership is for ages 14 and up, has no cost since it is a timecard membership, and has a digital membership card (see the section above this) to allow facility access to three facilities.
- Facility Access is added in the Edit this Membership screen at the top of this page
- This membership is for ages 14 and up, has no cost since it is a timecard membership, and has a digital membership card (see the section above this) to allow facility access to three facilities.
- Make sure this is set to Show Public and Show Management
Create a Membership
Memberships can be used to allow access to certain facilities or provide discounts/limit access to activities. They can be limited to certain amounts of people or age by the Type assigned. They can also be provided for different amounts of time by the Length assigned.
Setting Up Memberships
- Go to the Memberships tab in the left-hand navigation, then click Add New Membership
Info
If you do not see the Memberships tab, contact MyRec.com staff for training to turn the module on for you.

- Enter Membership Details
- Membership Name: (required) Enter the name of the Membership
- Order #: (required) Identifies the position in the listing of Memberships
- Consider assignment based on similarities or alphabetize
- Status: (required) Defines if the membership is Active or Inactive
- Set to Active by default
- Description: (optional) Enter text describing the membership
- Suggest entering any specifics related to the membership such as card duplication fees, if pass is non-transferrable, etc…
- Global department information should not be entered
- To enter html code, click the HTML link and enter code
- Photo: (Optional) Select a Photo from the Photo Pool and select either upload your own photo or choose from the provided Stock Photos
- Special Settings
- Promo type
- Allows the membership to be declared as a promotional (non-donation) item for checkout
- Restricted - means this membership will only appear as a promotional membership suggestion on those memberships that have selected it
- Global - means it will appear on all memberships as a promotional item
- Allows the membership to be declared as a promotional (non-donation) item for checkout
- Promo type

- Show Promotional Memberships
- Allows selection of declared promotional items for display on checkout when registering for this membership (ex. You might also like...)
- Any past or cancelled memberships will be denoted with *Inactive and will not be asked at checkout
- Show Add-On Products
- Allows membership to suggest/require purchase of products during checkout
- Next, click Submit
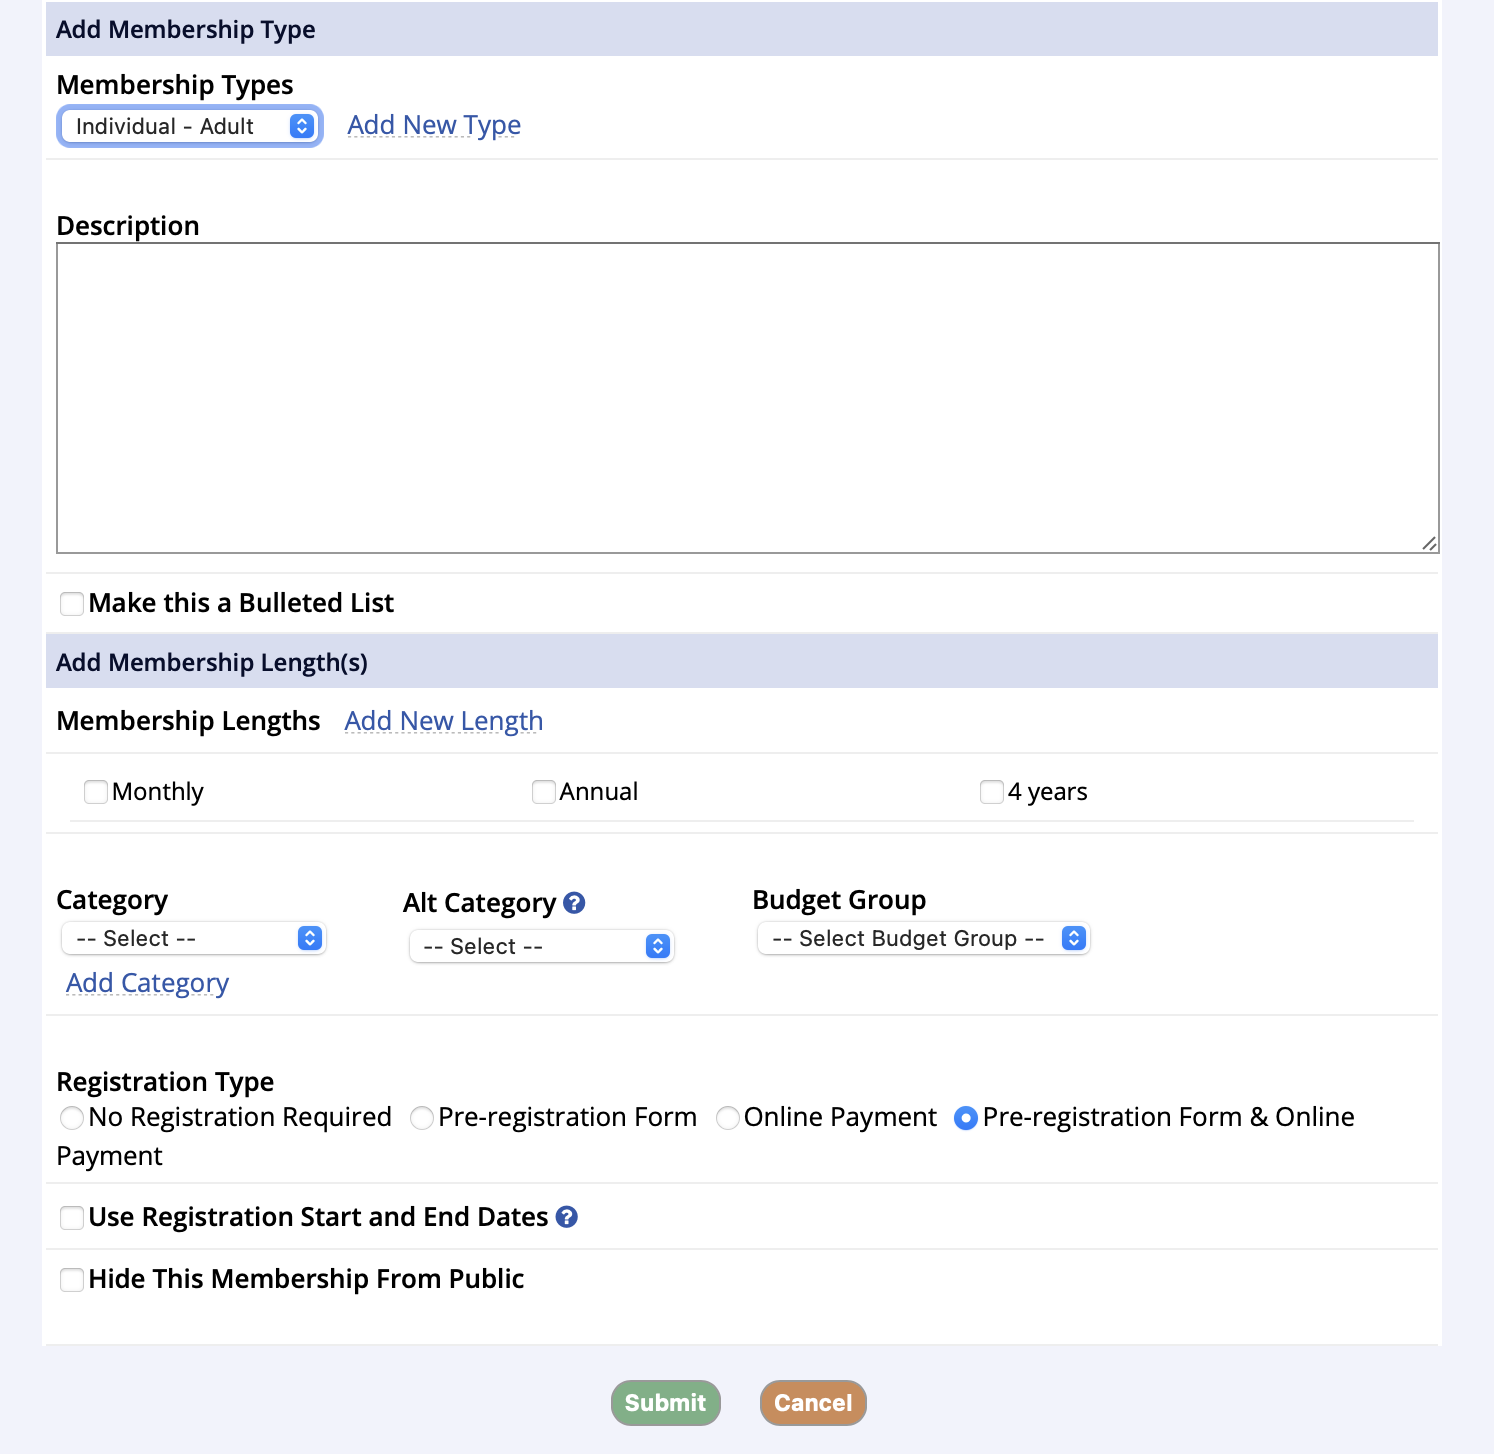
Create the first Type/Length
The next screen allows the first Type to be created and the Lengths to be associated with it.
- If the Type that is needed is not in the drop down menu, create a new Type by clicking the Add New Type link
- Types are used to assign who you’d like to allow to purchase the membership
- You can add multiple Types under a membership, but you can only add one at a time
- After selecting a Type, choose the lengths to be associated with it
- Lengths are used to determine how long a membership Type will be valid for before expiring
- Multiple Lengths can be assigned at once
- Click the Add New Length link to create a new one
- Complete the category, budget group, and registration type
- Category: (required) Memberships will display under the assigned Category from the public side
- Budget Group: (required) - Assign the applicable Budget Group for journaling to the revenue account
- Registration Type: (required) Select the RegistrationType applicable to the membership
- No Registration Required – select this option if the membership does not require participants to register
- Printable Form Only – select this option if the membership can only be purchased via printable form
- Online Payment Only – select this option if the membership may be purchased and paid in full online
- Online Payments & Printable Forms – select this option of online payments or printable forms are permitted through the public side
- Registration Start and End Dates: Select the option to specify the parameters for opening and closing registration dates
- Click Submit to save or Cancel to exit out of the membership – all additions/changes will be lost
- After clicking submit, the system will automatically advance to Edit Membership Fees
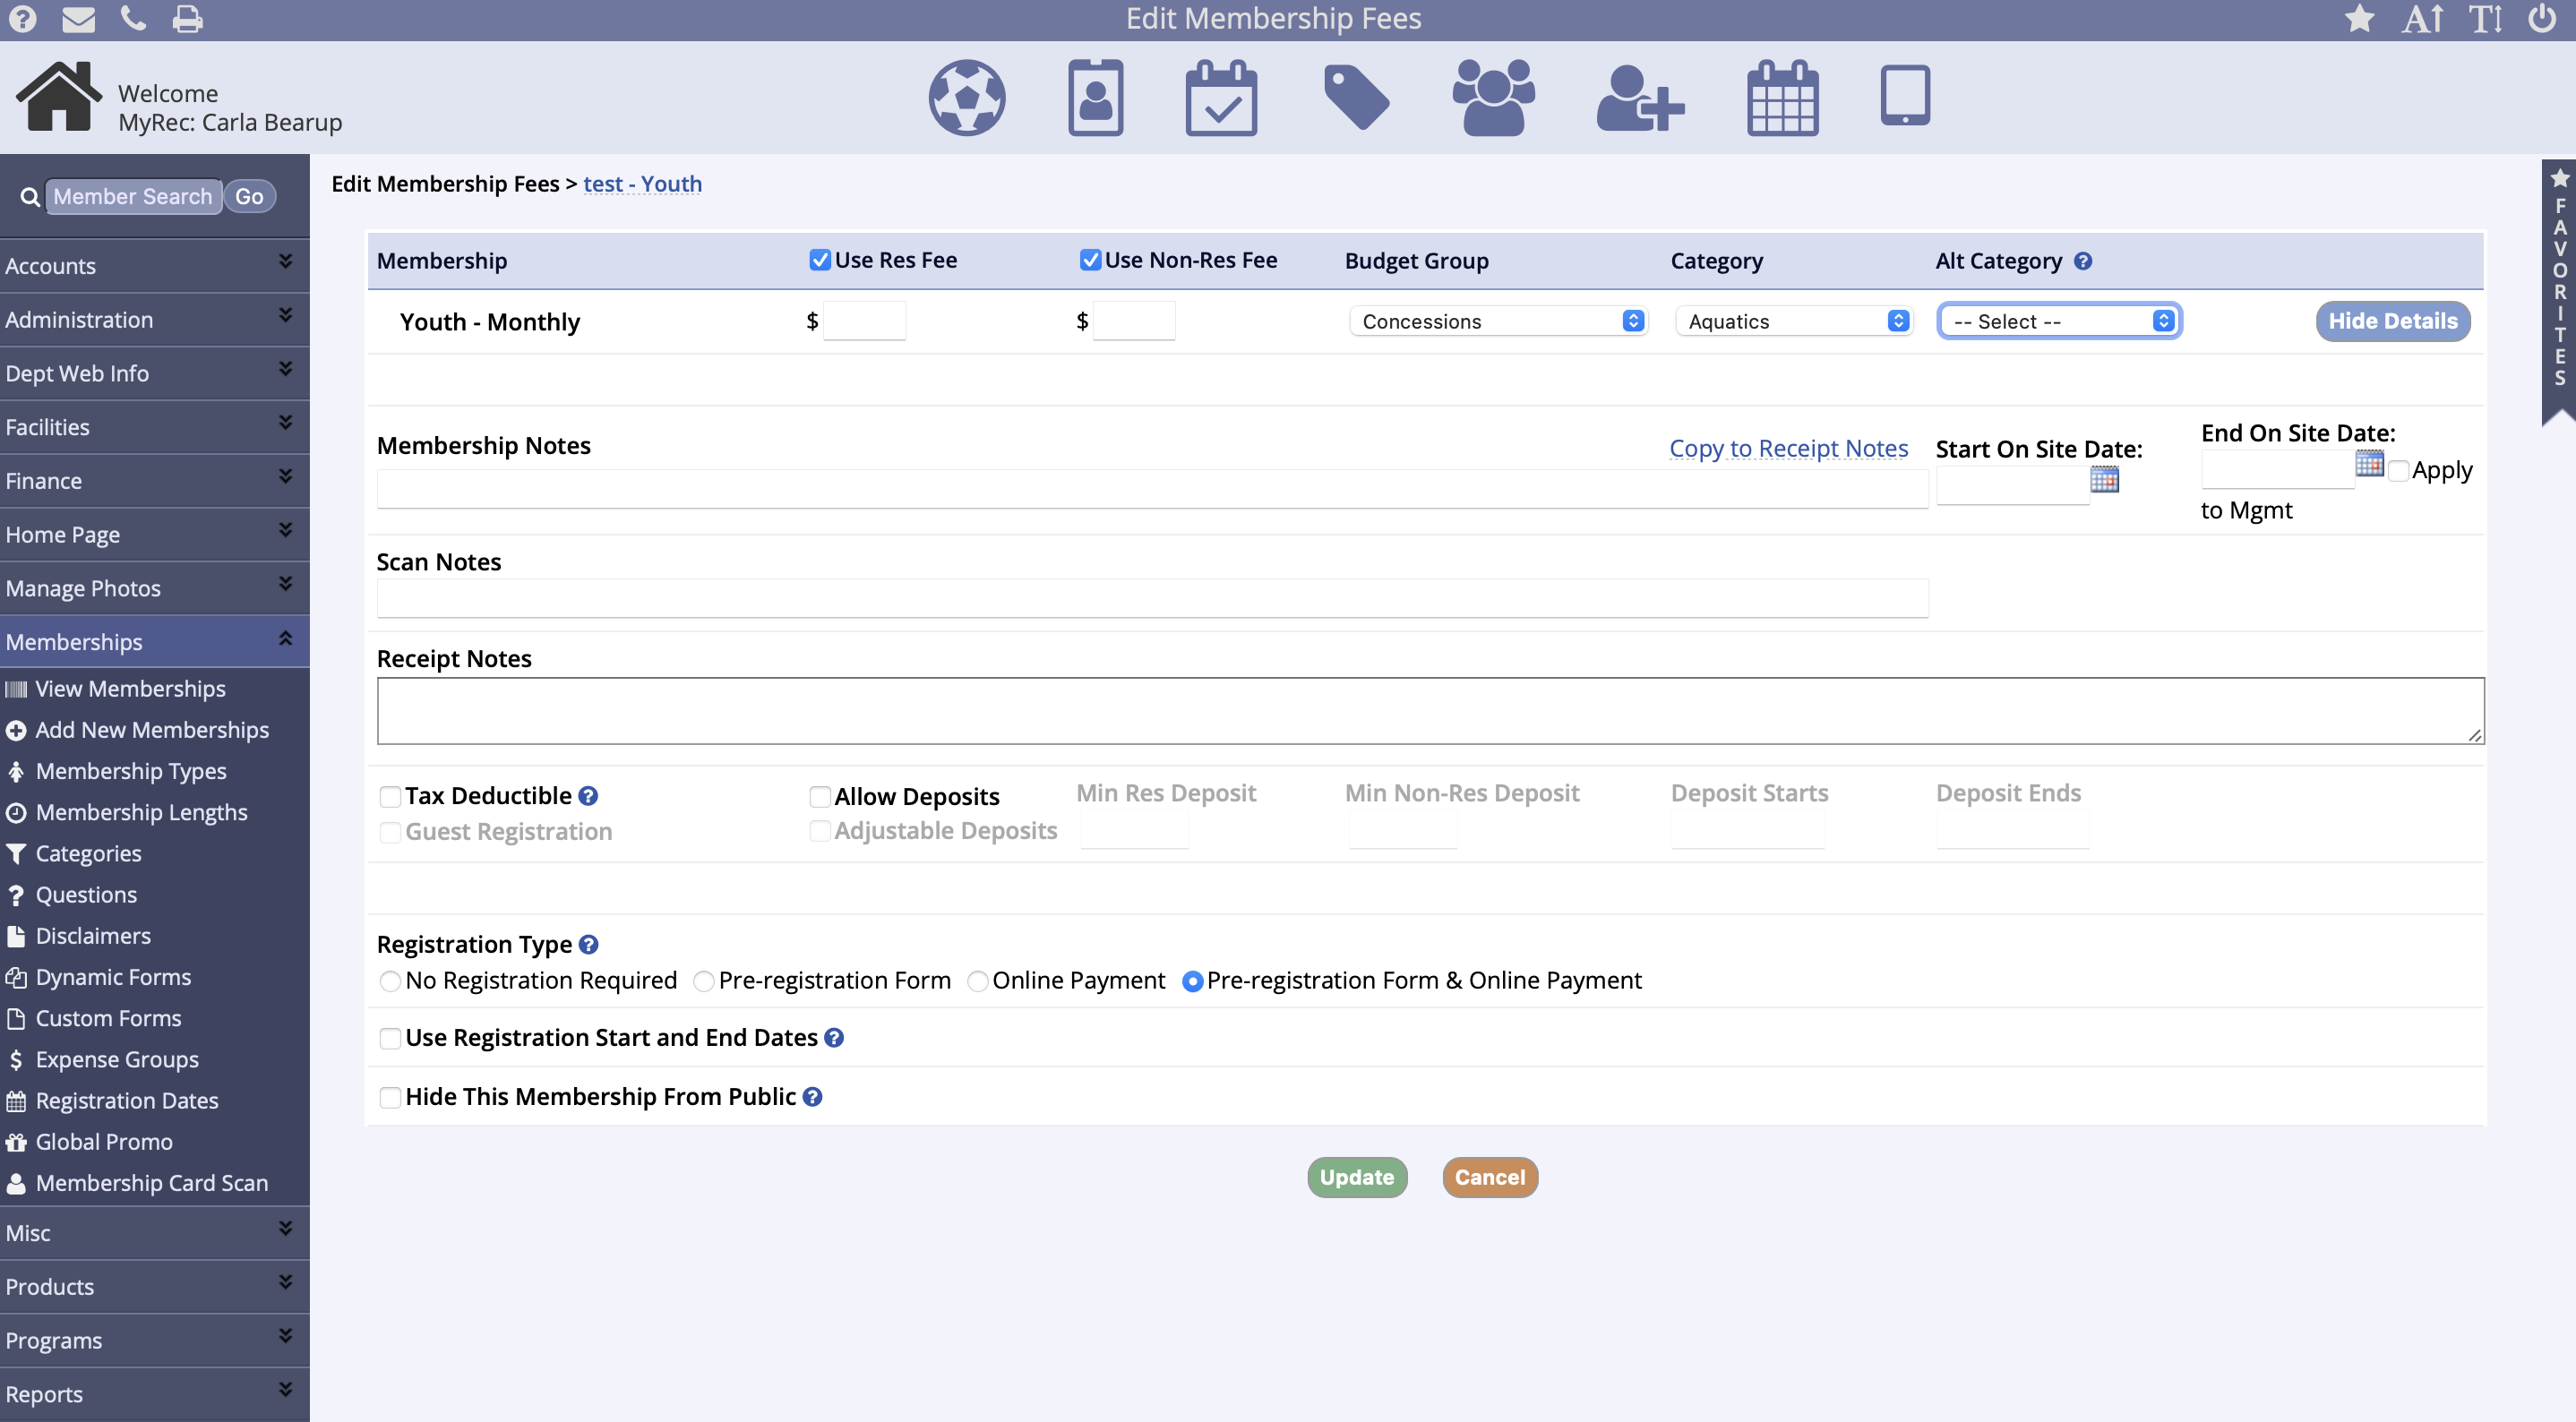
Edit Membership Fees
- Res Fee - Enter the amount Residents will be charged. Non-Res Fee - Enter the amount Non-Residents will be charged. (Note: The Non-Resident fee should be the entire fee, not the difference between the resident and non-resident rate.)
- You can edit additional information about the length by clicking the Show Details button.
- Start on Site/End on Site: (optional) - The Start and End on Site fields provide date delimiters for when the membership will begin showing and ending on the public side.
- Membership Notes - Show on the Membership page under this Type/Length on the Public Site.
- Scan Notes - Show when the membership card is scanned that has membership purchase.
- Receipt Notes- Show on the printed or emailed receipt / invoice.
- Tax Deductible - Checking Tax Deductible catagorizes this item for customers. All items that are designated as tax deductible appear under the account finance tab under the Tax Deductible view. Viewable for both public and management account views.
- Allow Deposits - Allows for registration of the membership with only a designated portion of the registration fee to be paid. The remaining portion will be owed on the account.
- Hide From Pub Check this field to hide the membership from the public side.(Note: checking this field does not just hide the fees, it hides the Type/Length of the membership entirely.)
Add Additional Types
After creating a new membership, it is possible to add additional types, thus creating additional membership purchasing opportunities. For example, if your department offers several membership options for summer swim passes, create the first swim pass, then continue to add using the Add New Membership Type link.
Add Facility Access to the Membership
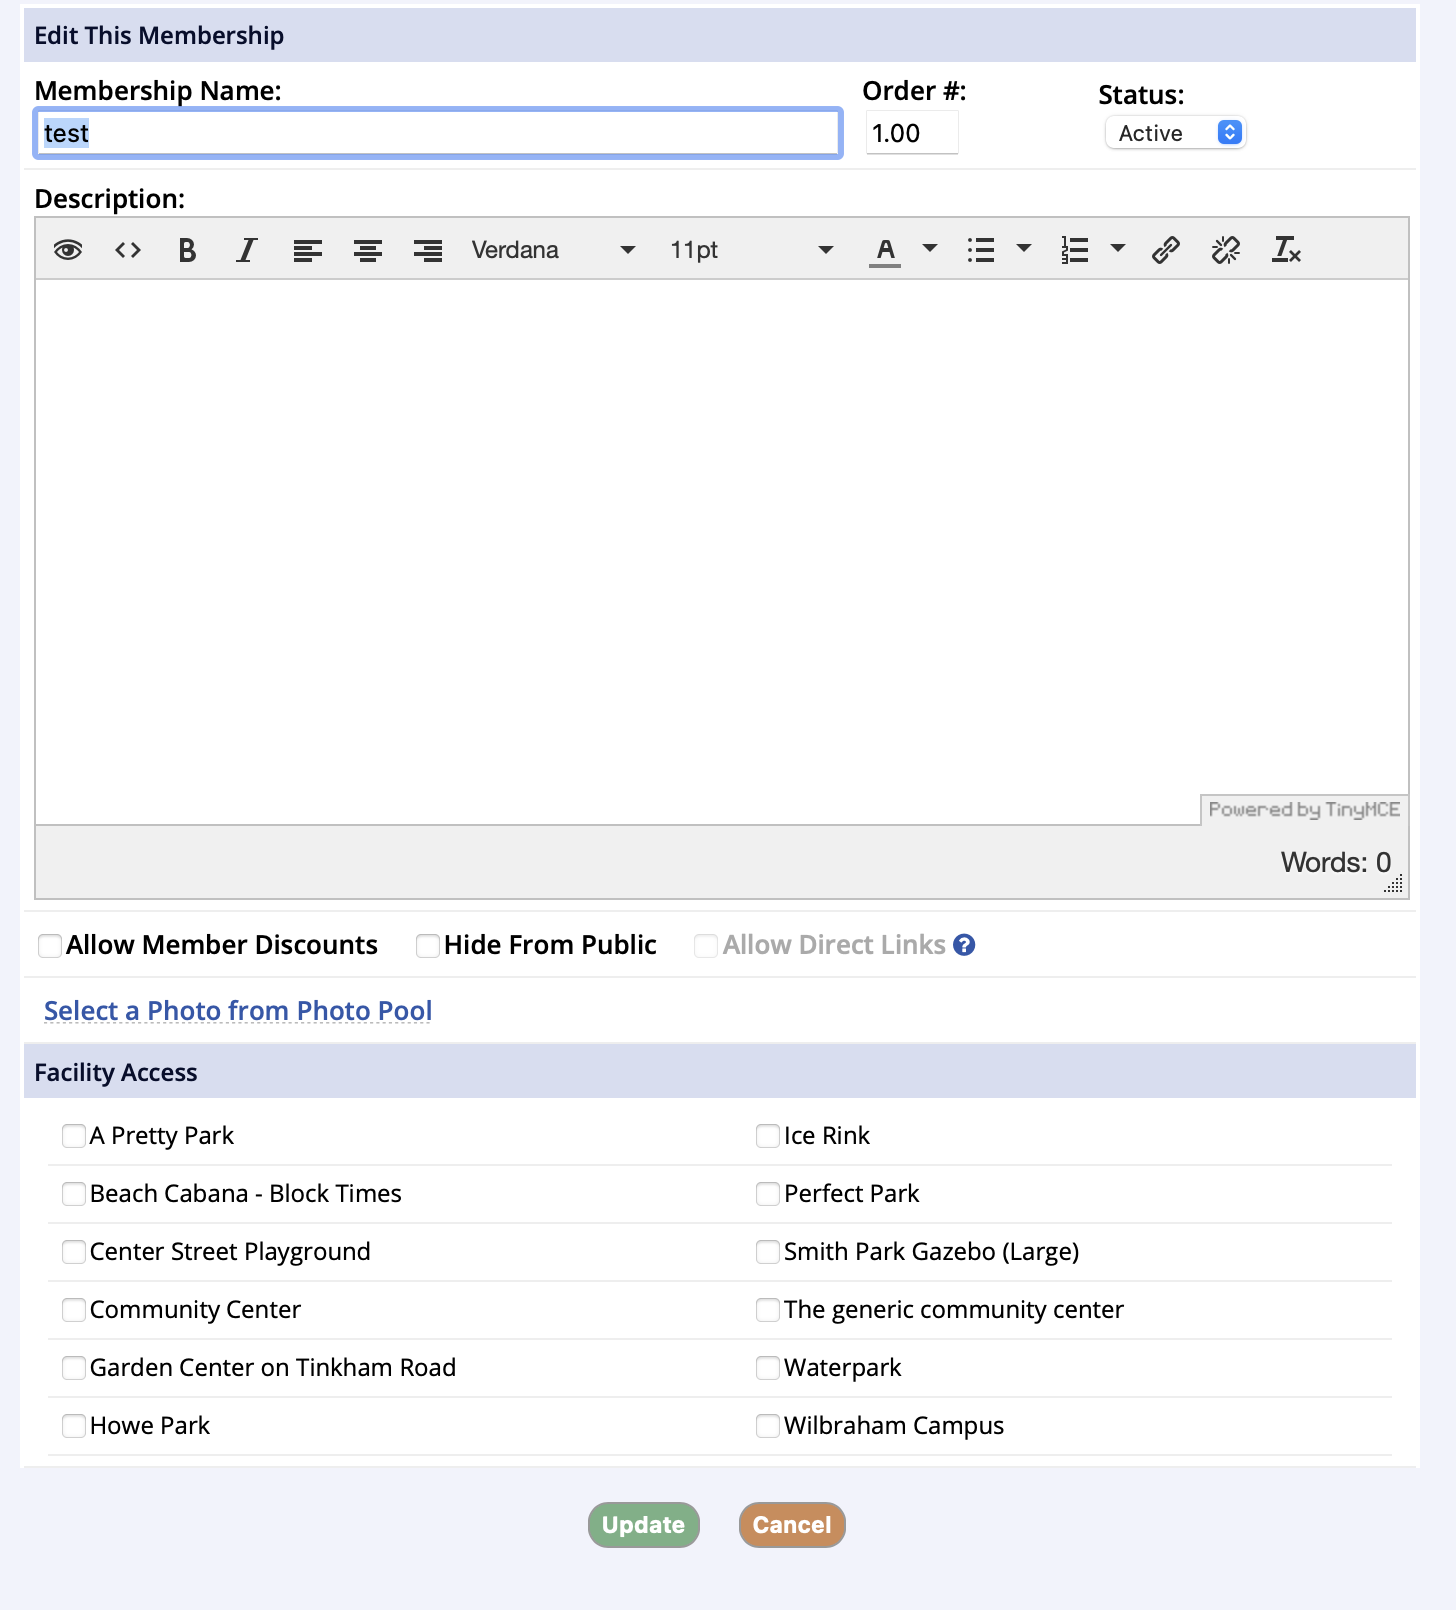
Facility access allows you to associate the membership with a facility. This is useful if you are intending to use membership scans.
- To add Facility Access to a membership, go to the Membership from the View Memberships link in the Memberships tab
- Click Edit This Membership / Photo
- At the bottom of the screen check off the Facilities that this membership grants access to and the click Update
Public Registration
You can add a public-side homepage icon or navigation group option for ease of use, or you can find this membership under the Memberships list on your homepage.

- The worker or volunteer will find the membership from the public side and click Register Now
- The membership is per individual, so if there are multiple household volunteers, they can select the checkbox for each person who needs a timecard
- Click Add to Cart
- Read and complete any disclaimers, questions, or other requirements built into the membership and click Continue
- Click Checkout Online
- Since this is a free transaction, click Process
- To save the timecard to their device or to print it on a print, they will click View/Print Receipt
- Click View Membership Card(s) on the invoice popup
- Save or print as needed per their device

Scan In/Out at the Facility
There are several ways to use a membership with facility access to scan into a facility. The card will have a barcode for scanning, a number for manual entry, or the Member Search can be used from within the Facility Access Portal in the POS.
Facility Access Portal
The Facility Access Portal can be accessed through the POS portal and several shortcuts from the management homepage.
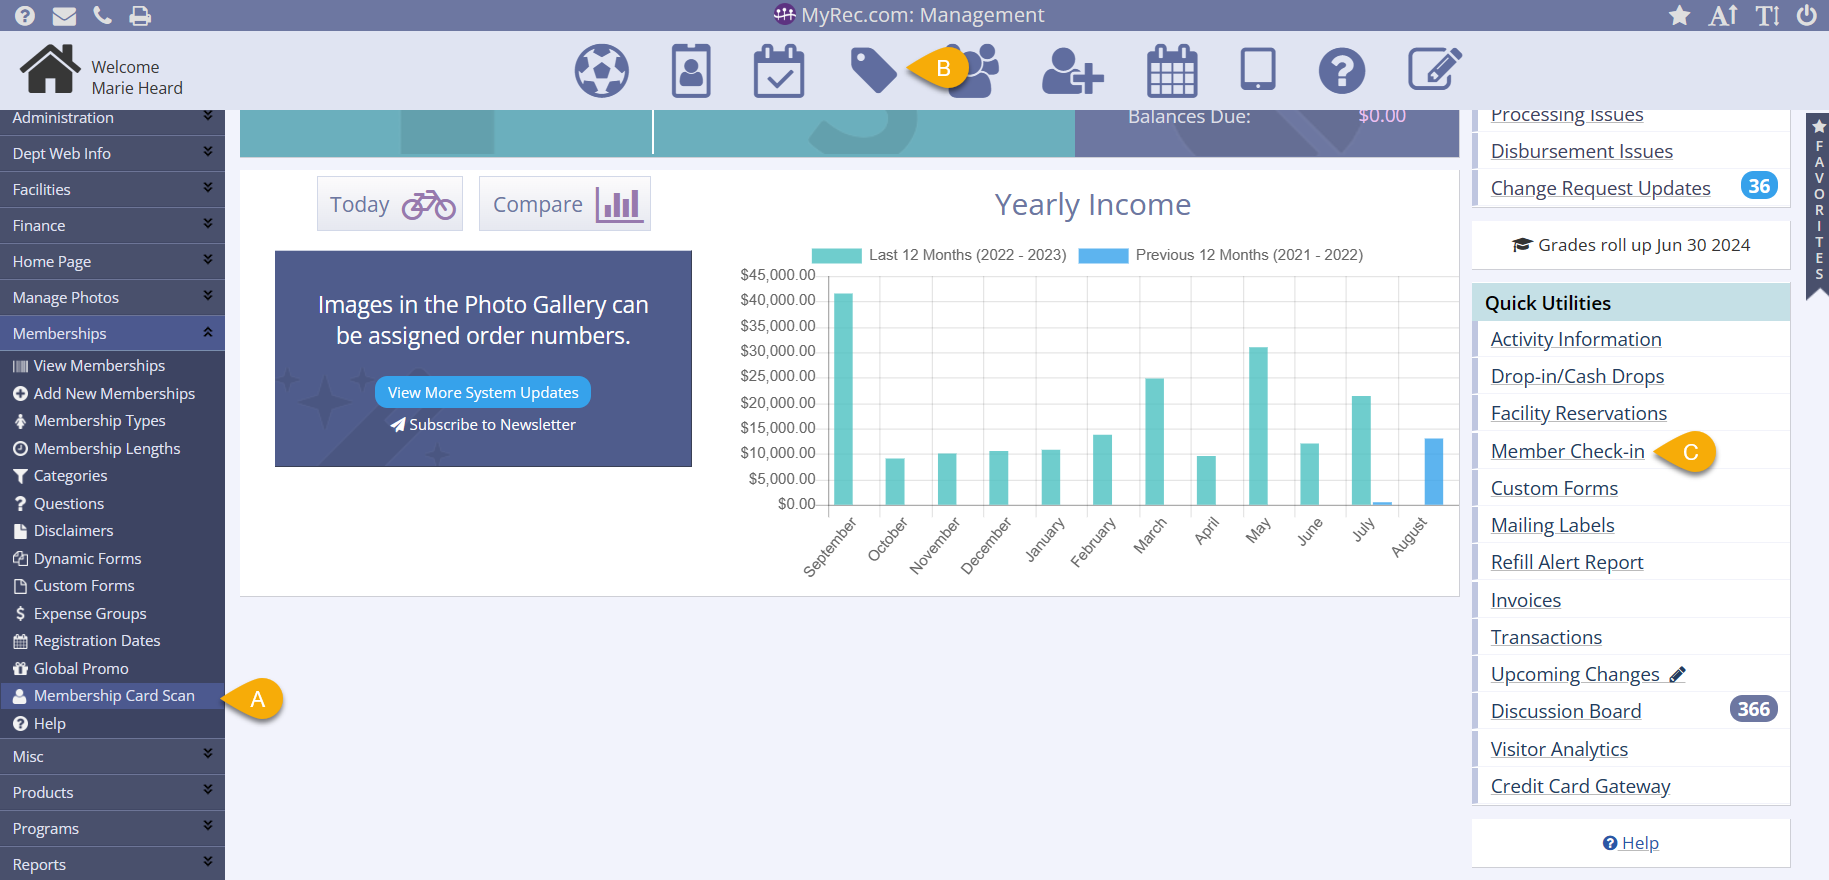
Scanning a Member Into a Facility
- To give a member access to a facility, you can open the Facility Access Portal
- In the Membership menu on the leftside navigation bar
- By clicking the POS icon on the top of the management screen
- By using the Member Check-In link in the Quick Utilities box on the right side of the management homepage
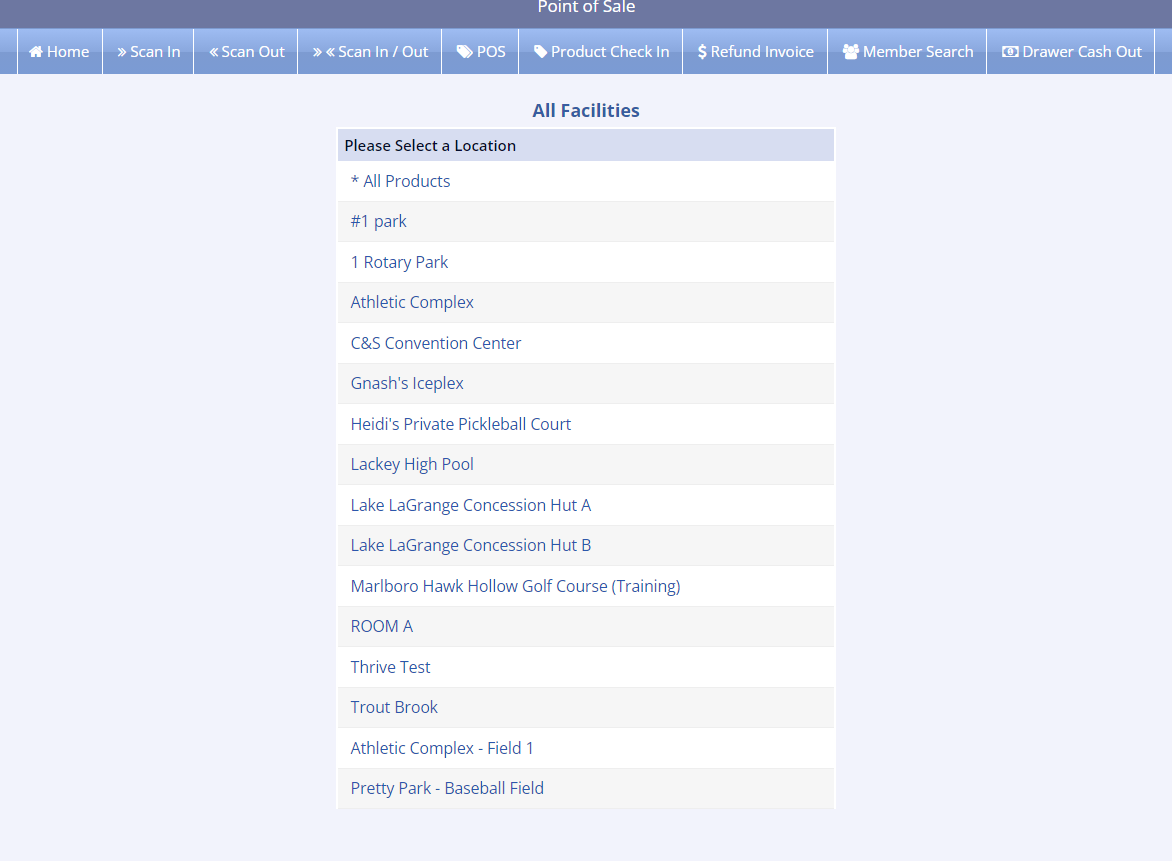
- Select the facility
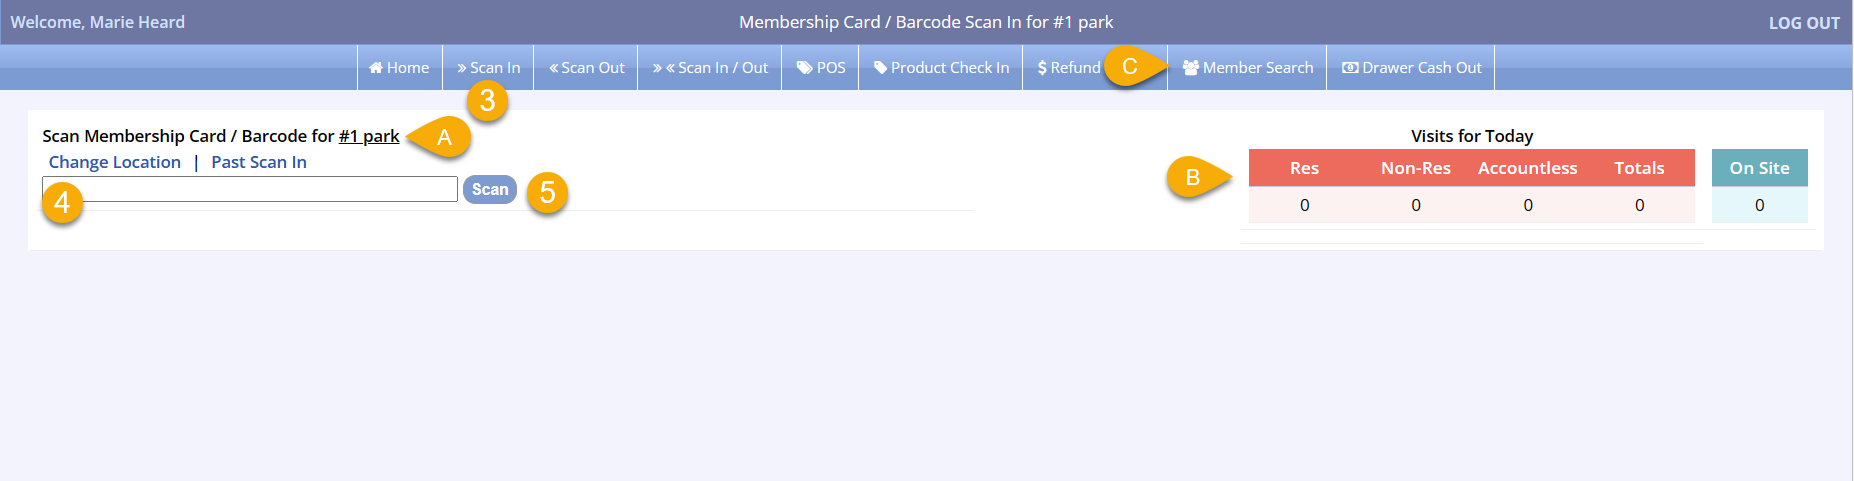
- Click Scan In from the bar along the top of the screen
- Note the location you selected on the previous screen is displayed
- The Visits for Today are display on the right side of the screen
- If you do not have the membership number to enter, which allows access to the facility, you can select Member Search in the top option bar to find the member
- Enter the barcode membership number or Scan the barcode using your barcode scanner
- Click Scan
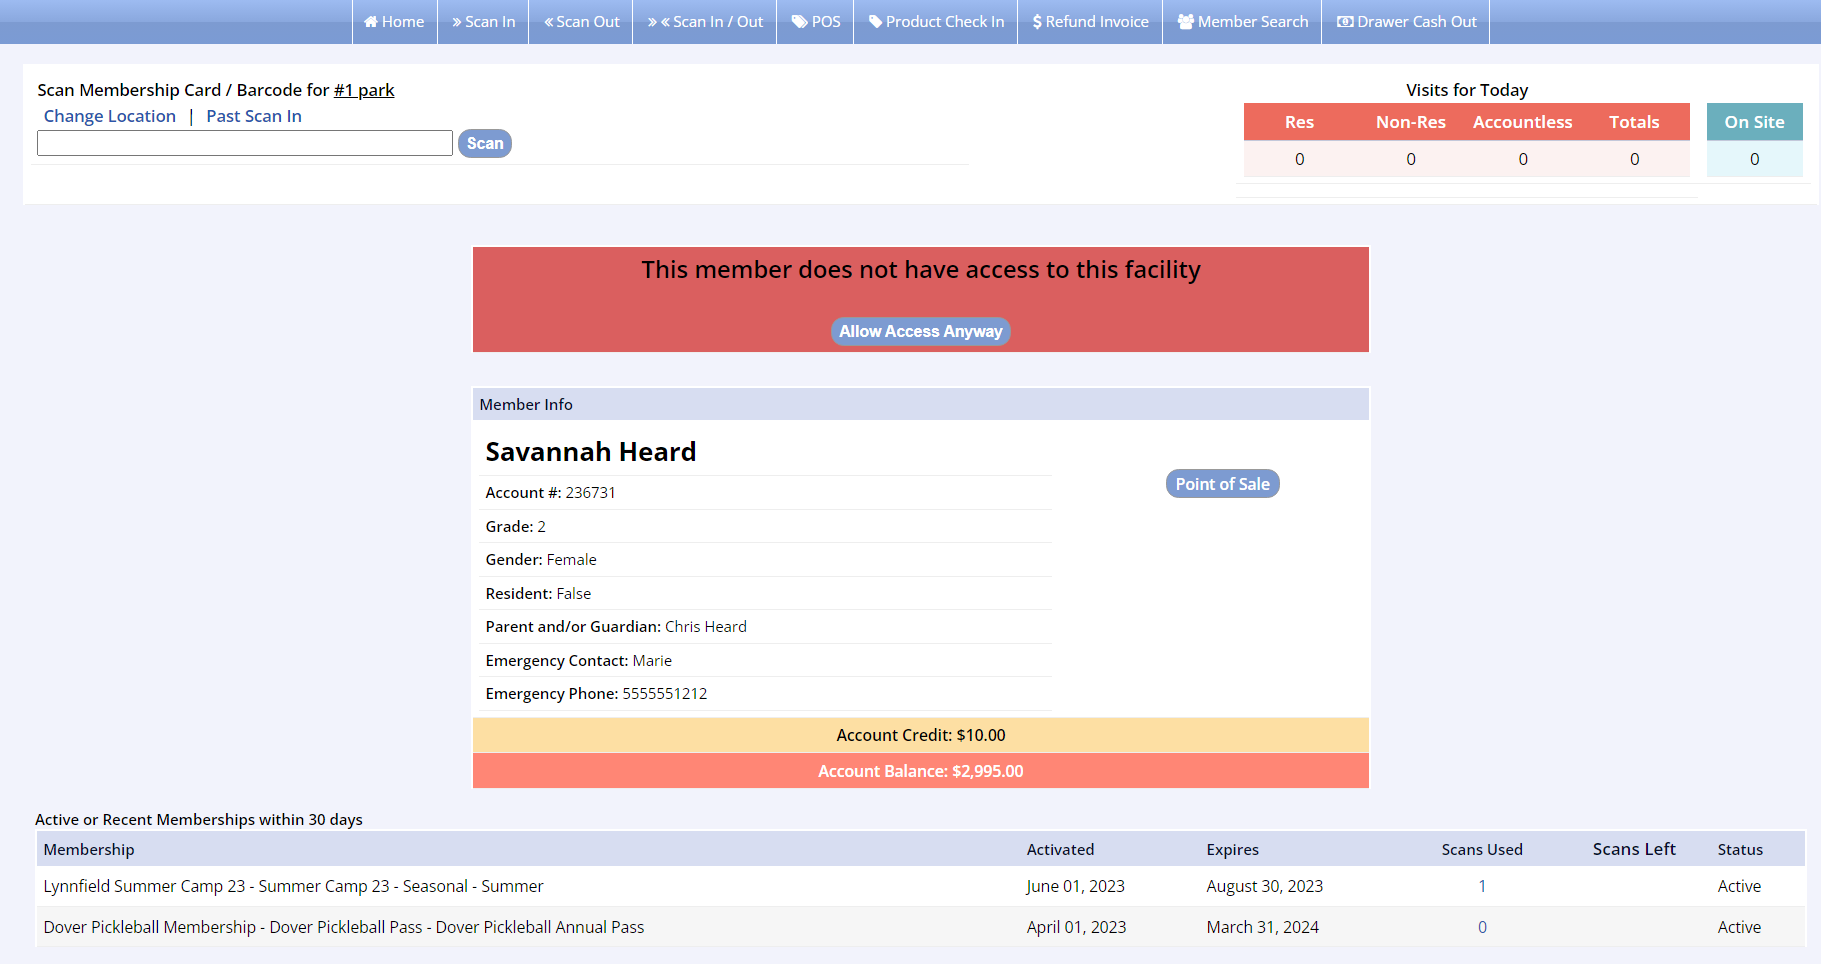
Member Does Not Have Access
- A red bar will be display and an alert will sound (if computer audio is working) to indicate that the member scanned does not have access to this facility
- You can override this by clicking Allow Access Anyway
- You can visit the member's Point of Sale
- You can view active or recent memberships at the bottom of the screen
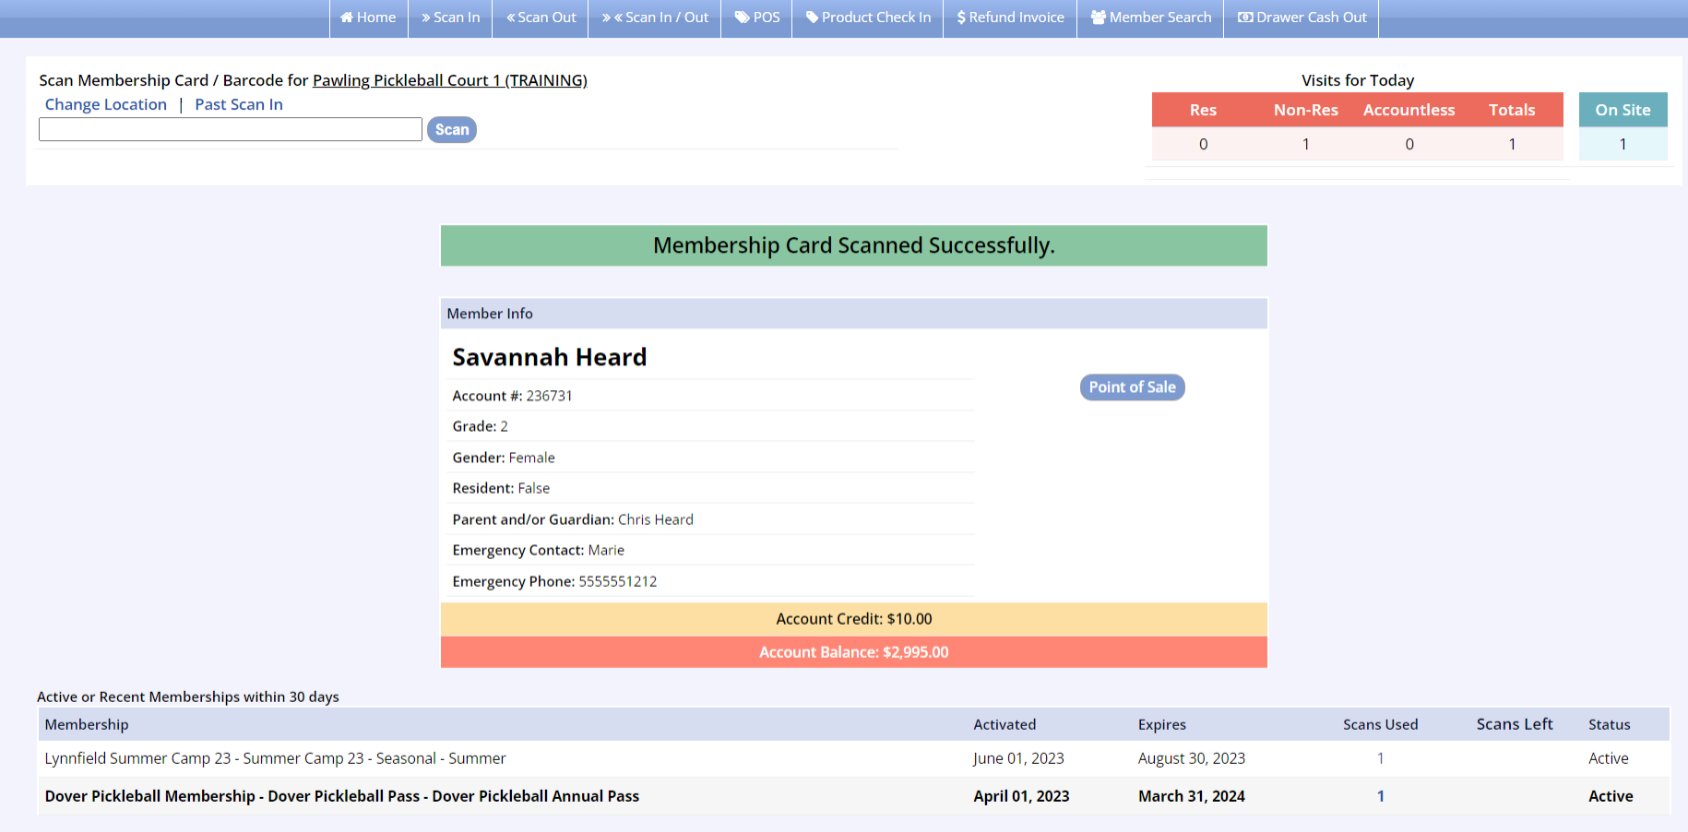
Member Does Have Access
- A green bar will be display and a doorbell will sound (if computer audio is working) to indicate that the member scanned does have access to this facility
- You can see the Visits for Today in the upper right corner has been updated to reflect the member's access
- You can visit the member's Point of Sale
- You can view active or recent memberships at the bottom of the screen
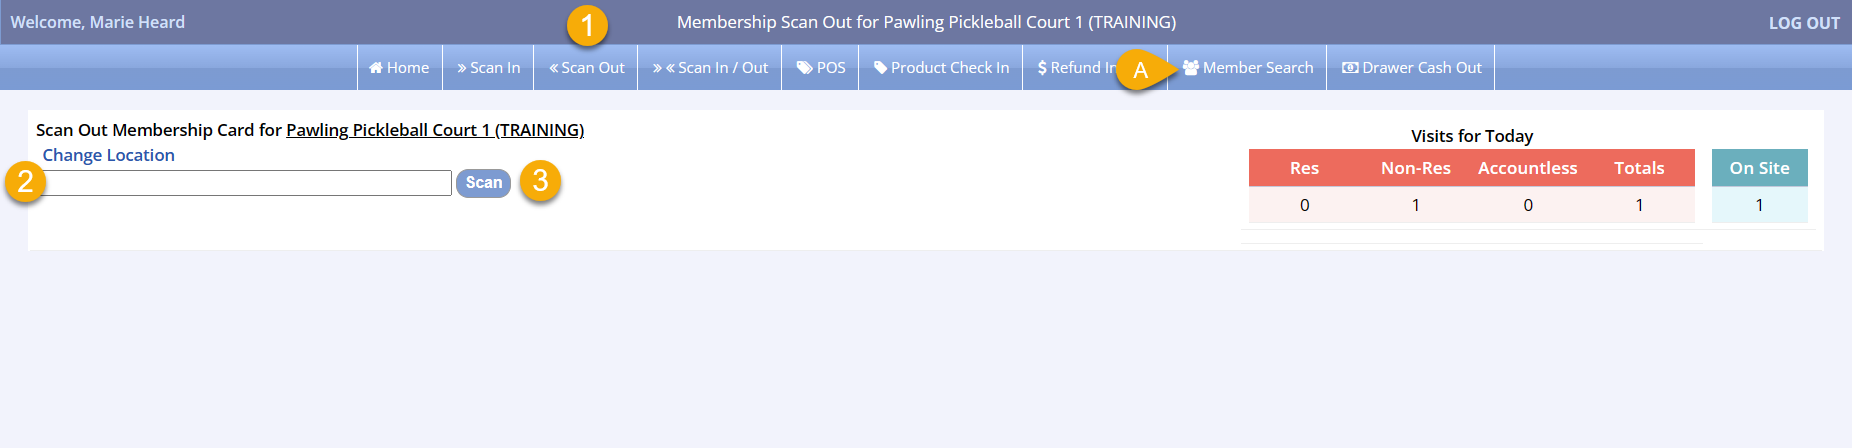
Scanning a Member Out of a Facility
- Click Scan Out from the bar along the top of the screen
- If you do not have the membership number to enter, which allows access to the facility, you can select Member Search in the top option bar to find the member
- Enter the barcode membership number or Scan the barcode using your barcode scanner
- Click Scan
Reporting on Hours Worked
- Navigate to the Reports menu on the leftside bar
- Click Membership Reports
- Select Access Scans
- Set the date, time, membership options, and click Submit
- Click the name of the Facility and the report will show the worker, their info, and their time in/out on relevant dates, and their time spent at the facility
- If your worker forgot to scan out, they will be listed as an Orphan on the report
- This report can be exported or printed

More information on the Access Scan Report can be found in our KB article.