
Team Sport programs have a feature that will allow staff to auto-create a schedule for the activity, assigning teams as Home and Visitor to the game time slot.
Creating a Team Schedule
- Create a Team Sport program
- Add an activity with a standard schedule
- Create teams using the Teams/Group tab
- You must have teams created for the activity before you will be able to add a team schedule
Adding Teams to an Activity
How to Create Teams
- Go to Programs on the leftside navigation menu
- Click View/Search Programs
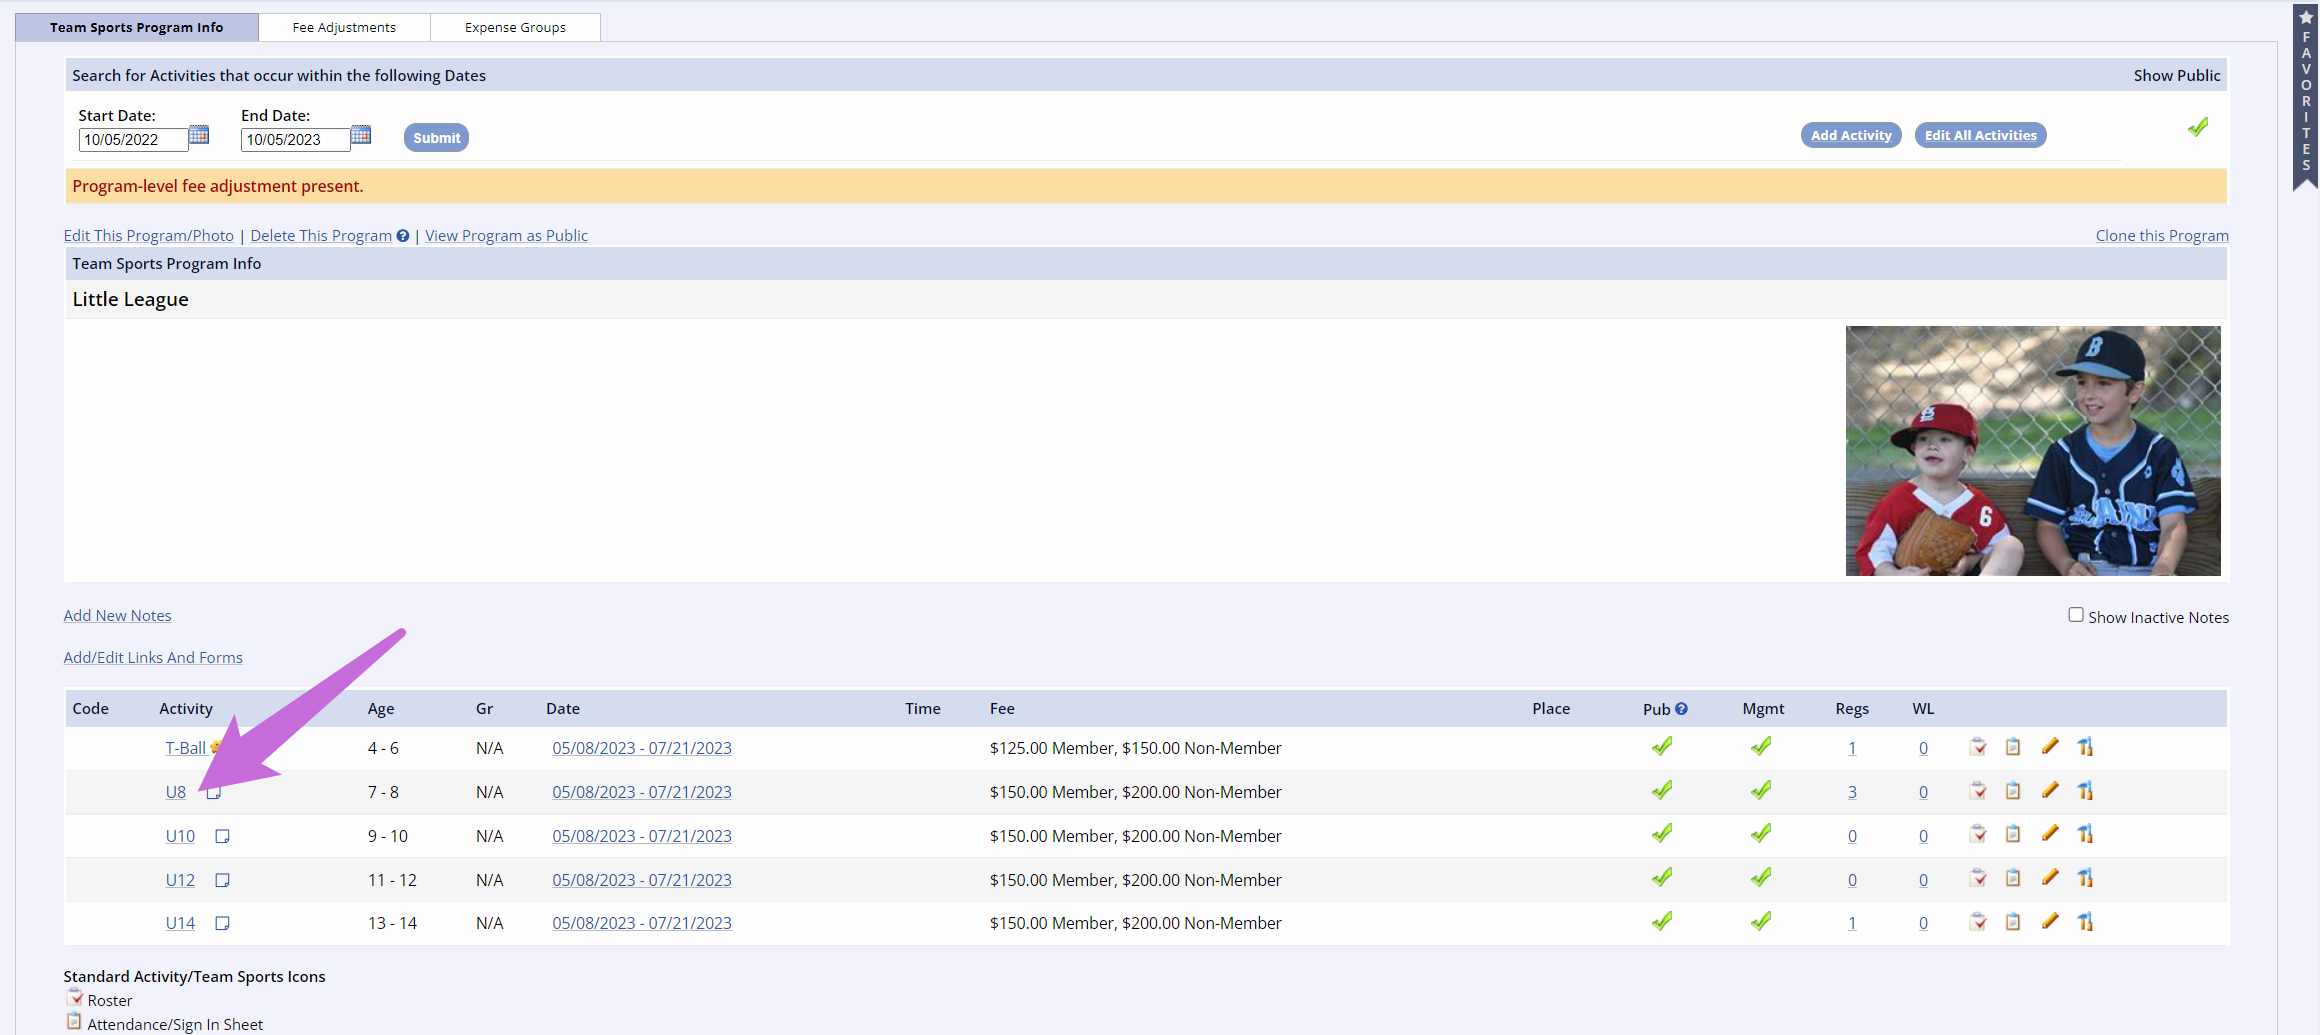
- Select the Program that needs to have teams added i.e. Little League
- Click on the Activity that needs to have teams added
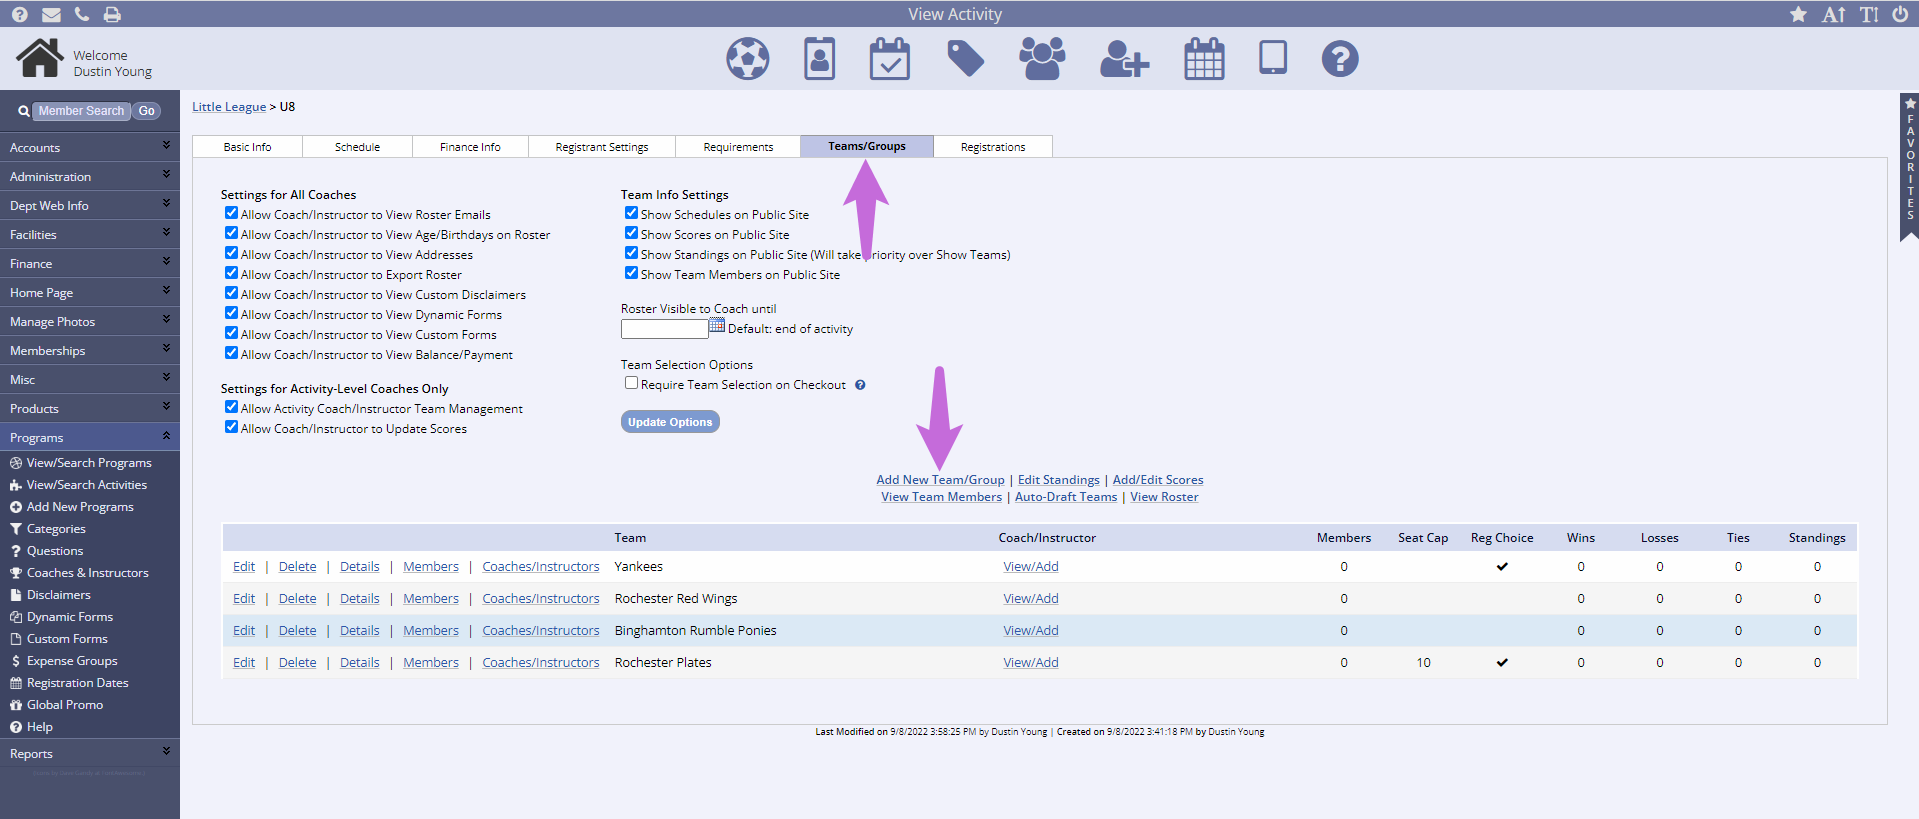
- Click on the Teams/Groups Tab
- Select Add New Team/Group
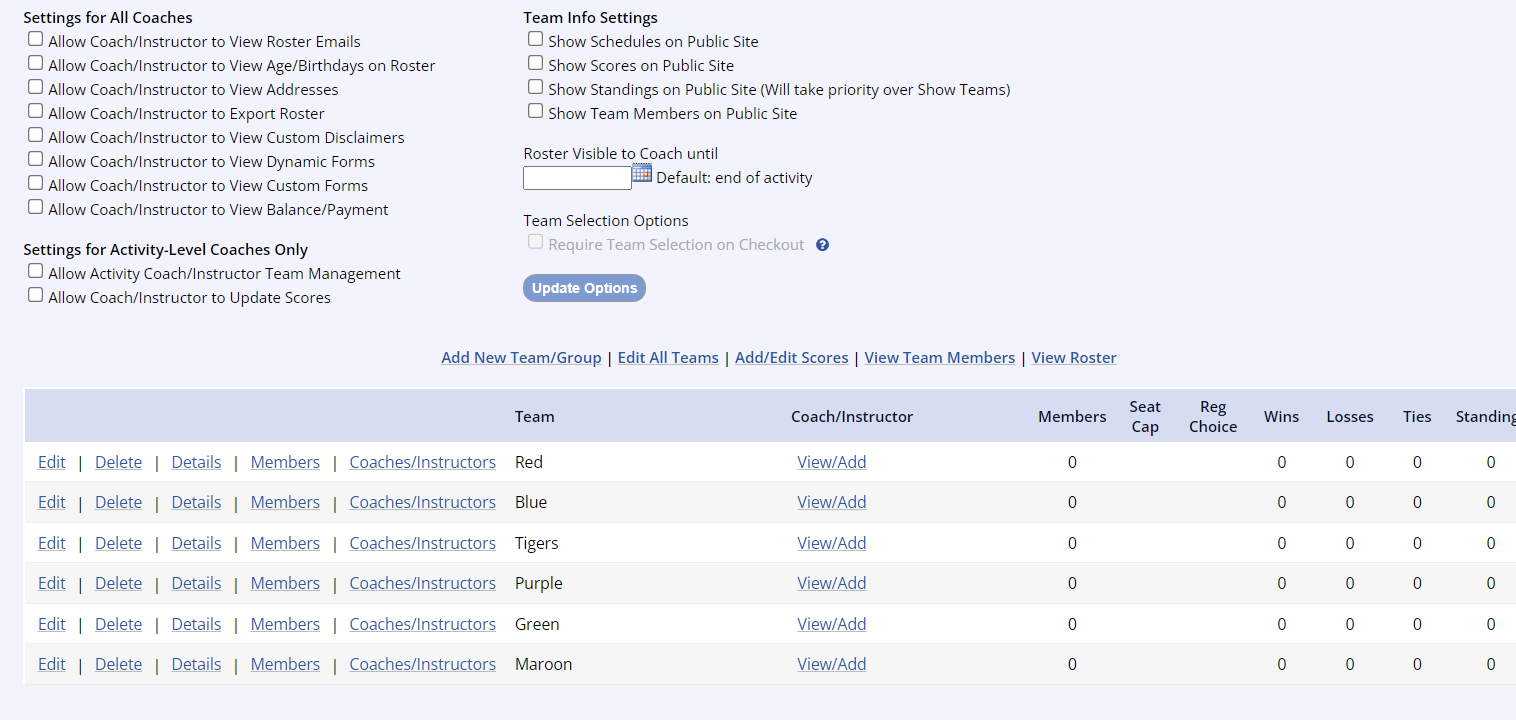
- Enter the Team Name and Team Seat Cap (if applicable)
-
Include as Registration Choice allows you/your customers to pick a team during checkout
- If a team is not chosen, the registrant will be a free agent not yet assigned to a team
- If this setting is left unchecked, all team assignments will need to be made on the management side by staff
- To add coaches to a team, select a Coach/Instructor from the drop-down menu, you can also search by the Coach/Instructor Assignment Type
- You must mark the individual as a coach for them to appear in the drop-down
Note: In a Team Sport Activity, you can set a date for Show Info on Public Site until, otherwise it will default to the end of the activity for public visibility.

Assigning a Coach/Instructor
- The instructor must have a public household account with your site
- They must be a member user in their household
- Once they have set up an account, you can make them a coach/instructor
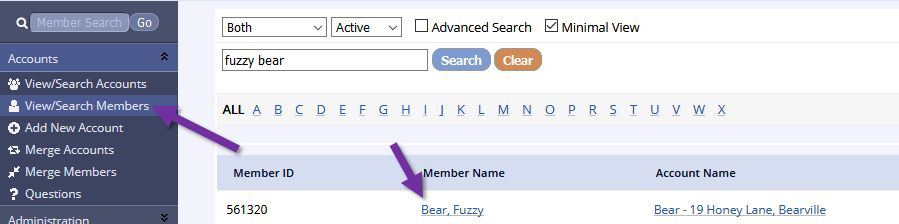
- This is done by going to their member page (View/Search Members > click on the Member Name) from the management side
- Then click Edit Member at the top of their member page
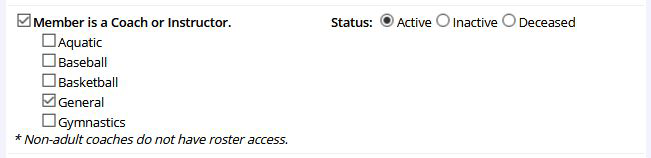
- About halfway down, you’ll see a checkbox Member is a coach/instructor, select this box
- Next, go to the program > activity that you would like them to coach and click on the activity
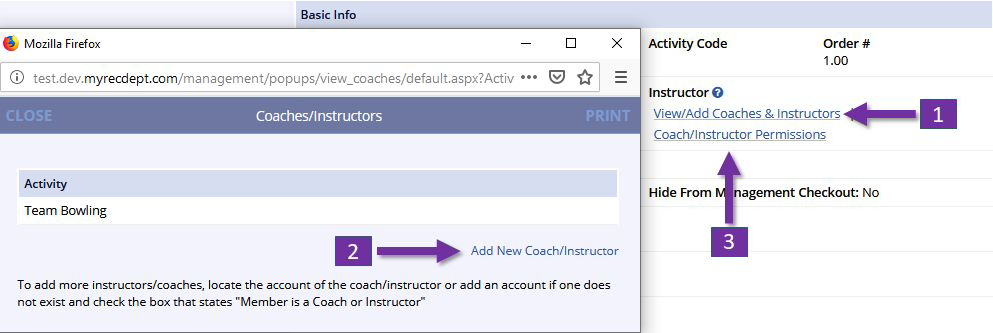
- From the basic info tab, click view/add coaches & instructors (towards the top of the basic info area and to the right) to add them as a coach
- If you add coaches here at the activity level, they can be given the option to add/edit scores, which coaches added at the team level (in the team/group tab) cannot access
- Head coaches have more permissions available than other coaches, so be sure to assign the Type from the drop down
- These are permissions that you can choose to enable for your coaches
- If you add coaches here at the activity level, they can be given the option to add/edit scores, which coaches added at the team level (in the team/group tab) cannot access

- Just beside the link to add the coaches, you can edit their permissions
- This allows you to give them access to additional info, like registrant email addresses
Now the coach/instructor can access the rosters and additional info from their public account overview by clicking on the soccer ball icon for rosters.

Repeat steps 1-4 to assign multiple coaches to an activity. Assign coaches at the team level using the Team/Group tab for coaches with fewer permissions.
Staff Testing of Coach/Instructor Access
As with other public facing features, MyRec.com strongly recommends that you test the coach assignment and public coach access from your own public household account prior to using it on your public members. This way, you will know which permissions are appropriate and which your department prefers to leave inactive. You will be able to see what a coach will see, and you can use that information in the future if a coach has an issue with their own access.
Coach Permissions Public View
A coach with full permissions will see the following list in their Roster view on the public account.

- View Roster

- A coach can use the filters and sorting tools at the top for the roster, and they can search for a specific member or registrant easily by using the CTRL+F keyboard shortcut
- View Digital Sign in/out

- View Entire Roster

- This also shows how the View Age/Birthdate, View Addresses, and View Email Addresses can look when enabled.
- View Registrations

- This also shows how View Balance/Payment can look when enabled.
- View Custom Disclaimers

- View Dynamic Forms
- Dynamic forms has been deprecated and will only show forms on programs for which they were historically added.
- View Custom Forms

- Attendance and Sign in/out

- Email Roster

- Text Message Roster

- Email Coaches

- Click Submit
- This process is repeated until all teams have been created for the activity
Note: If a team is full, Management can override and overfill the team on the management side only. The public does not have this ability.
How to Add Registered Members to a Team
- To the left of the team name you created, click Members

- Check the boxes next to all registrants that you want on the selected team
- Click the button Add Selected to Team
- You will see the team members populate at the top of the screen
- To add members to another team, change the team in the drop-down near the top of the screen and follow steps 2 and 3 above
- To remove members from a team, select the team from the drop-down, then check the box next to the members, and click Remove Selected from Team
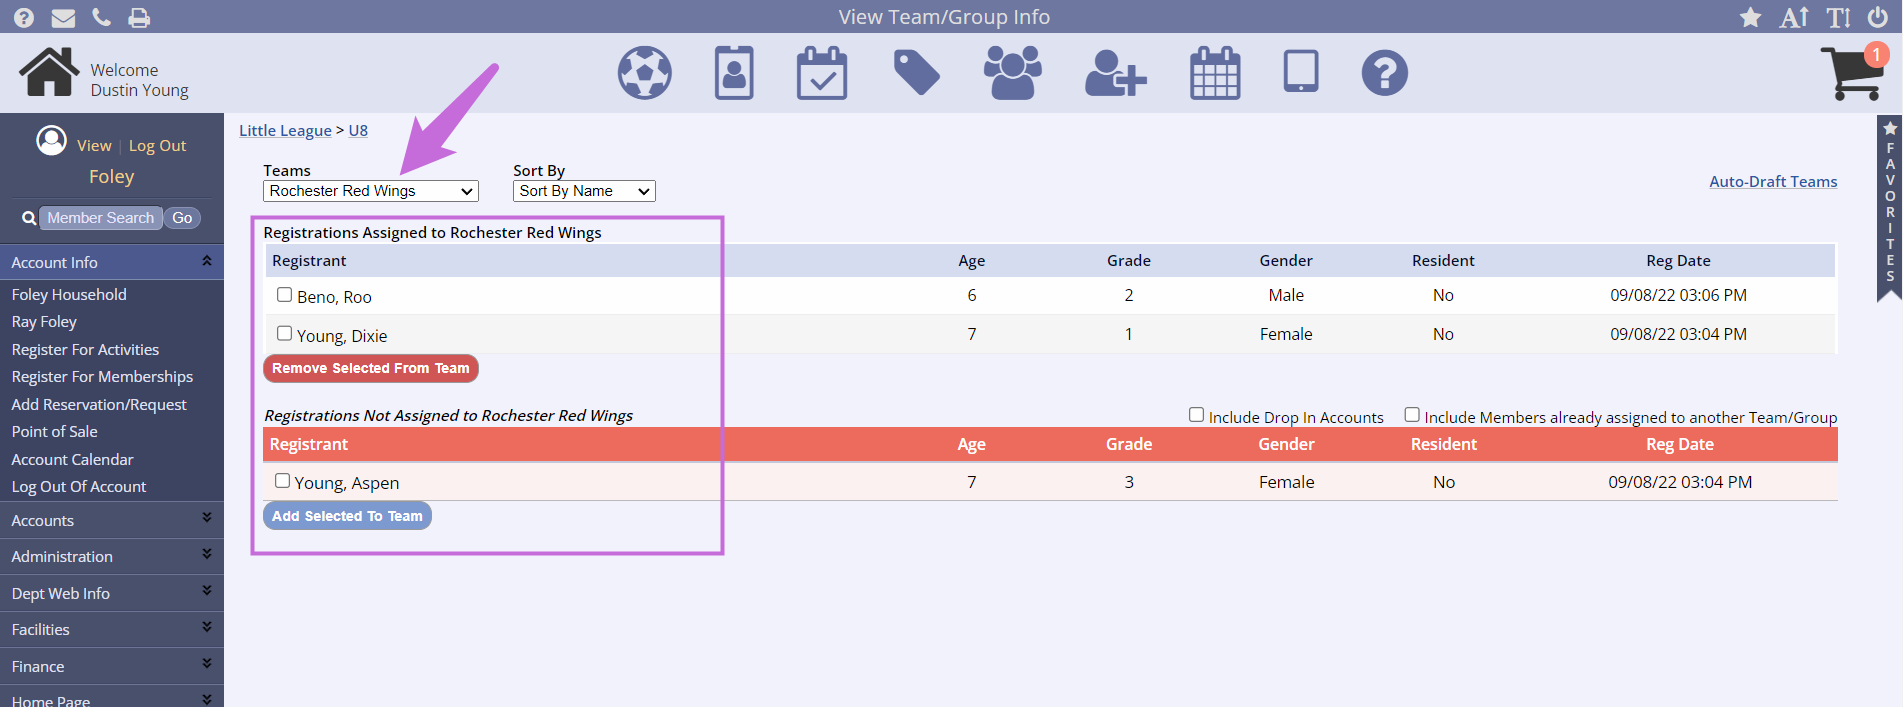
- Auto Draft Teams will take any registrants who haven't been assigned to a team and place them on a team
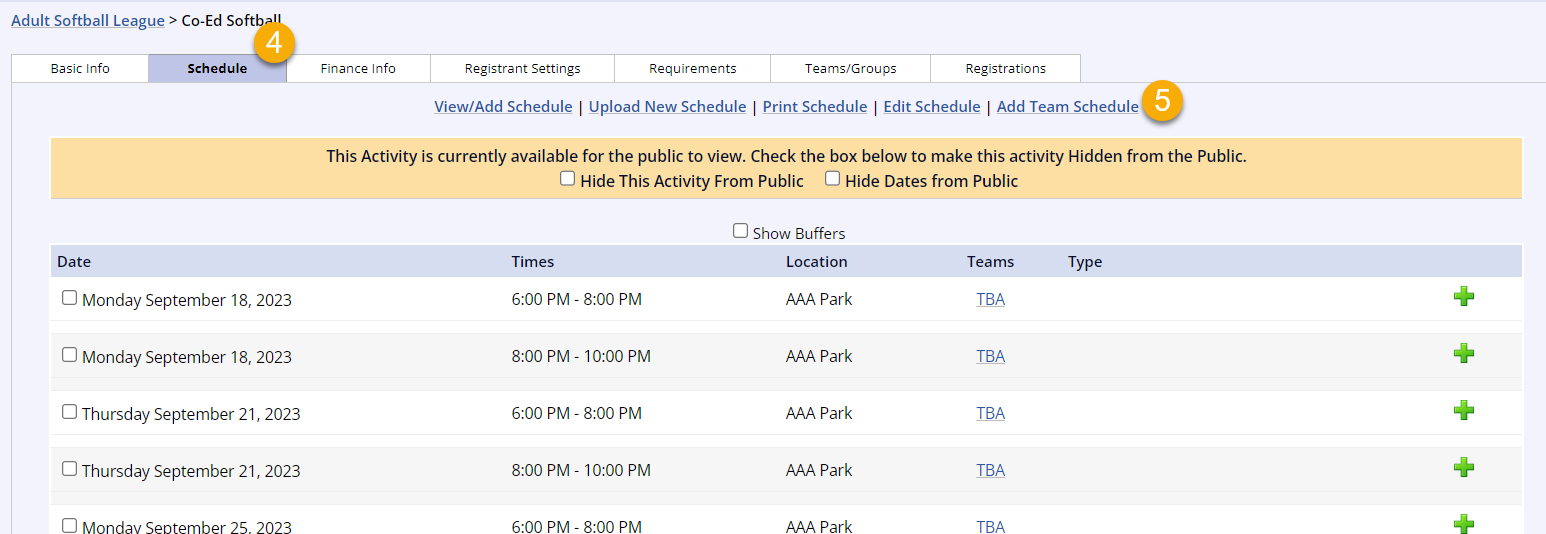
- Select the Schedule tab within the activity
- Note that the Teams column has TBA displayed for all scheduled times/dates
- Click the Add Team Schedule link at the top right of the screen
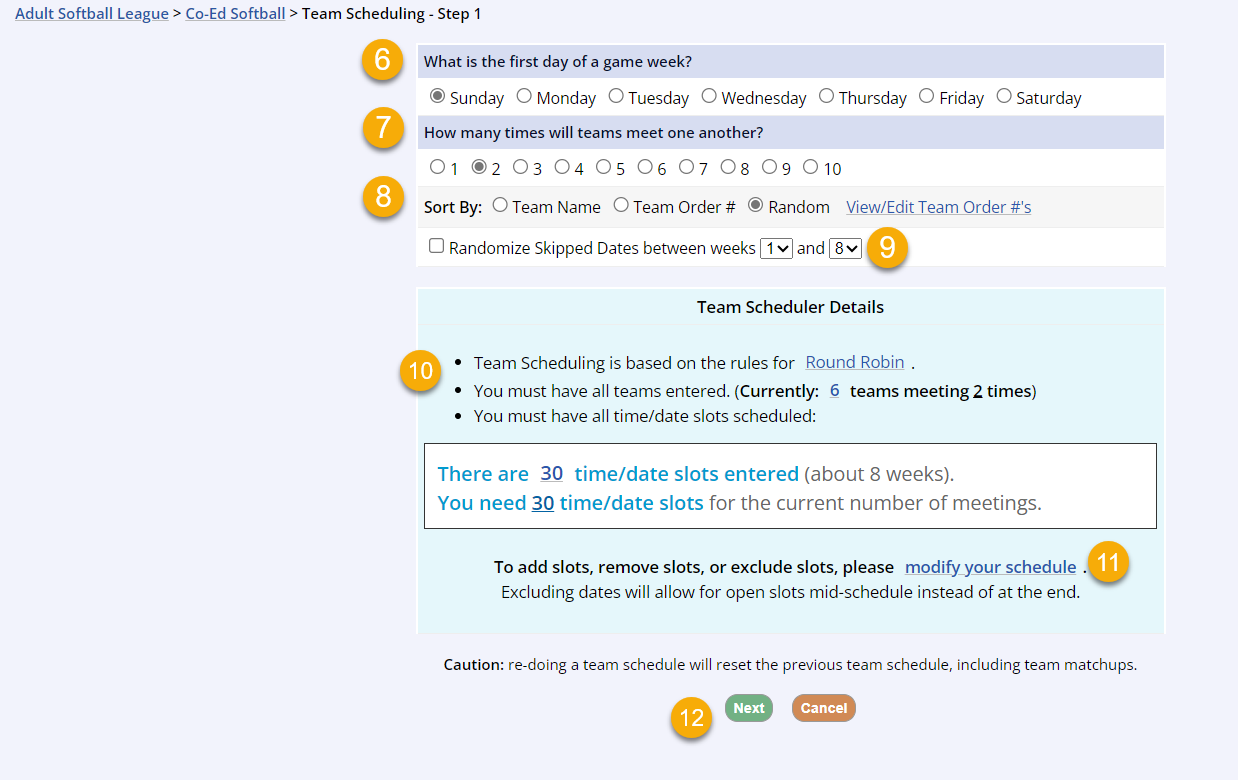
- Select the day of the week for the game week to begin
- Choose how many game meetings each time will have against the other
- You can sort the games by team name, the team order number, or randomly
- You can click the
View/Edit Team Order #s link the revise the team order
- You can click the
- For bye-games, you can select to randomize the skipped dates and can select specific weeks from the drop down
- Rules for Round Robin scheduling are available by clicking the Round Robin link
- You can see how many teams are entered into the schedule
- The scheduler will tell you how many game slots are currently available and how many are needed
- The scheduler will also tell you how many additional spots are needed if you do not have enough game meetings for the number of game meetups you set in step 7
- Click the modify your schedule link to add or remove dates so the schedule has the correct amount of game meetings
- Once you have the correct number of meetings and your settings are selected, click Next
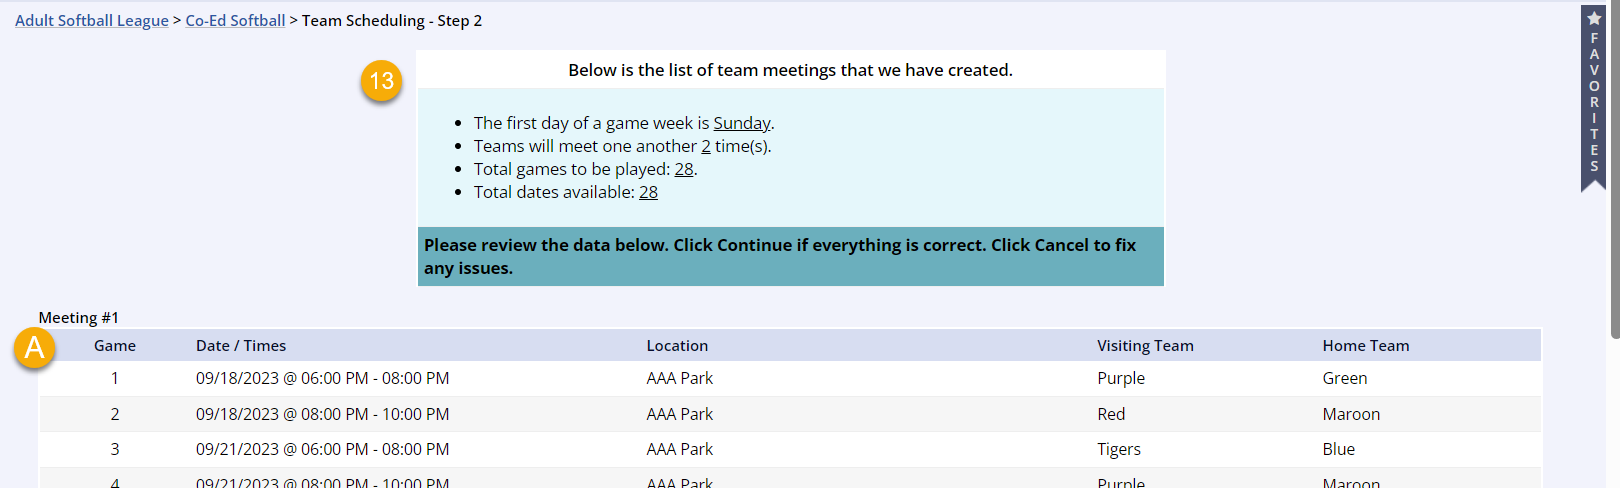
- There is a confirmation box that will review the game week starting day, the number of meetups between teams, the total number of games, and the total available game dates
- The first meetup between teams is listing in a table including
- Game number
- Date/time
- Location
- Visitor
- Home team
- The second meetup, and subsequent meetups, will be in their own tables displaying the same column information
- Exemption dates will be displayed at the bottom of the page
- The first meetup between teams is listing in a table including

- You can use the checkbox to add the gme schedule to the Team Scores page
- Note that this will override any previous data/scores, so take this into consideration
- Typically, this is checked only at the creation of the activity schedule before score and standing data has been entered
- Note that this will override any previous data/scores, so take this into consideration
- Click Continue
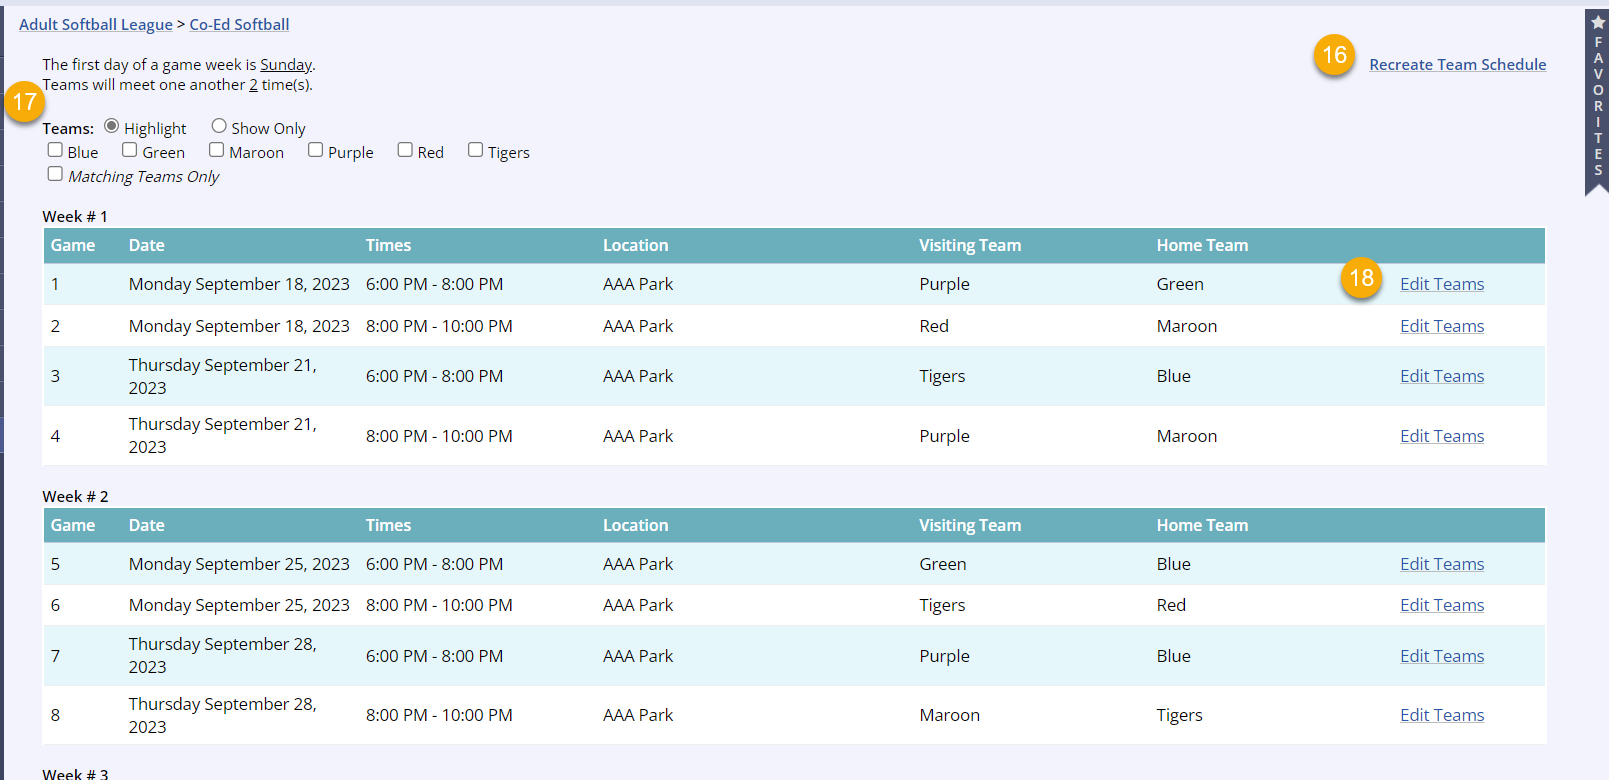
- Click Recreate Team Schedule to create a new schedule
- Use the sorting checkboxes to view only specific team schedule info
- Select Highlight or Show Only
- Click Edit Teams within the game row to edit the specific matchup by changing selected teams
- If you don't wish to make any changes, you can navigate back to the activity or program level from the links at the top of the page
Changes to the Schedule and Using the Score Keeper
The Score Keeper will only update via the Team Schedule at creation/re-creation, not when the activity or team schedule is edited. If you are wanting to update the Score Keeper, you should remove the existing schedule and build a new one with the corrected info. If the Score Keeper isn't being used, you can continue with editing the activity or team schedule.
The activity schedule determines the game dates for the team schedule, and the team schedule will populate the home/away team match-ups in the activity schedule. If a date is changed for an event in the activity schedule, this will reflect in the team schedule; if a team(s) is changed in the activity schedule, this will NOT reflect in the team schedule. If a team(s) is changed in the team schedule, this will reflect in the activity schedule; and you cannot change dates in the team schedule.
We recommend that you test out your activity schedule, team schedule, score keeper, and making revisions in the Demo Sandbox to be certain you have the information you need. If you do not have access to the Demo Site, please contact Client Services Support for access.