Registration Payment Plans (RPPs) are available for standard activities, advanced activities, team sport activities, and membership registrations both on the management side and on the public side checkout. Your users can now purchase registrations on the public side that have been set up on a payment plan schedule.
This is particularly useful for high fee programs and memberships like:
- summer camps
- childcare programs
- recreation center memberships
- leagues
- and more!
RPPs can be set up in multiple ways depending on the situation (Client Services is always happy to go over suggested applications), and there is also the option to add an RPP cutoff date to end the registration window for an RPP and revert to traditional checkout only. The frequency of registration payment plans can be set by Week(s), Month(s) or Year(s). The member will be charged in accordance with the frequency of payments created in the registration payment plan at the activity or membership level. Charges will be applied to the payment method that was selected or added at the time of account payment plan creation.
Conditions for Use
Departments must meet the following conditions in order to use payment plans
- Departments must be using Zeamster/Fortis, Authorize.net, or MX Merchant as their payment gateway
- Authorize.net departments must have activated CIM in the payment gateway and cc storage
- Payment Plans are not compatible with split fees
- ACH is not a payment option for MX Merchant clients
- In the eCommerce page, Allow Credit Card Storage, Allow Staff Credit Card Access and Enable Payment Plans must be activated by MyRec.com staff
Creating an RPP in MyRec.com
Which type of RPP would you like to create?
Registration Payment Plans for Activities
Registration Payment Plans (RPPs) for Activities are different from Account Payment Plans in that they have a public side feature, they do not have the editing features of an account payment plan, and they are created on the activity instead of the user's account. Once you create the RPP at the activity level, both public and management check out will have the option to purchase the registration via the attached payment plan.
Creating Registration Payment Plans (RPPs) on the Management Side
Choose your activity type:
Standard Activity
Steps for Management Users to Create a Standard Activity RPP
- Create the Standard Activity following the regular process until you reach the Finance Info tab
- If you Allow Deposits, the amount of the deposit will be collected up front upon checkout before the payment plan cycle begins
- On the Finance Info tab, check the Use Payment Plans box
- Enter the amount the public user will pay
- Add the frequency (every 2 weeks, every 1 month, etc…)
- Set the starting on date, which will be the date of the 1st payment transaction
- Optional: You can set a Payment Plan Cutoff Date, which will be the date that this payment plan becomes unavailable as a checkout option for the public user and reverts to the full purchase payment only (regular registration process)
- Finish the settings on the Finance Info tab
- Click Submit
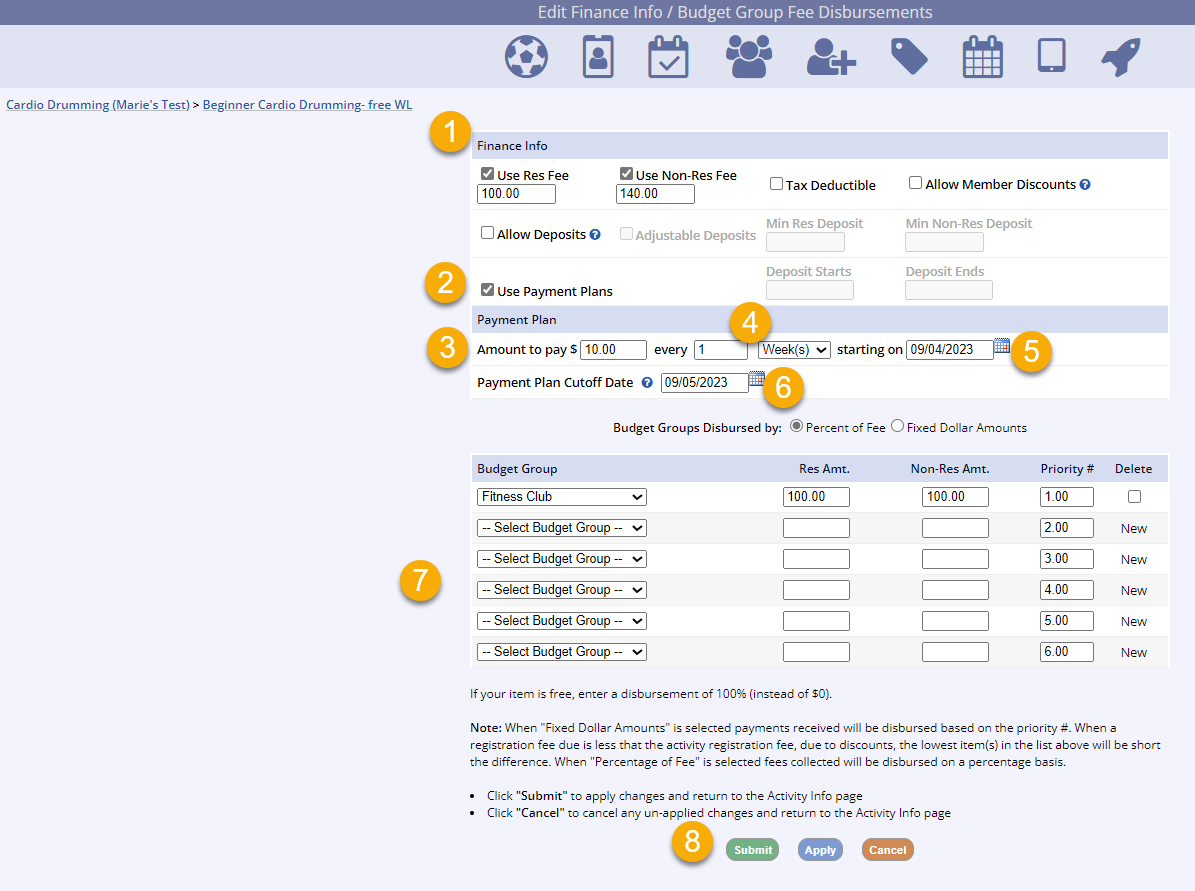
- Complete the rest of the Standard Activity creation process
Cloning Standard/Team Sport Activities with Payment Plans
To clone a standard or team sport activity and capture the RPP settings, you must use the advance date-driven feature. If you do not use the advance date-driven feature, the activity will be cloned, but you will have to set up the RPP again if you want it on the cloned activity.
Cloning a Standard Activity with RPP for same schedule dates
This is useful when you want to clone an activity with its RPP settings that has same date/different times in your schedule instead of creating it from scratch.
To do a complete clone of a standard or team sport activity with RPP for the same dates, you will still use the advance date-driven feature.

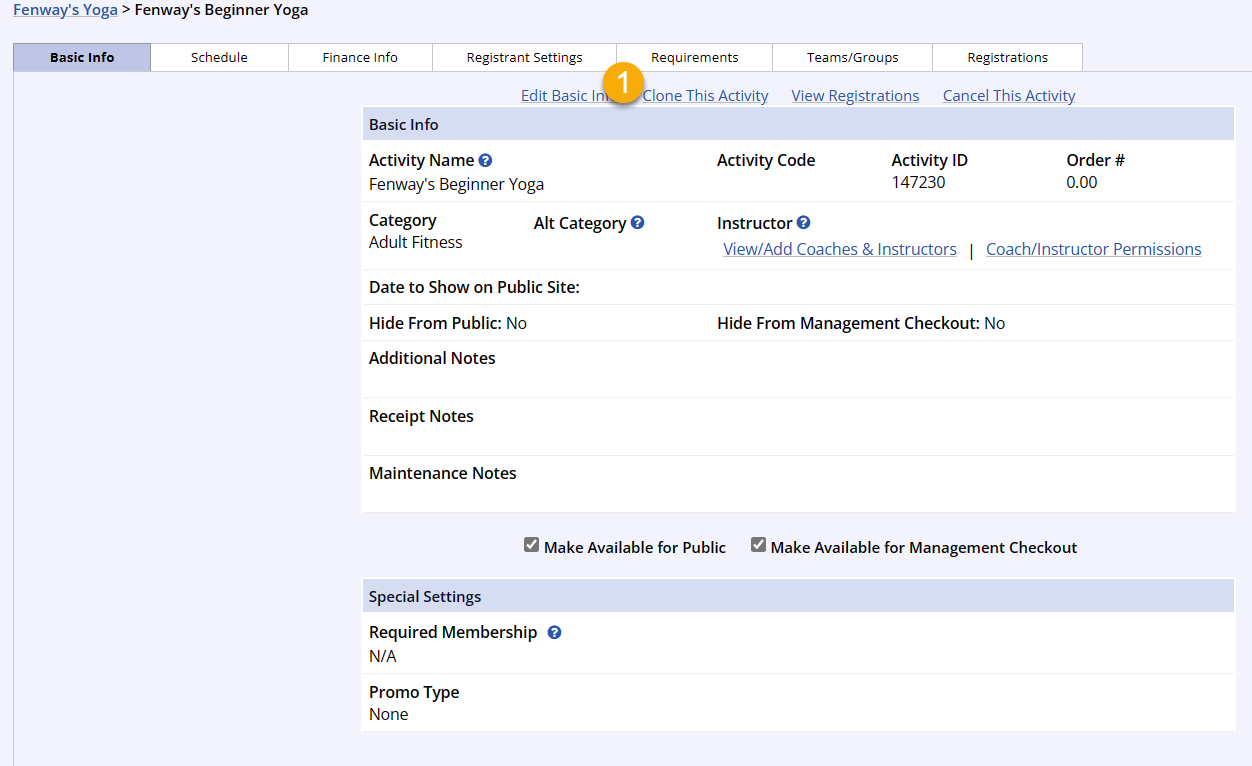
- Note the registration payment plan (RPP) setup details on the original activity
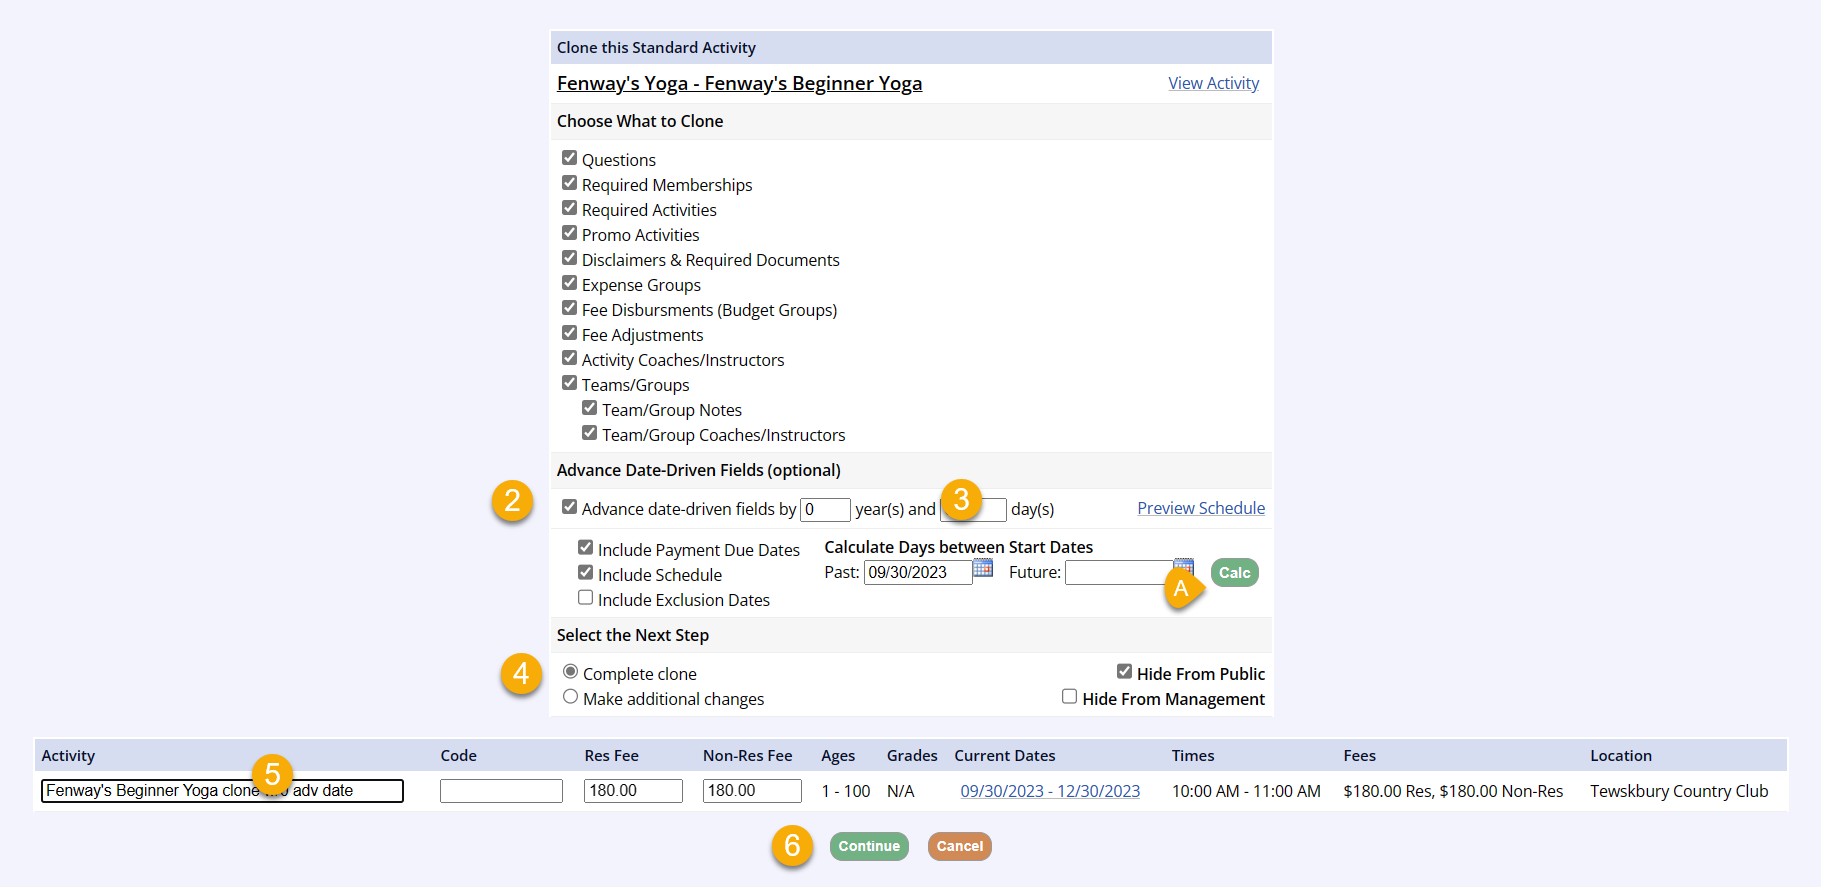
- On the activity's Basic Info tab, click Clone This Activity
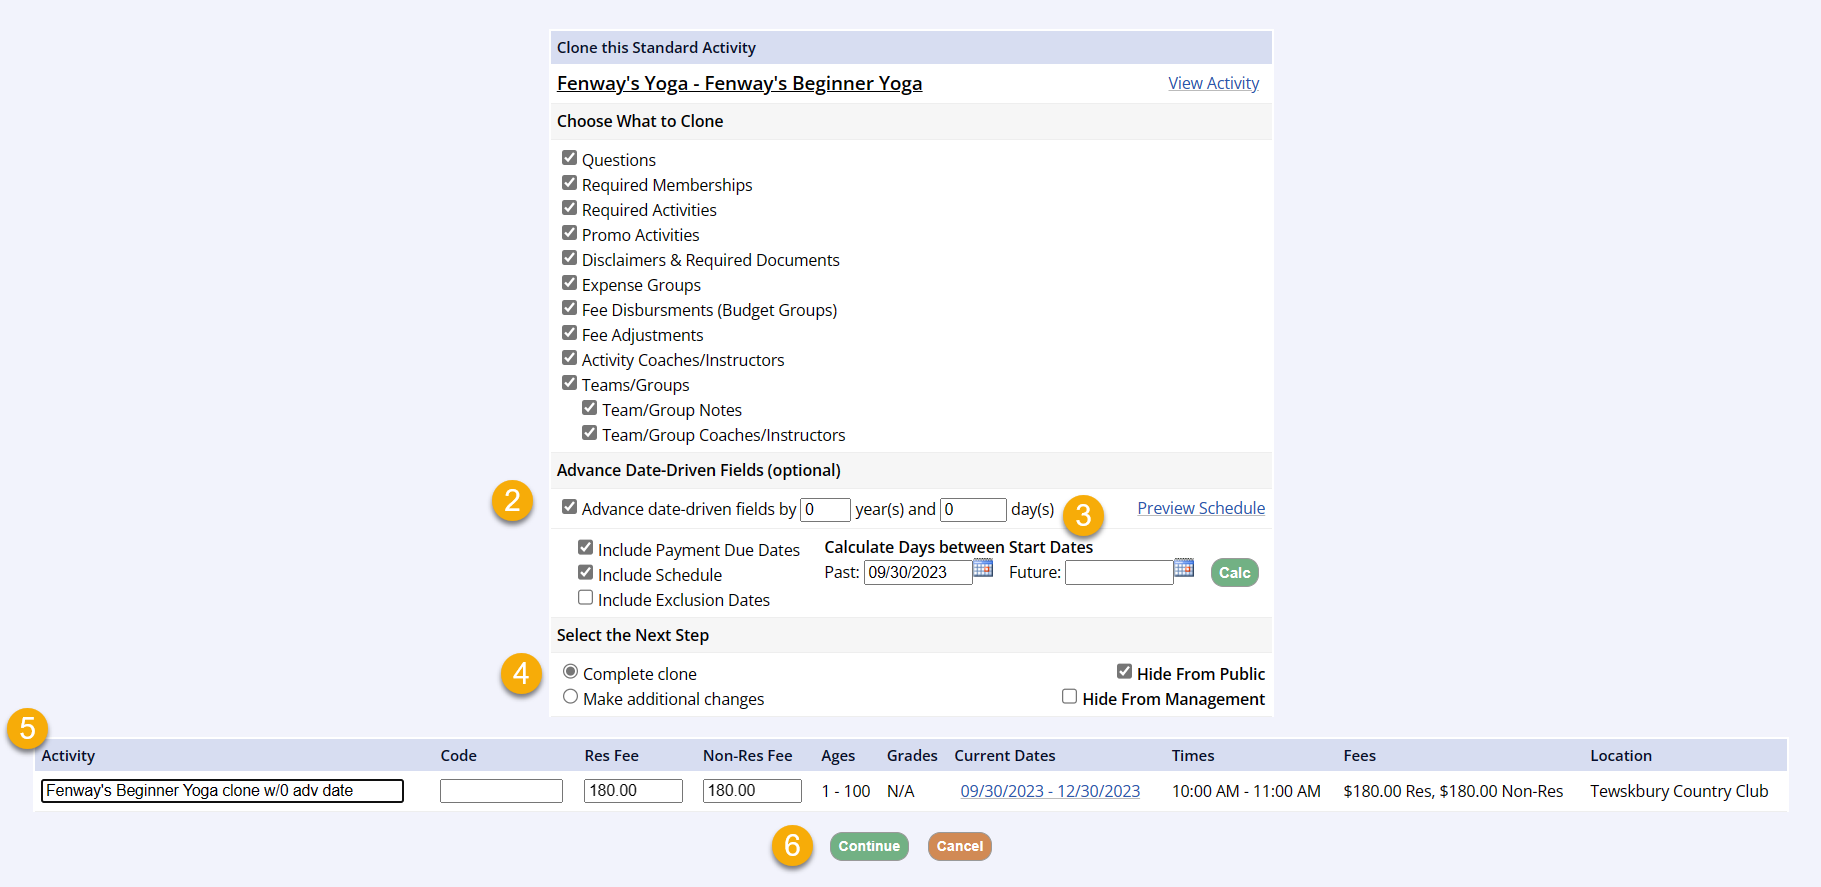
- Check the Advance date-driven fields by box
- Enter 0 in the years and days boxes
- Select Complete Clone
- Make any changes to the new activity's title, code, or fees
- Click Continue
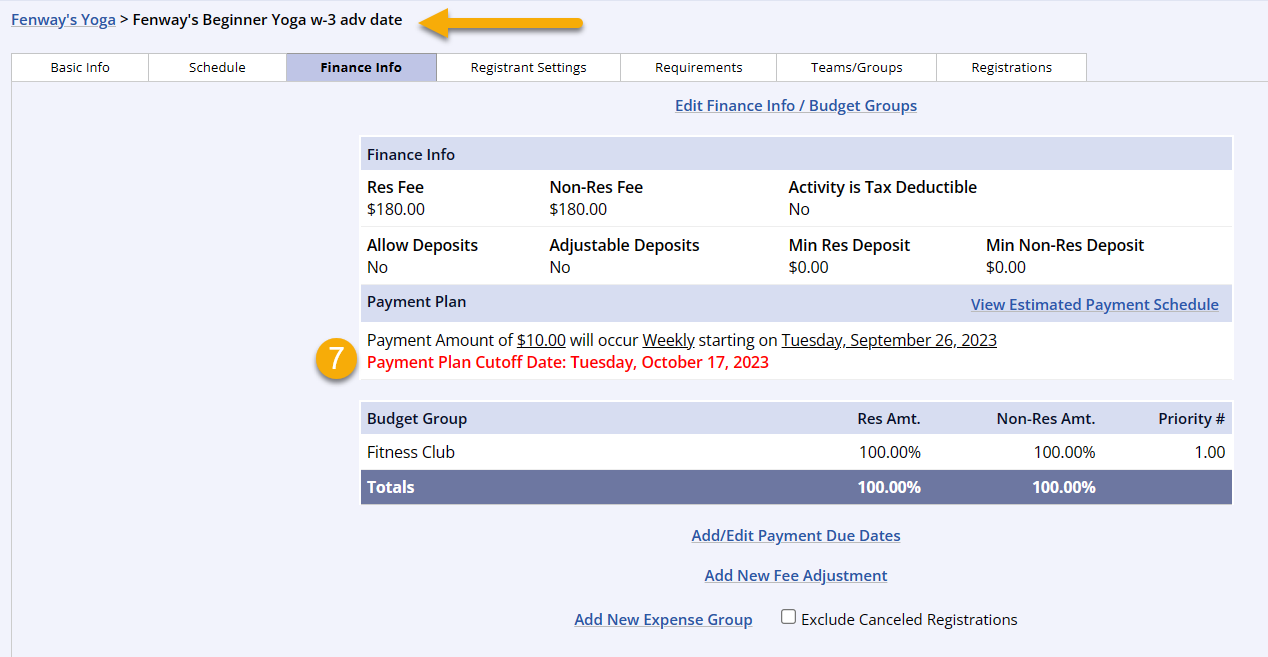
- Note the RPP setup details on the new, cloned activity have been successfully cloned
- Now, you can navigate to the Schedule tab to edit, delete, add, or update the schedule of the cloned activity accordingly
Cloning a Standard Activity with RPP for different schedule dates
- Note the registration payment plan (RPP) setup details on the original activity
- On the activity's Basic Info tab, click Clone This Activity
- Check the Advance date-driven fields by box
- Enter the number of years/days in the years and days boxes
- There is a calculator to assist with determining the correct entries
- Select Complete Clone
- Make any changes to the new activity's title, code, or fees
- Click Continue
- Note the RPP setup details on the new, cloned activity have been successfully cloned and advanced by the number of years/days entered
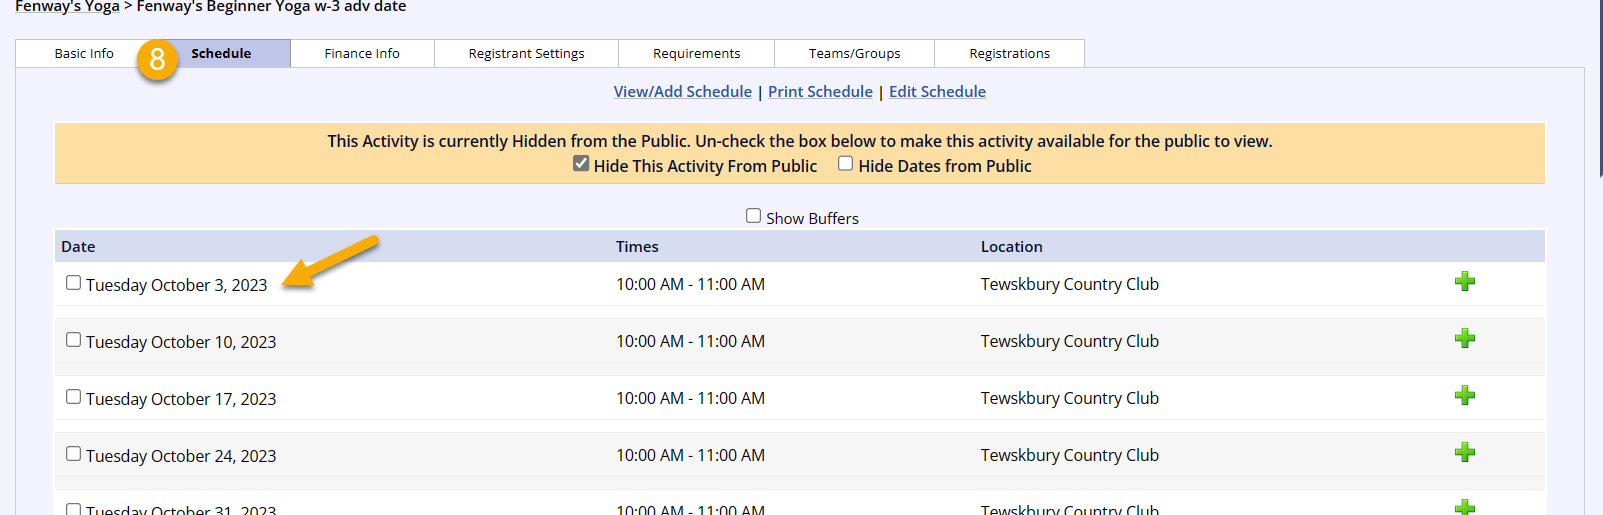
- Navigate to the Schedule tab and notice that the schedule dates have also been advanced by the number of years/days entered
Cloning without cloning the RPP setup
To clone a standard or team sport activity without cloning the RPP settings, you will follow the cloning process without advancing date-driven fields. You will create the schedule within the Schedule tab just like on any other activity clone.
Advanced Activity
Enhanced Features in Advanced Activity Payment Plans
Recurring Subscription Payments |
Advanced Activity Payment Plans |
| Lacks the ability to use a deposit | Offers deposits as an optional setting for public and management checkout |
| Requires a separate registration item for subscription customers and paid-in-full customers (this prevented all registrants from appearing on the same roster) | Allows for registration payment plan customers and paid-in-full customers to register for the same advanced activity item and be added to a common roster by using adjustable deposits set to a minimum of $0 with the option for customers to Pay In Full |
| Lacks the ability for a registration fee to be added within the subscription settings | Allows a registration fee to be set as a deposit setting within the registration payment plan settings (eliminates the need for multiple registrations for your customers to satisfy a registration fee and an activity fee) |
Steps for Management Users to Create an Advanced Activity RPP
Pricing Options and Advanced Activity Payment Plans
RPPs for Advanced Activity are available on weekly and monthly pricing options. It is not compatible with entire session pricing options (see below on how to set up for entire pricing scenario)
- Create the Advanced Activity following the regular process until the Pricing Option steps
- If you Allow Deposits, the amount of the deposit will be collected up front upon checkout before the payment plan cycle begins
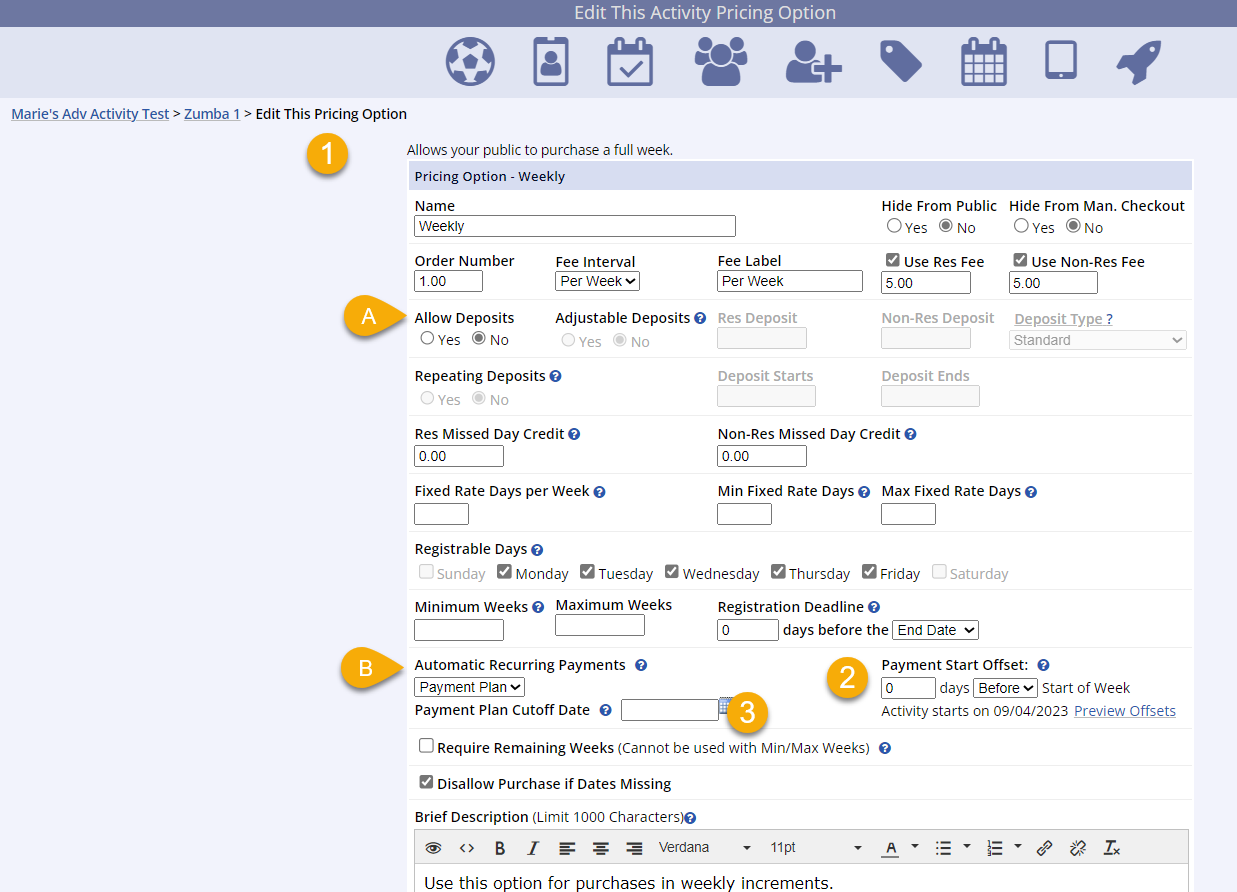
- Setup and limitations are identical to Subscriptions, just choose Payment Plans from the Automatic Recurring Payments dropdown
- Set the Payment Start Offset days and occurrence dropdown
- There is a Preview Offsets link to help you understand and set this date
- Optional: You can set a Payment Plan Cutoff Date, which will be the date that this payment plan becomes unavailable as a checkout option for the public user and reverts to the full purchase payment only (regular registration process)
- Click Submit
Entire Session Pricing Setup
To use the RPP for advanced activity feature for a situation with entire session pricing, you will follow the steps above until the Fee Interval dropdown. Then,
- Select the Per Week option
- Change the Fee Label to “Entire Session” or whatever your entire session is called
- Be sure to check the Require Remaining Weeks box to create an entire session option
- Proceed with the rest of the steps in the section above
Team Sport
Steps for Management Users to Create a Team Sport Activity RPP
- Create the Team Sport Activity following the regular process until the Finance Info tab
- If you Allow Deposits, the amount of the deposit will be collected up front upon checkout before the payment plan cycle begins
- On the Finance Info tab, check the Use Payment Plans box
- Enter the amount the public user will pay
- Add the frequency (every 2 weeks, every 1 month, etc…)
- Set the starting on date, which will be the date of the 1st payment transaction
- Optional: You can set a Payment Plan Cutoff Date, which will be the date that this payment plan becomes unavailable as a checkout option for the public user and reverts to the full purchase payment only (regular registration process)
- Finish the settings on the Finance Info tab
- Click Submit
- Complete the rest of the Team Sport setup process
Cloning Standard/Team Sport Activities with Payment Plans
To clone a standard or team sport activity and capture the RPP settings, you must use the advance date-driven feature. If you do not use the advance date-driven feature, the activity will be cloned, but you will have to set up the RPP again if you want it on the cloned activity.
Cloning a Standard Activity with RPP for same schedule dates
This is useful when you want to clone an activity with its RPP settings that has same date/different times in your schedule instead of creating it from scratch.
To do a complete clone of a standard or team sport activity with RPP for the same dates, you will still use the advance date-driven feature.
- Note the registration payment plan (RPP) setup details on the original activity
- On the activity's Basic Info tab, click Clone This Activity
- Check the Advance date-driven fields by box
- Enter 0 in the years and days boxes
- Select Complete Clone
- Make any changes to the new activity's title, code, or fees
- Click Continue
- Note the RPP setup details on the new, cloned activity have been successfully cloned
- Now, you can navigate to the Schedule tab to edit, delete, add, or update the schedule of the cloned activity accordingly
Cloning a Standard Activity with RPP for different schedule dates
- Note the registration payment plan (RPP) setup details on the original activity
- On the activity's Basic Info tab, click Clone This Activity
- Check the Advance date-driven fields by box
- Enter the number of years/days in the years and days boxes
- There is a calculator to assist with determining the correct entries
- Select Complete Clone
- Make any changes to the new activity's title, code, or fees
- Click Continue
- Note the RPP setup details on the new, cloned activity have been successfully cloned and advanced by the number of years/days entered
- Navigate to the Schedule tab and notice that the schedule dates have also been advanced by the number of years/days entered
Cloning without cloning the RPP setup
To clone a standard or team sport activity without cloning the RPP settings, you will follow the cloning process without advancing date-driven fields. You will create the schedule within the Schedule tab just like on any other activity clone.
Checking Out with RPPs for Activities
Registration Payment Plans have a separate checkout process from standard checkout. Both management and public users will complete the checkout process individually for any payment plan items in the household's cart.
Management Registration Payment Plan Checkout

- Continue through the checkout process
- Select a Billing Contact to associate to this payment plan and invoice
- If there are stored payment methods available, they will be listed
- Select the stored payment or click Add a New Payment Method
- If choosing a stored card, clicking Submit will process a payment for the Deposit plus Fees, if applicable, then will create the payment plans and all is completed
- Processing Fees will be recalculated based on selected stored payment being CC or ACH
- Only passed-on fees will appear in this amount, so if your department is absorbing fees, those fees will not appear separately here
- Processing Fees will be recalculated based on selected stored payment being CC or ACH
- If no stored payment methods are available or Add a New Payment Method is selected, you will be brought to the secure credit card page
- Upon saving the stored payment method, you will be returned to the page above, with the new stored card pre-selected
- If there is a Deposit Due, it will be displayed along with Processing Fees that are setup in the eCommerce settings
- If choosing a stored card, clicking Submit will process a payment for the Deposit plus Fees, if applicable, then will create the payment plans and all is completed
- Select the stored payment or click Add a New Payment Method
- If there are stored payment methods available, they will be listed
On the Public Checkout
Public-side checkout does NOT get the option to choose a Billing Contact but can choose a stored payment method.
Public Registration Payment Plan Checkout
- Proceed through the regular registration process and click to Add to Cart
- Any deposits, add-ons, or promotions will appear during the process
- Click Check Out
- A notification about the RPP and checkout process appears at the top of the cart screen
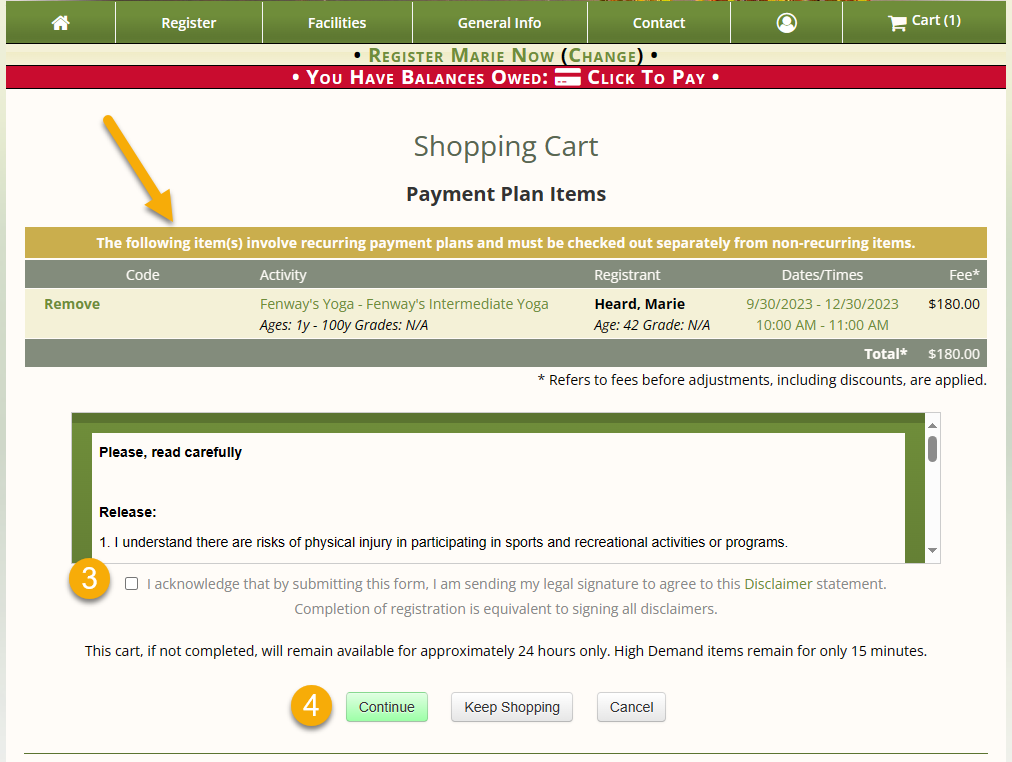
- Check the disclaimer checkbox
- Click Continue

- If you have a promo code, click Apply Promo Code and enter the code
- Select a payment
- If the registrant has a stored card on file, they can select the stored card and click Submit in the space below the deposit
- If the registrant needs to add a payment, select Add a New Payment Method and click the Continue to Payment Form button that will appear instead of a Submit button under the deposit area
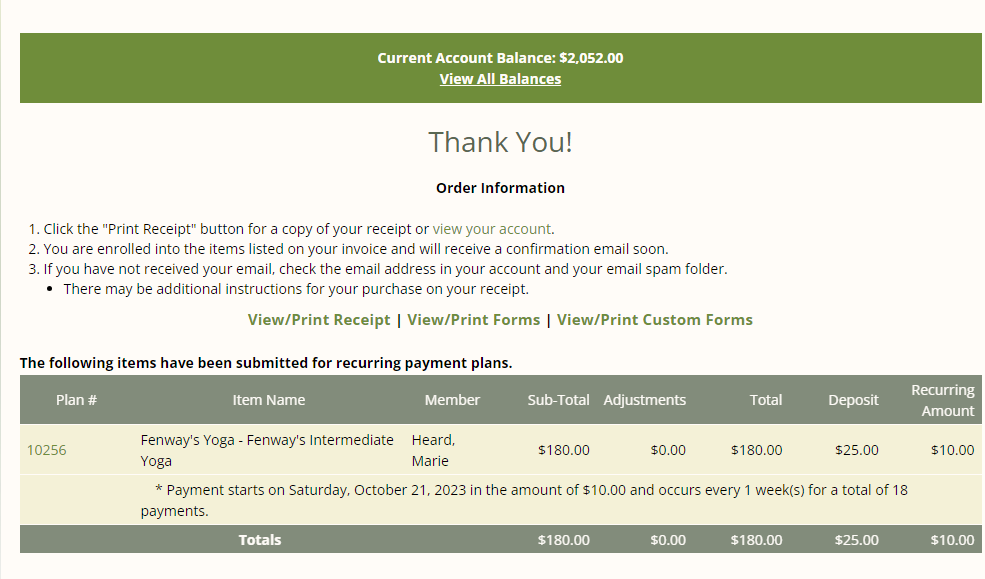
- A confirmation screen will appear with RPP details and links to print or view applicable receipts and forms
Updating Fees in RPPs for Activities
The management can make changes to the fee on an Activity RPP either on the Standard Activity level, which will apply to all RPPs, or on an existing RPP for Activities that is active within a user's account.
Changing the Fee within the Standard Activity
Editing Options in RPPs for Activities
Standard Activity RPPs can be edited, paused, cancelled, and updated; Advanced Activity RPPs can only be cancelled at the activity level. To edit an existing RPP for Advanced Activities, see Changing the Fee on Existing, Active RPPs for Activities below.
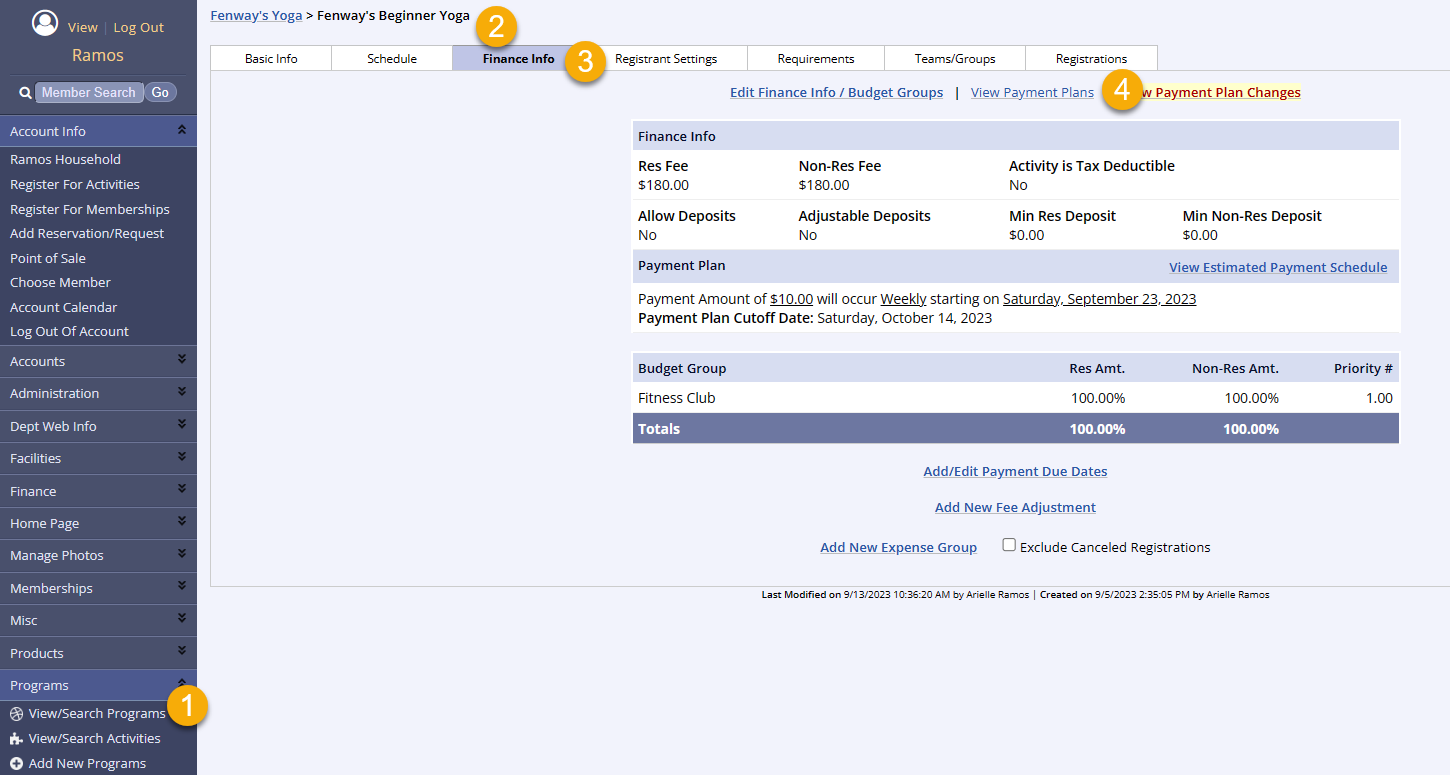
- Go to the Program menu on leftside navigation bar and find the program
- Select the correct activity from the list
- Choose the Finance Info tab
- Click the View Payment Plans link from the top of the screen
- Click the Update Payment Plans link at the top right of the screen
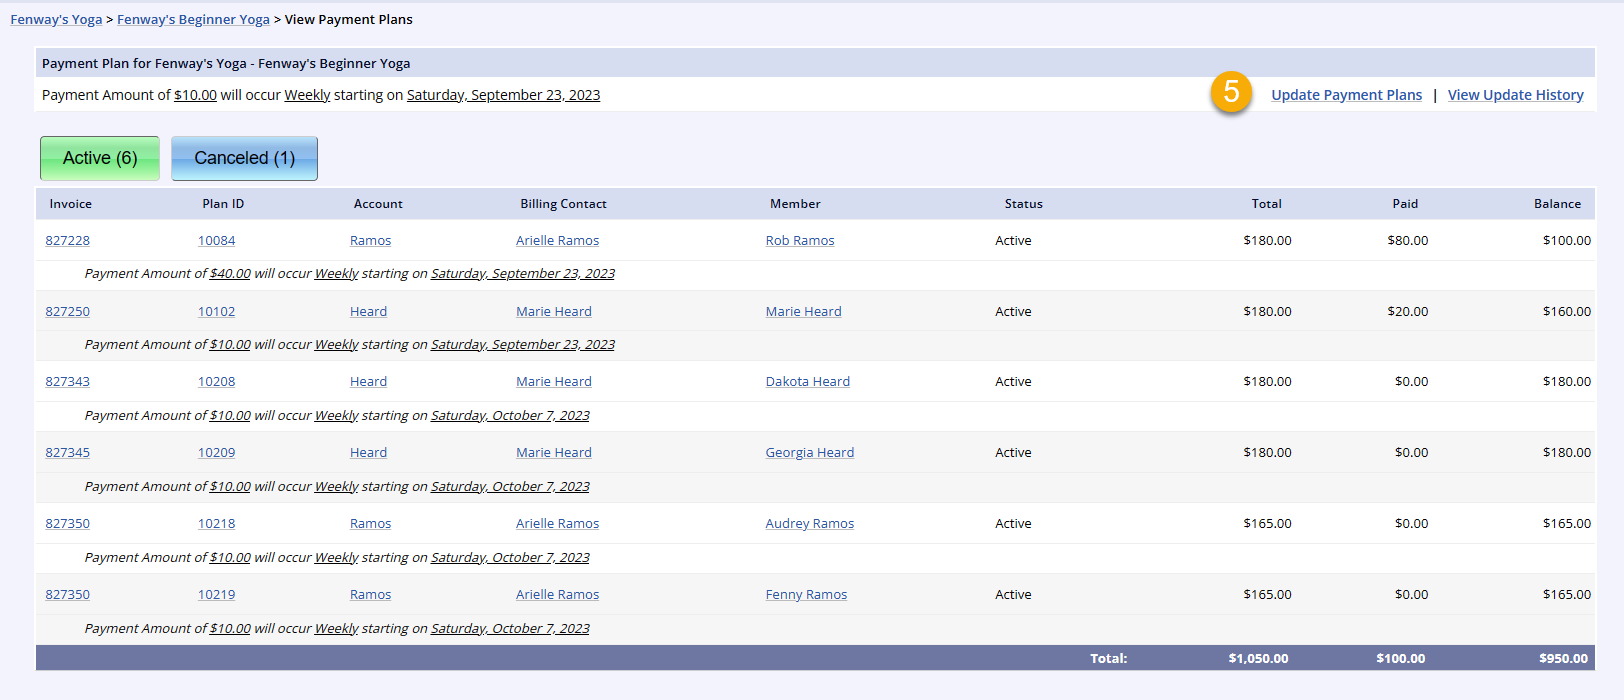
- Choose the Update Payment Amounts button

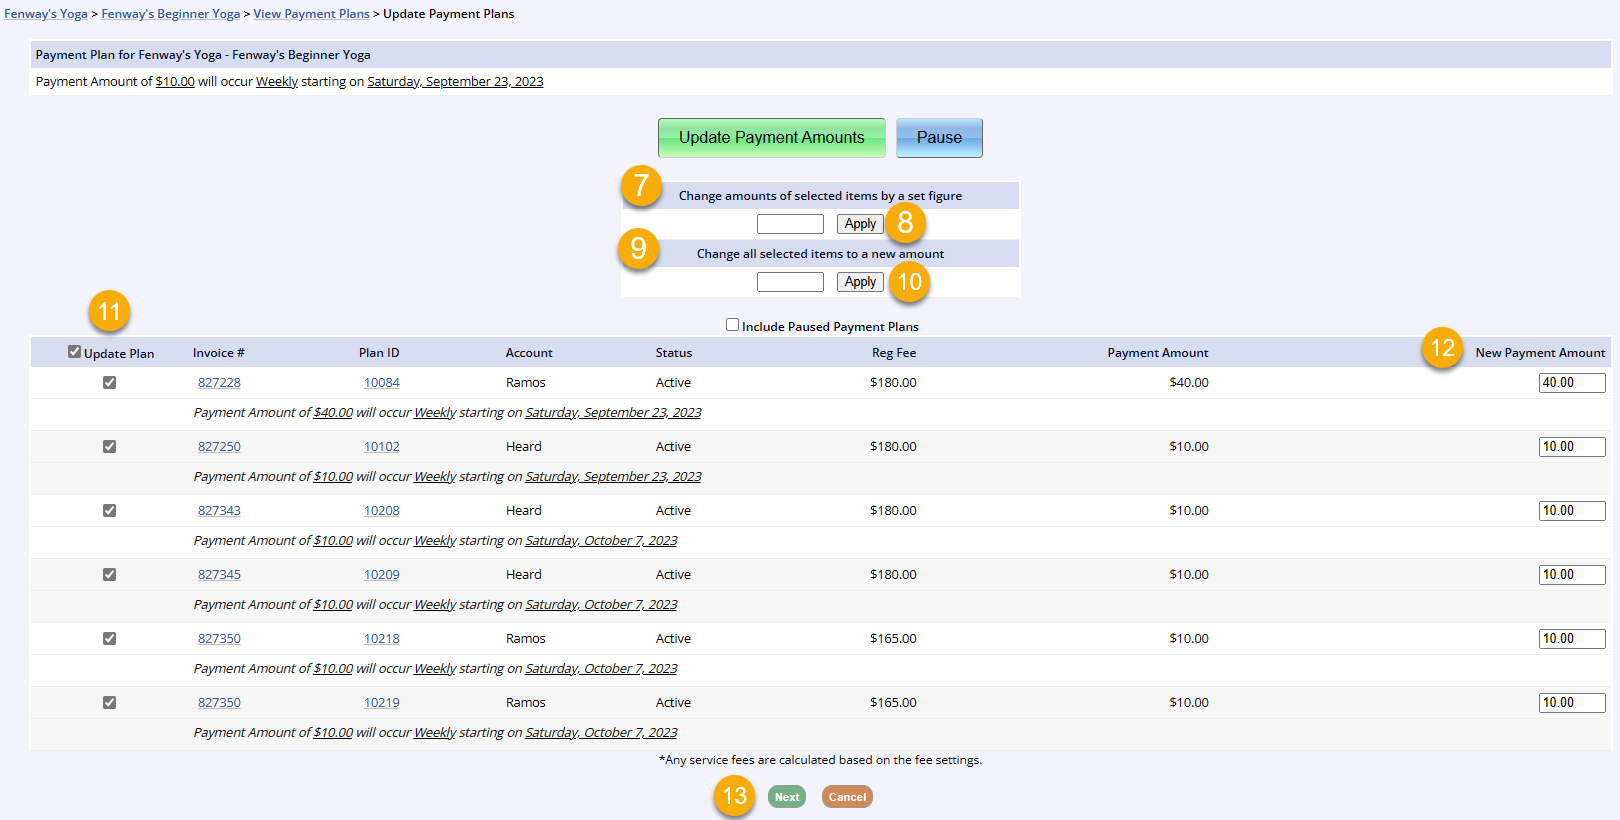
- Bulk changes: Enter the amount you would like all selected items (defaulted to All – see step 11 to change) to increase/decrease by
- For instance, if you want all payment amounts to increase by $3.00, enter 3 into the box for step #7, and the amounts will be changed to $43, $13, $13, $13, $13, and $13 respectively
- Click Apply
- Bulk changes: If you would like to change all of the amounts to the same payment value, enter that amount in the box for step #9 instead
- For instance, if you would like all of the payment amounts to be $18, enter that amount, and the amounts will all be changed to $18 regardless of their original varying amounts
- Click Apply
- If you do not wish to change all active plan amounts for this activity, just deselect the checkboxes next to the plans that should not be updated
- Manual changes: View the new payment amounts and make any manual changes necessary
- Click Next
Changing the Fee on Existing, Active RPPs for Activities
Making Adjustments
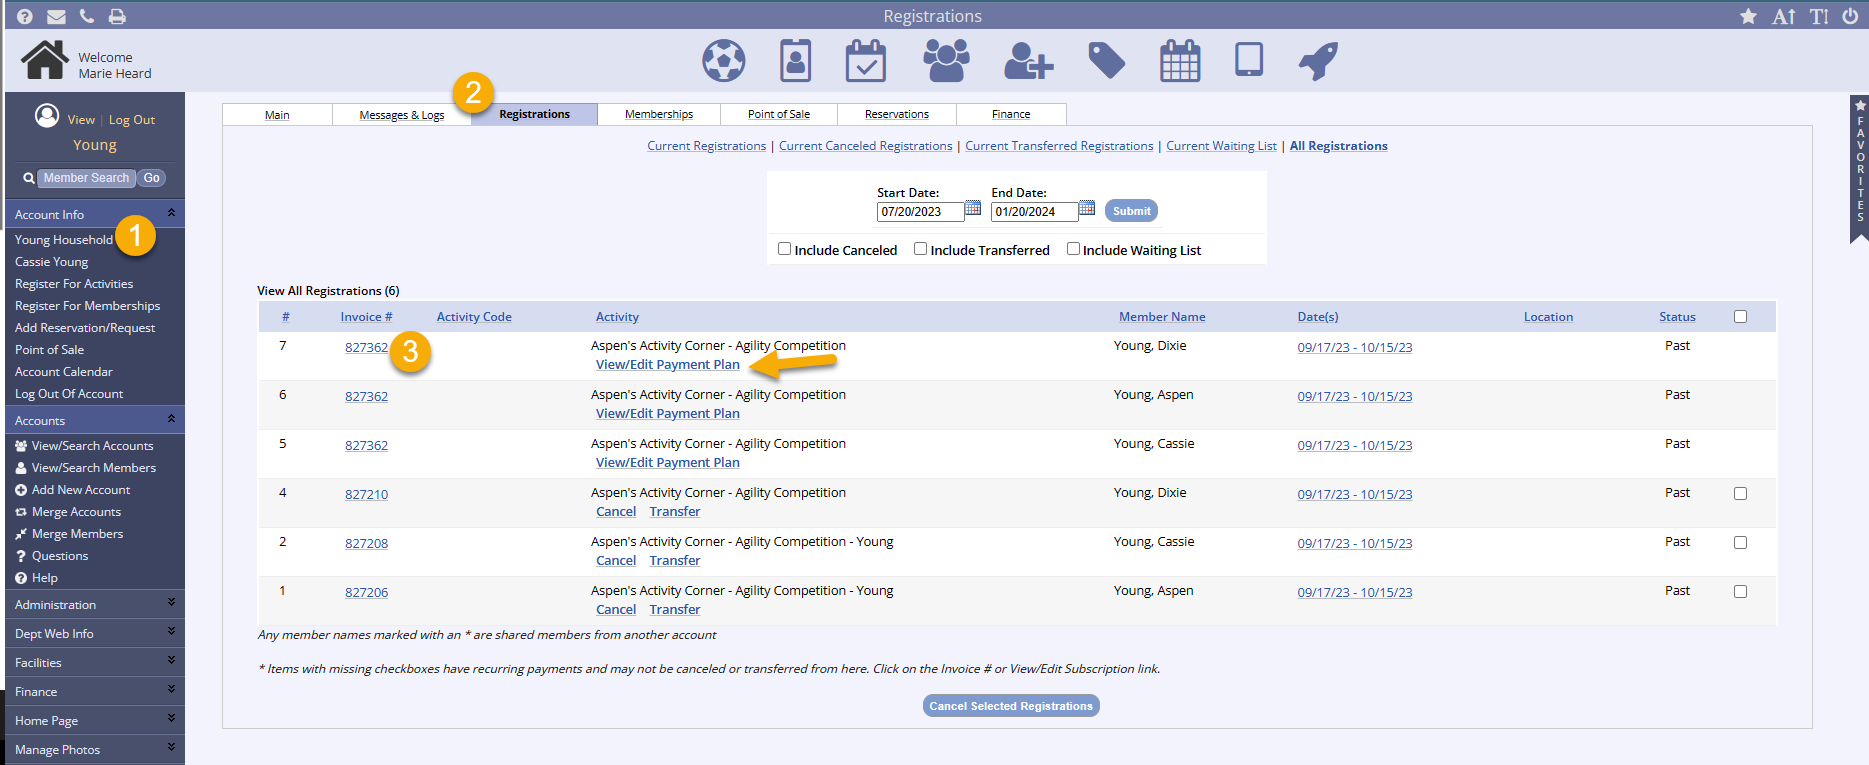
- Go to the household account
- Click the Registrations tab
- Open the payment invoice within the household account for the RPP
- Notice that registrations with RPPs for Activities have a link to View/Edit Payment Plan
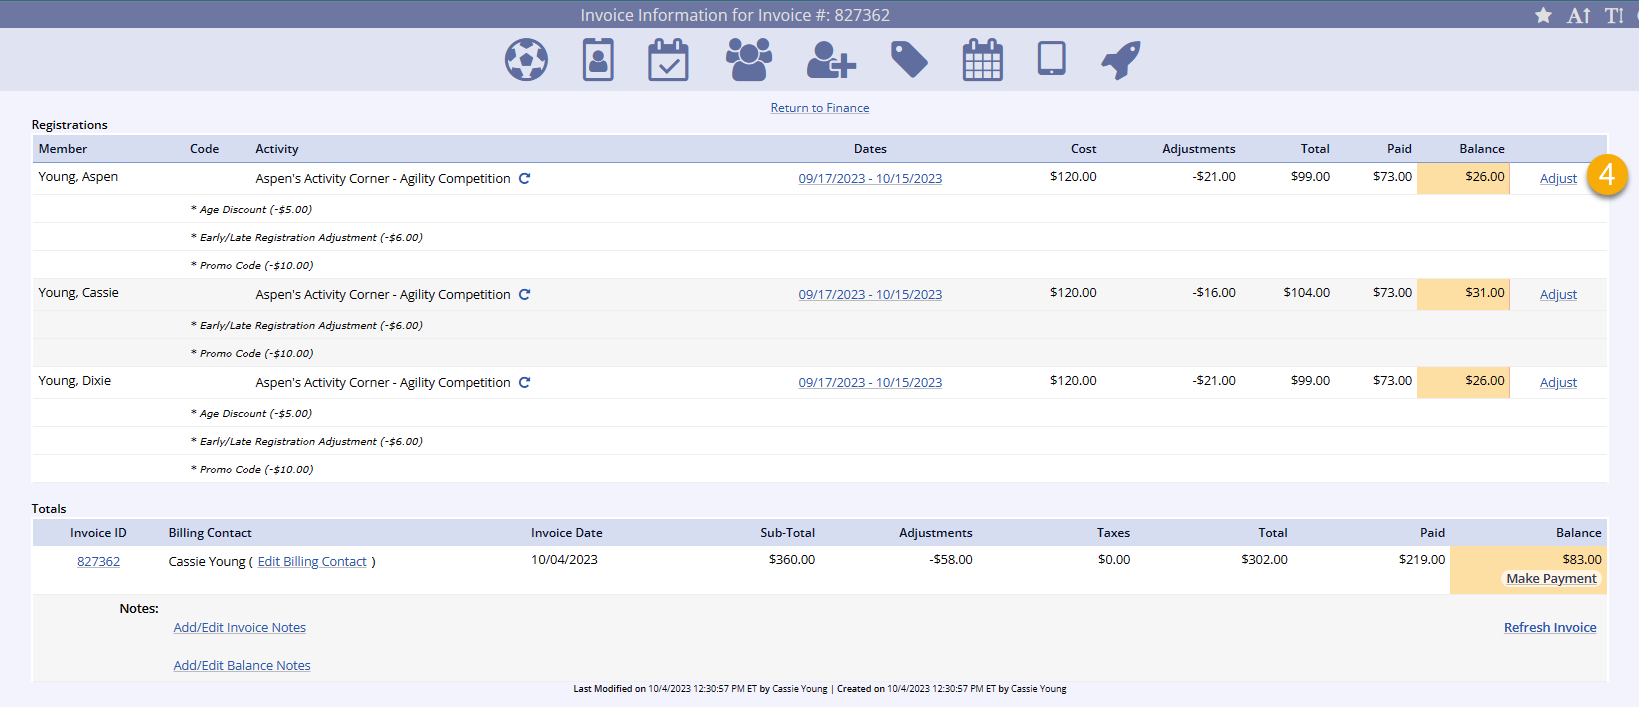
- Click Adjust to add an adjustment to the item
- Add the desired adjustment and the RPP will reflect the change
Making Payments in Addition to the RPP schedule
- Go to the household account
- Click the Registrations tab
- Open the payment invoice within the household account for the RPP
- Notice that registrations with RPPs for Activities have a link to View/Edit Payment Plan
- Click Make Payment to add a payment to the item in addition to the RPP scheduled payments

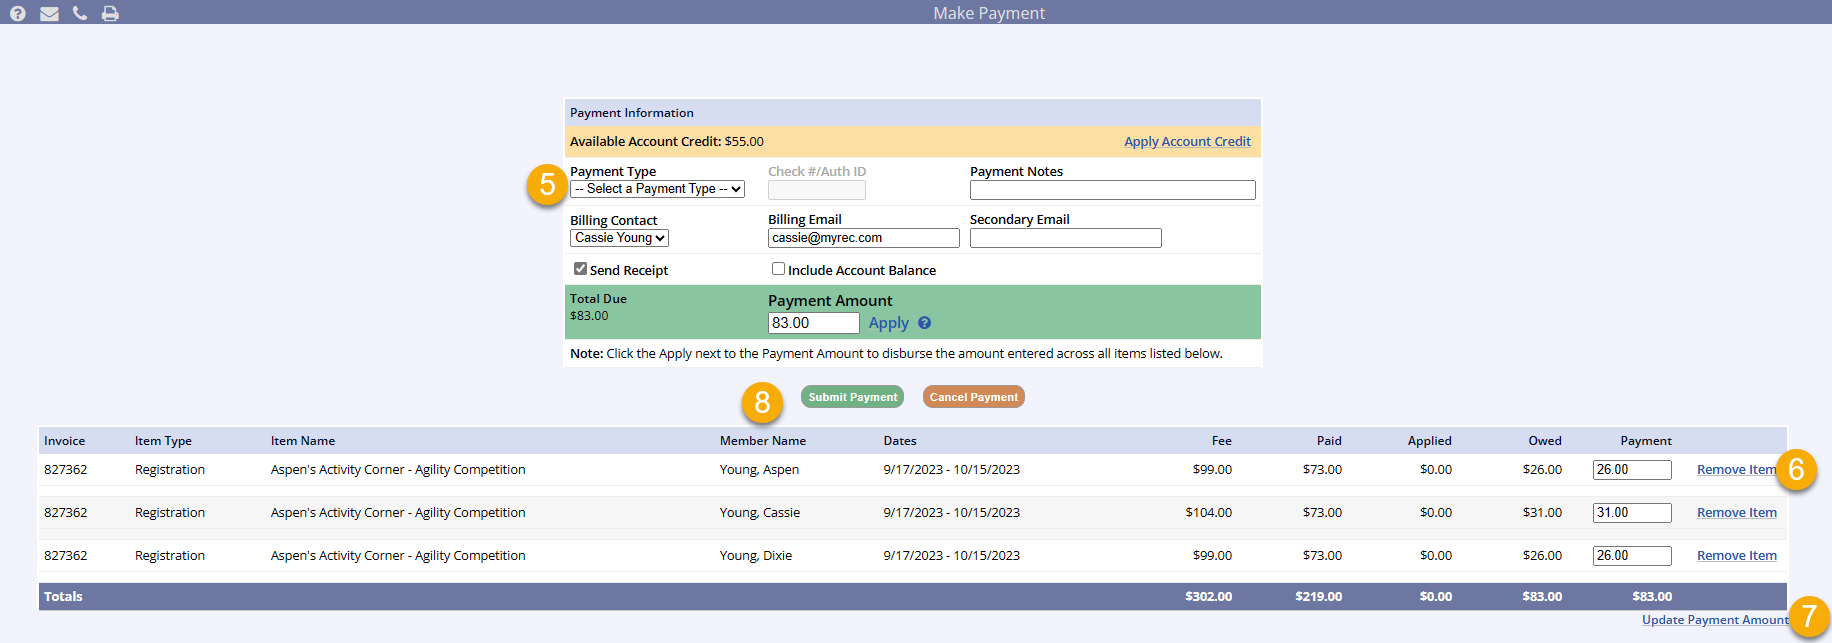
- Select the correct payment type from the dropdown
- Either click Remove Item for registrations that will not be receiving a payment or enter $0.00 in the payment field
- Removing the item will not remove the registration from the RPP, it will just remove it from this additional payment screen
- Click Update Payment Amount
- Click Submit Payment
- The RPP will reflect the change resulting from the payment
Registration Payment Plans for Memberships
Making the Switch from Recurring Subscriptions to RPPs for Memberships?
Transitioning from Recurring Subscriptions to Registration Payment Plans for Memberships
Registration Payment Plans (RPPs) for Memberships have many similar features to the Recurring Subscription feature, which was the auto-pay solution through Authorize.net for your membership subscriptions. However, RPPs for Memberships have several additional advantages for our clients because they are created within the MyRec.com system, see Registration Payment Plans for Memberships.
Similar Functions to Recurring Subscriptions
For departments who have been using Recurring Subscriptions, this Quick Reference resource will help you use similar functions in RPPs for Memberships.
Auto-Pay/Recurring Subscriptions
|
RPPs for Memberships
|
| Updates to fees are done from the membership length page (update recurring fees) | Updates to fees are done from the membership info page after clicking the length (view payment plans link) |
| Create the subscription option on the membership length from the dropdown | Create the payment plan option on the membership length from the same dropdown |
| Offer a copy of the membership length for customers who don't want to pay via subscription | Offer a copy of the membership length for customers who don't want to pay via RPP |
| If the credit card payment is declined once, the subscription will be closed and the recurring payments will stop. This will also expire the membership. If this happens, a new membership will need to be purchased if the member wishes to continue | If the credit card payment is declined once, the RPP for Membership will pause after a decline, and the membership itself will pause. A public-side user or management-side user can Update the Payment Method. Then, management will unpause both the RPP and the membership. |
| Recurring subscription payments display only the next, upcoming payment | RPPs for Memberships display the next 10 payments on the View Payment Plan screen |
| Changes made to the membership fees will not affect current, existing subscriptions | Changes made to the membership fees will not affect current, existing RPPs for Memberships |
| In the Main or Registrations tab of an account, you can click into a subscription for the purposes of cancelling it, seeing the payments that have occurred so far, checking the subscription's status with Authorize.net, or updating the credit card | In the Main tab of an account, you can click the View Payment Plans link on the top right then the Plan # for the purposes of pausing, cancelling, seeing the payments that have occurred so far, checking the subscription's status with Authorize.net, updating the credit card, and viewing the edit history |
| You can use the Payment Subscription report to see if there are any credit cards being used in recurring payments that have expired or are about to expire | The Expiring Cards link in the Needs Attention box on the management homepage will show up when there are cards about to expire |
| There is a Subscription Report under the Authorize.net Reports section in the Financial Reports area for subscription details on attempted payments | There is a Payment Plans report under Financial reports where you will click the View Payments link to view all attempted payments |
Creating Registration Payment Plans (RPPs) for Memberships on the Management Side
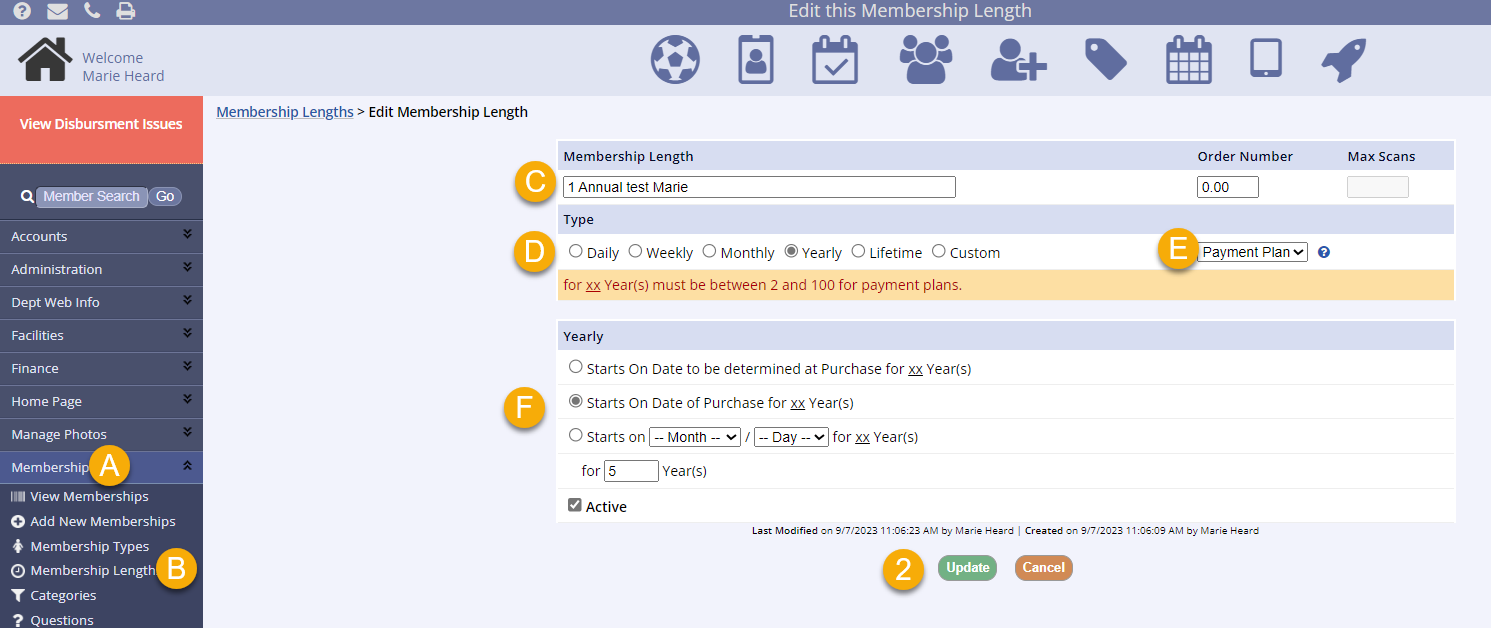
- Create the Membership Length to add the Payment Plan option
- It is helpful to name the length specifically so you know it is a RPP length
- Open the Membership tab in the navigation menu
- Click Membership Length
- Name the length with a unique and easily identifiable title
- Set the type
- Select Payment Plan from the dropdown
- Set the start date/duration
- Click Update
- Create the membership and add this length to the membership (the length with the RPP for memberships set up)
- Name the membership specifically so you know is it a RPP for Memberships
- Departments should create an additional duplicate Membership Length without the Payment Plan option for public users to purchase the membership outright
- Name the traditional length and membership specifically so you know it is not a RPP length
RPPs for Memberships Limitations
Setup and limitations for RPPs for Memberships are identical to that of Recurring Subscription Payments.
There is no Payment Plan Cutoff Date or Allow Deposits setting for RPPs for Memberships.
Each payment will be processed by individual Week, Month, or Year from the start date of the payment plan, unless it is paused, just like in an Account Payment Plan.
Checking Out with RPPs for Memberships
Registration Payment Plans have a separate checkout process from standard checkout. Both management and public users will complete the checkout process individually for any payment plan items in the household's cart.
Management Registration Payment Plan Checkout
- Choose the household account
- Select the registering member
- Click Register for Memberships
- Select the correct membership (we suggest these are titled specifically to know which is a RPP and which is not)
- Select all household members for the RPP for Membership
- Choose the Start Date (when applicable)
- Click Apply
- Click Add to Cart
- Make your Disclaimer selection
- Click Continue
- Select a Billing Contact to associate to this payment plan and invoice
- If there are stored payment methods available, they will be listed
- Select the stored payment or click Add a New Payment Method
- If choosing a stored card, clicking Submit will process a payment for the Deposit plus Fees, if applicable, then will create the payment plans and all is completed
- Processing Fees will be recalculated based on selected stored payment being CC or ACH.
- If no stored payment methods are available or Add a New Payment Method is selected, you will be brought to the secure credit card page
- Upon saving the stored payment method, you will be returned to the page above, with the new stored card pre-selected
- If there is a Deposit Due, it will be displayed along with Processing Fees that are setup in the eCommerce settings
- If choosing a stored card, clicking Submit will process a payment for the Deposit plus Fees, if applicable, then will create the payment plans and all is completed
- Select the stored payment or click Add a New Payment Method
- Does not include Absorbed or Split Fees options, only Passed On Fees
- If there are stored payment methods available, they will be listed
On the Public Checkout
Public-side checkout does NOT get the option to choose a Billing Contact but can choose a stored payment method.
Public Registration Payment Plan Checkout
- Proceed through the regular registration process and click to Add to Cart
- Any deposits, add-ons, or promotions will appear during the process
- Click Check Out
- A notification about the RPP and checkout process appears at the top of the cart screen
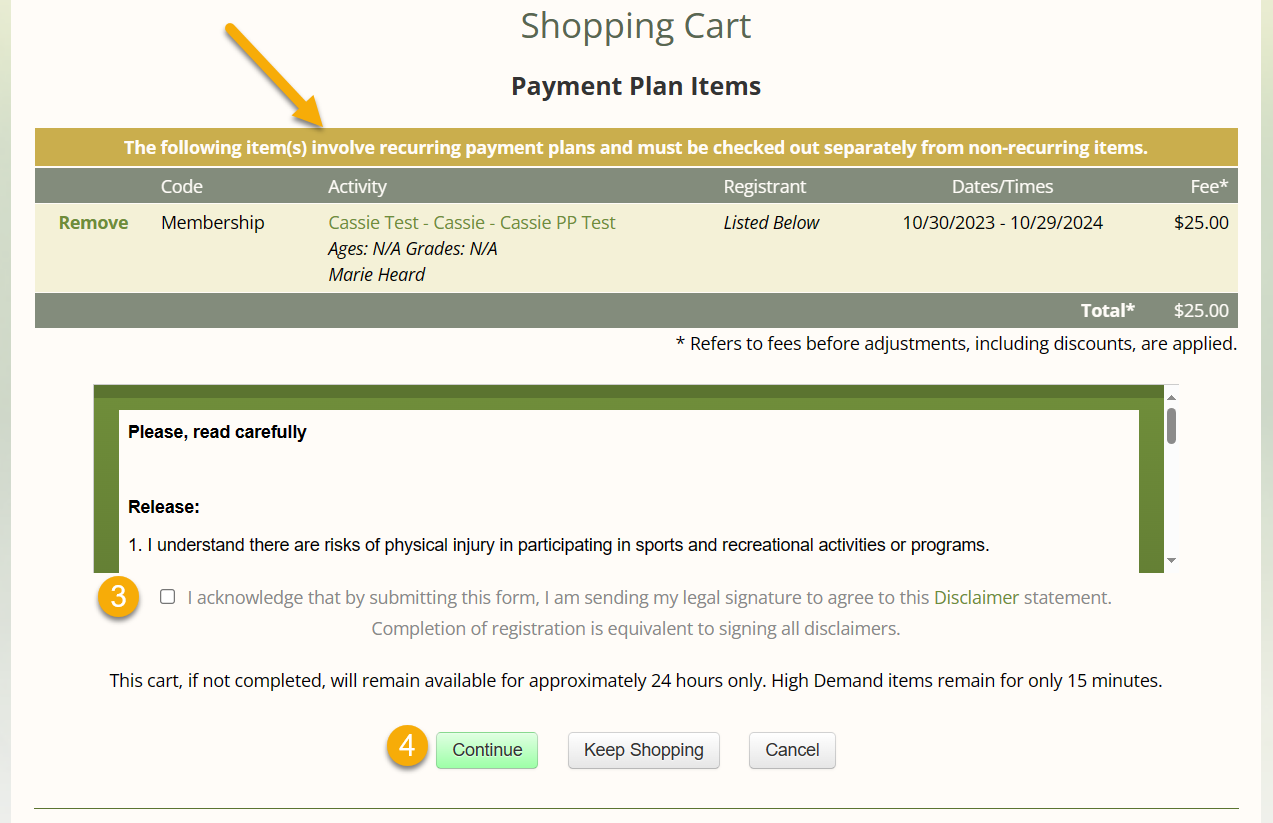
- Check the disclaimer checkbox
- Click Continue

- If you have a promo code, click Apply Promo Code and enter the code
- Select a payment
- If the registrant has a stored card on file, they can select the stored card and click the gree Submit button in the space below the deposit
- If the registrant needs to add a payment, select Add a New Payment Method and click the green Continue to Payment Form button that will appear instead of a Submit button under the deposit area
- Click the green button
- A confirmation screen will appear with RPP details and links to print or view applicable receipts and forms
Updating Fees in RPPs for Memberships
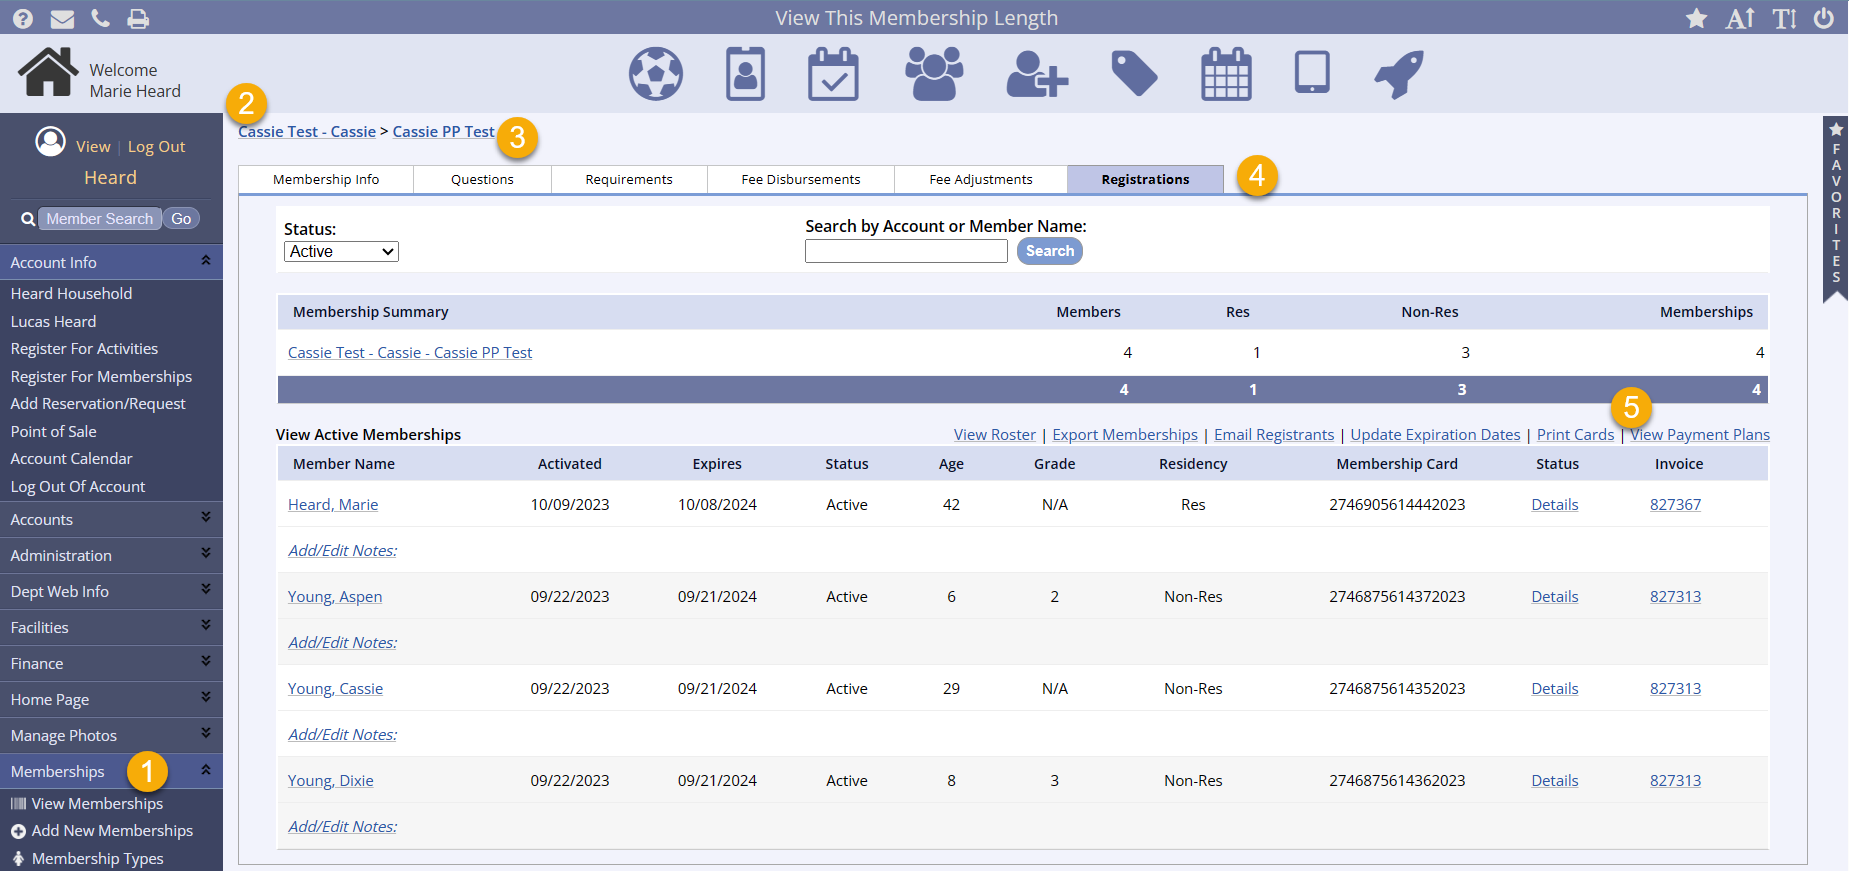
- Go to the Memberships tab in the leftside navigation menu
- View the correct membership
- Click the correct membership length from the membership info screen
- Select the Registrations tab
- Click the View Payment Plans link (this will only appear if you have registrations for the RPP length)

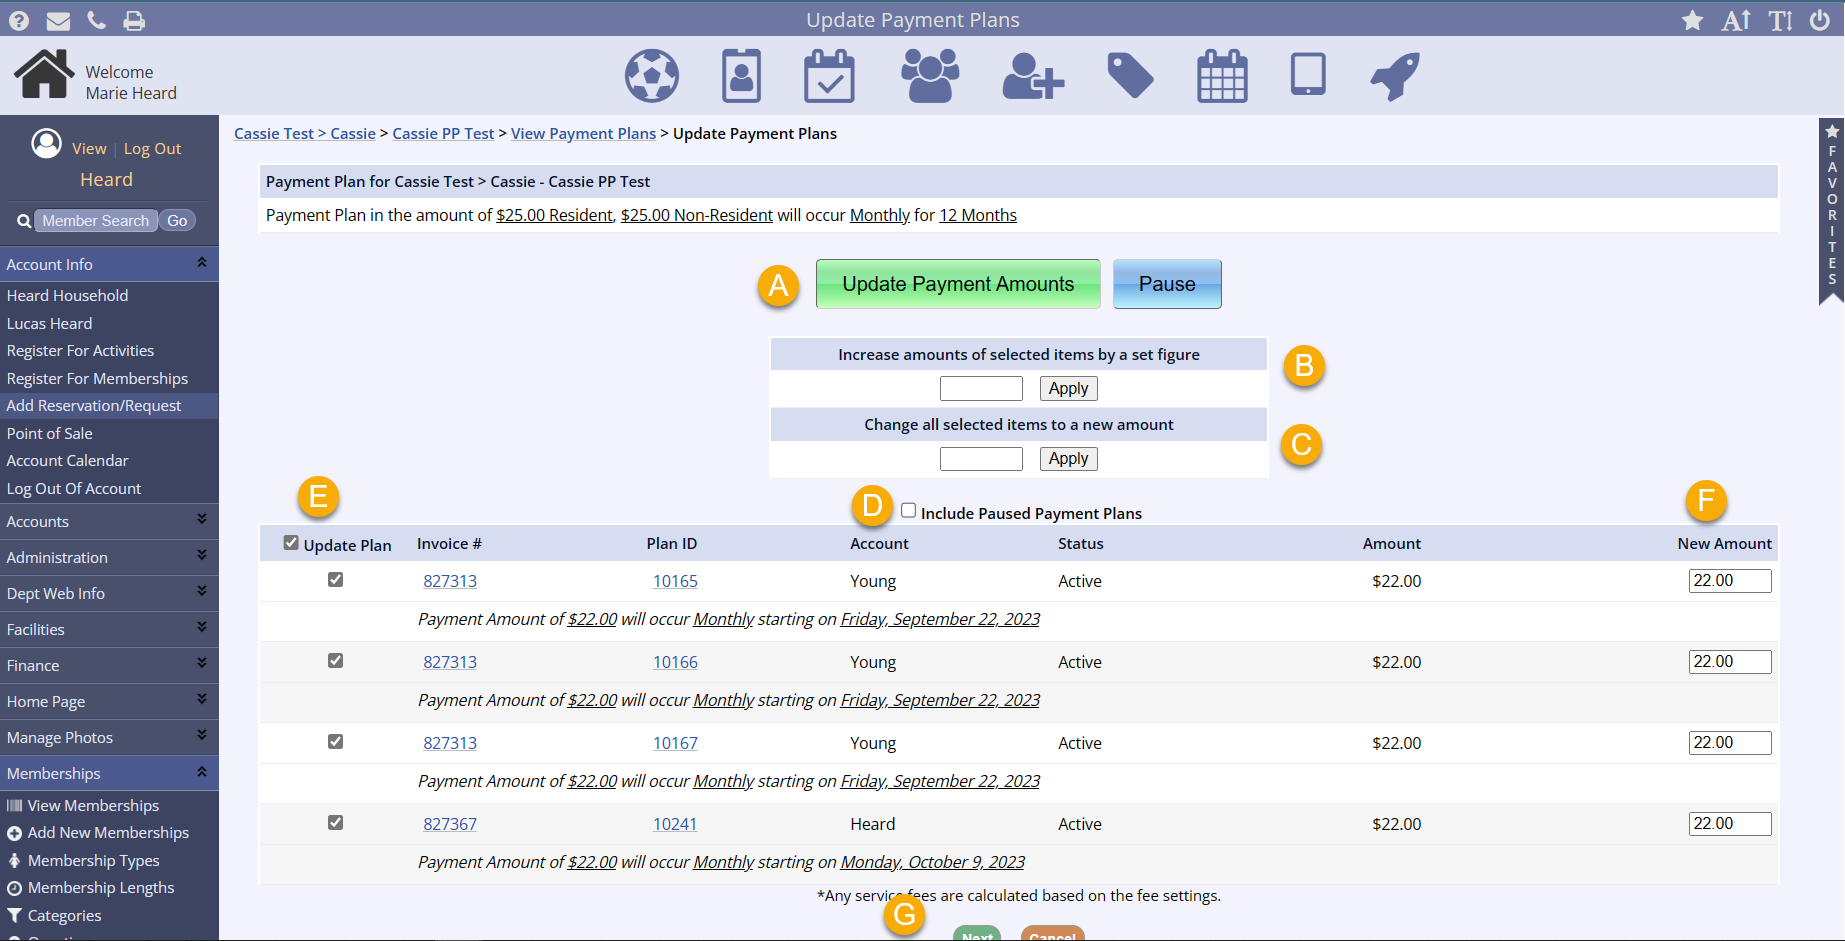
- To make changes to the RPP for Membership, click the Update Payment Plans link
- Click the green Update Payment Amounts button and the lower portion of the screen will become active
- Bulk changes: Enter the amount you would like all selected items (defaulted to All – see step 11 to change) to increase/decrease by
- For instance, if you want all payment amounts to increase by $3.00, enter 3.00 into the box for step #7, and the amounts will be changed to $43, $13, $13, $13, $13, and $13 respectively
- You can decrease fees in this field by entering a negative value, for instance -2.00
- Click Apply
- Bulk changes: If you would like to change all of the amounts to the same payment value, enter that amount in the box for step #9 instead
- For instance, if you would like all of the payment amounts to be $18, enter that amount, and the amounts will all be changed to $18 regardless of their original varying amounts
- Click Apply
- Check the box to include any paused RPPs for Memberships
- If you do not wish to change all active plan amounts for this activity, just deselect the checkboxes next to the plans that should not be updated
- Manual changes: View the new payment amounts and make any manual changes necessary
- Click Next
- To see all changes to the RPP for Memberships, click View Update History
- This link will show any changes made via the Update Payment Plans process above
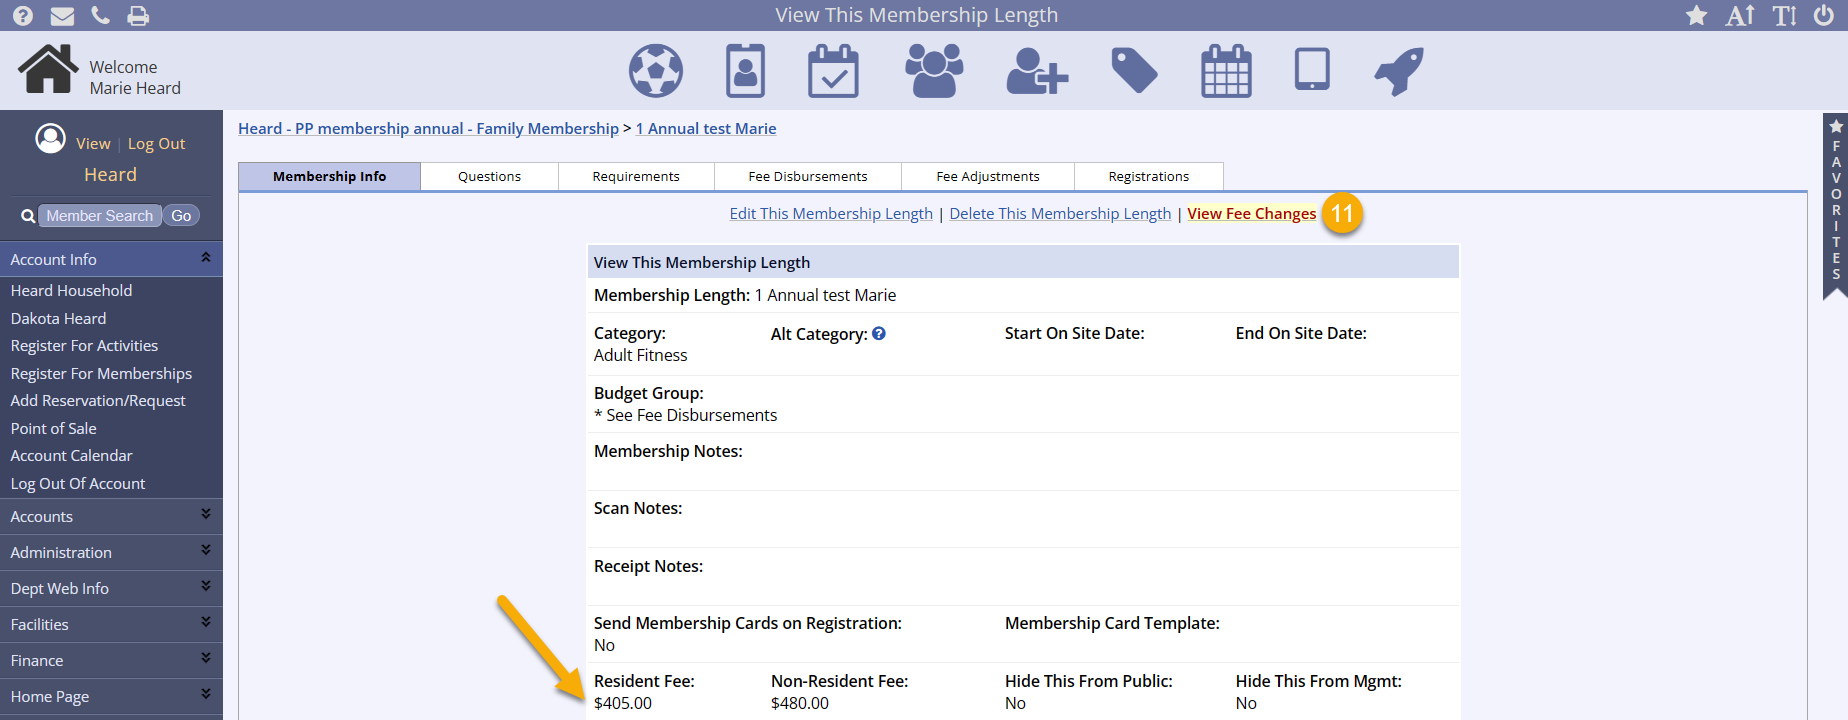
Edit Membership Fee on an RPP
- To change the actual membership fee, you will Edit This Membership Length
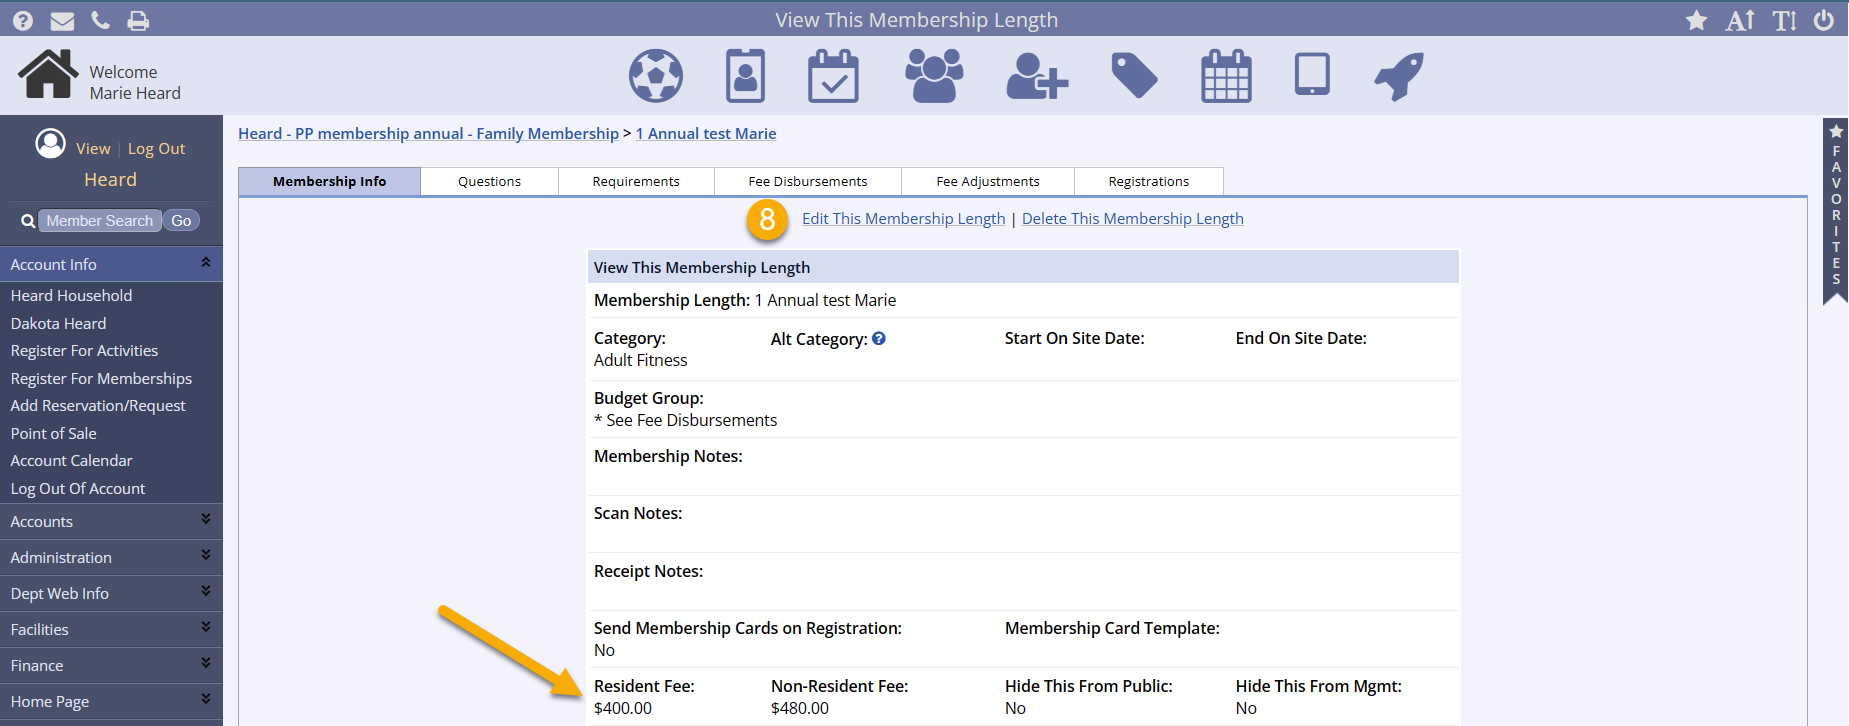
- Change the fee and click Submit
- Make any budget group changes and click Submit
- Now, a new View Fee Changes link appears at the top of the Membership Info screen and the fee is updated as well
- This link only appears when changes have been made to the actual membership fee, not just to the RPPs for this membership
Due Dates
Due dates are not recommended with payment plan setups.
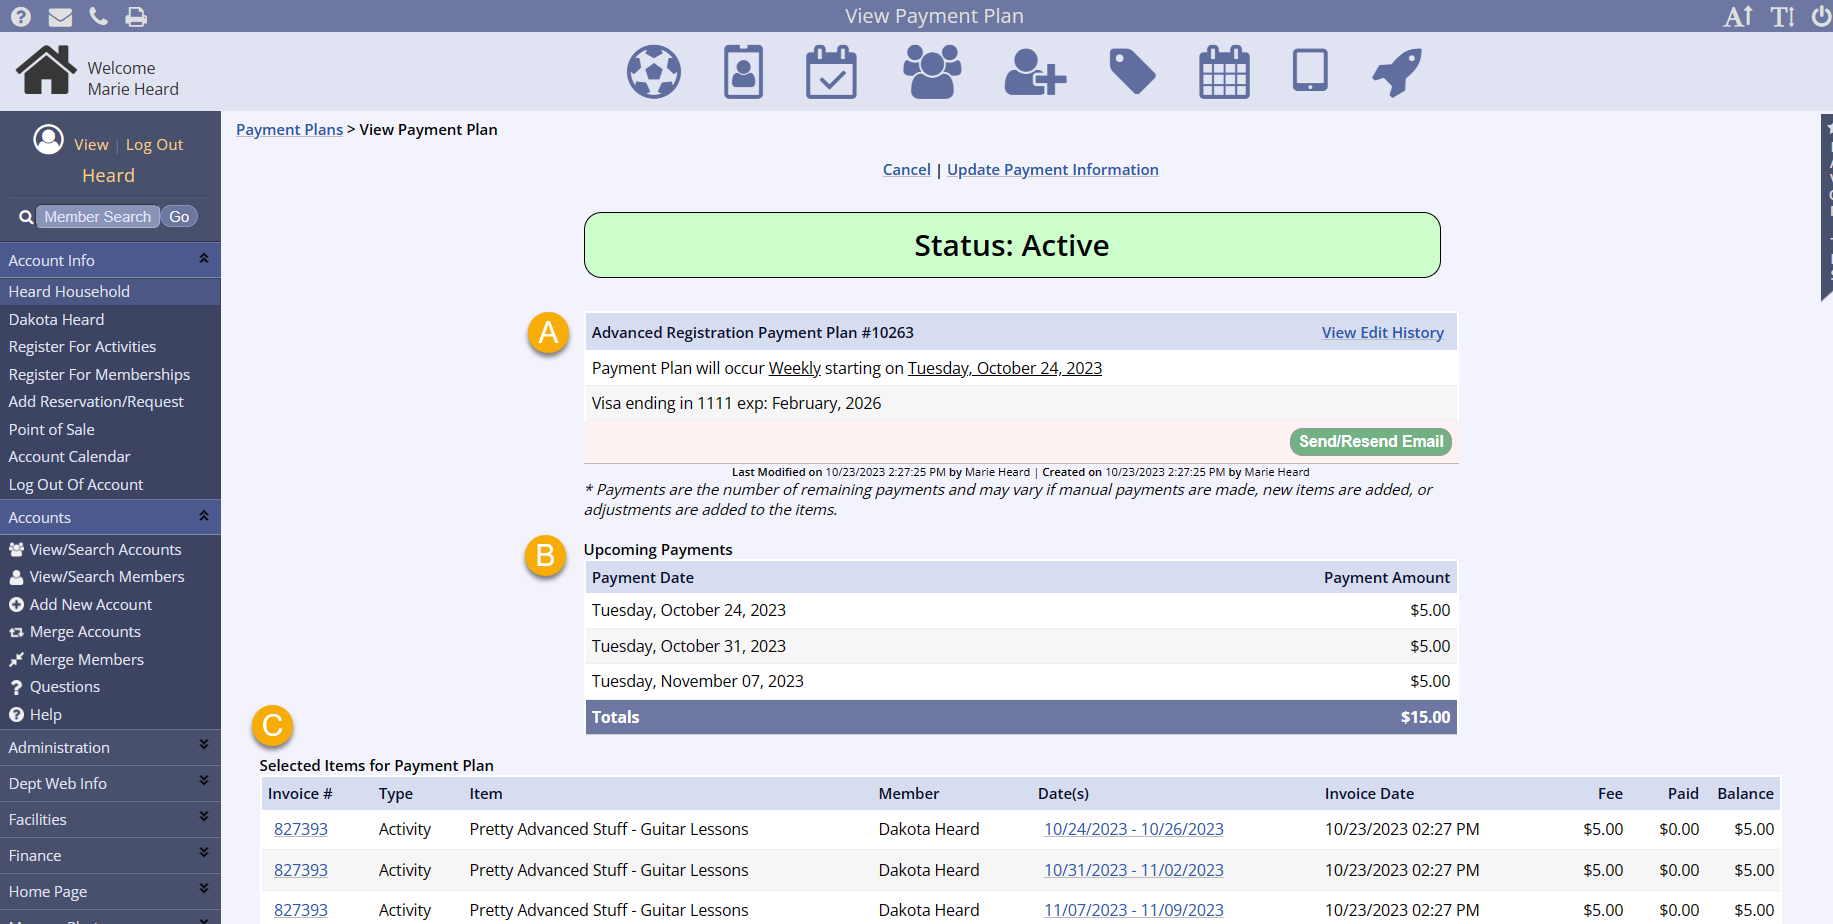
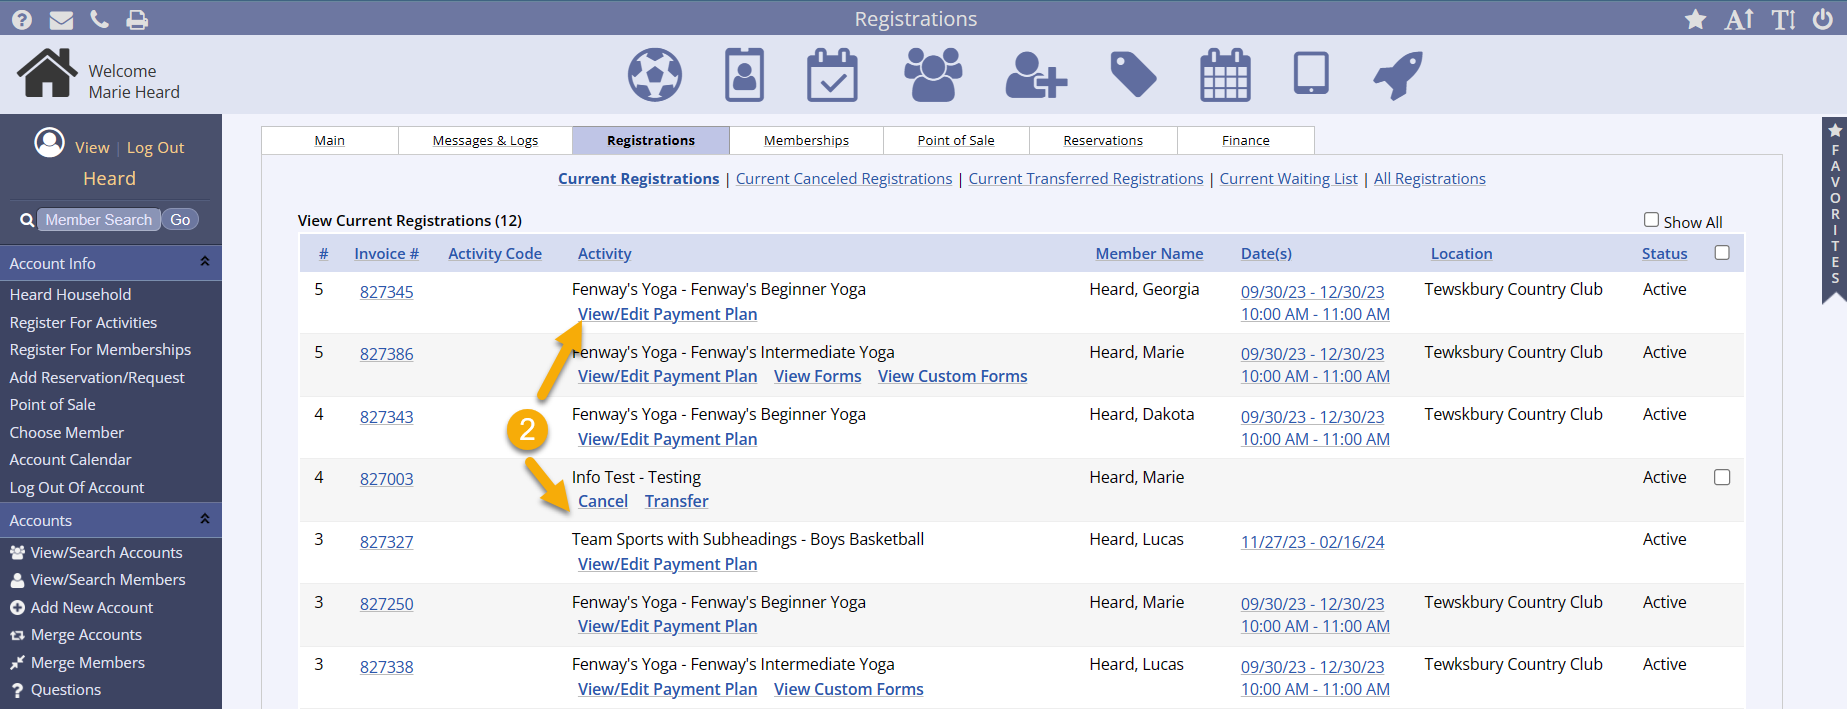
Viewing/Editing Active RPPs on the Household Account
To find a specific, active RPP for a user, you will want open the household account.
- Click the household Registrations or Memberships tab
- Look at the list of registrations and click View/Edit Payment Plan for the specific purchase
- Non-payment plan registrations do not have a View/Edit Payment Plan link
- Note: the View/Edit Payment Plan link will link to the specific RPP if it is active and will link to the general Payment Plans page if the RPP is completed, expired, paused, or cancelled
- This is why labeling RPPs specifically is so important
- i.e. It is easier to locate "Foley Recreation Center annual membership PP" or “Eastside Elementary AM/PM PP” because of the detailed title
- This is why labeling RPPs specifically is so important
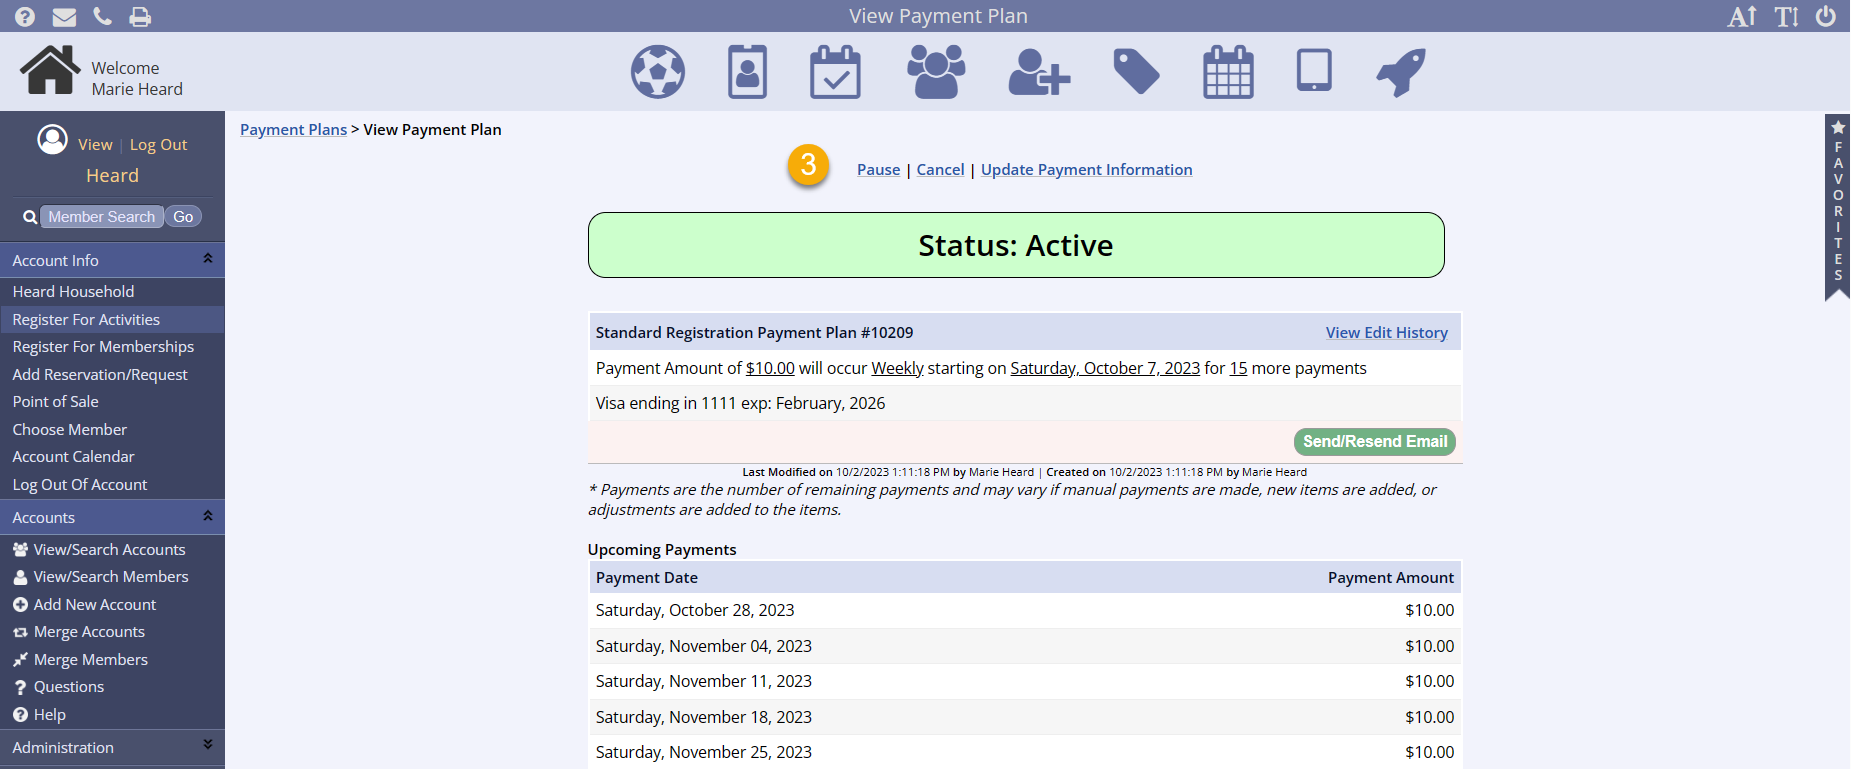
- Options available for the RPP type will appear at the top of the screen
- RPPs for Standard Activities can be paused, canceled, edited, and updated
- RPPs for Advanced Activities can be canceled and updated
- RPPs for Memberships can be paused, canceled, and updated
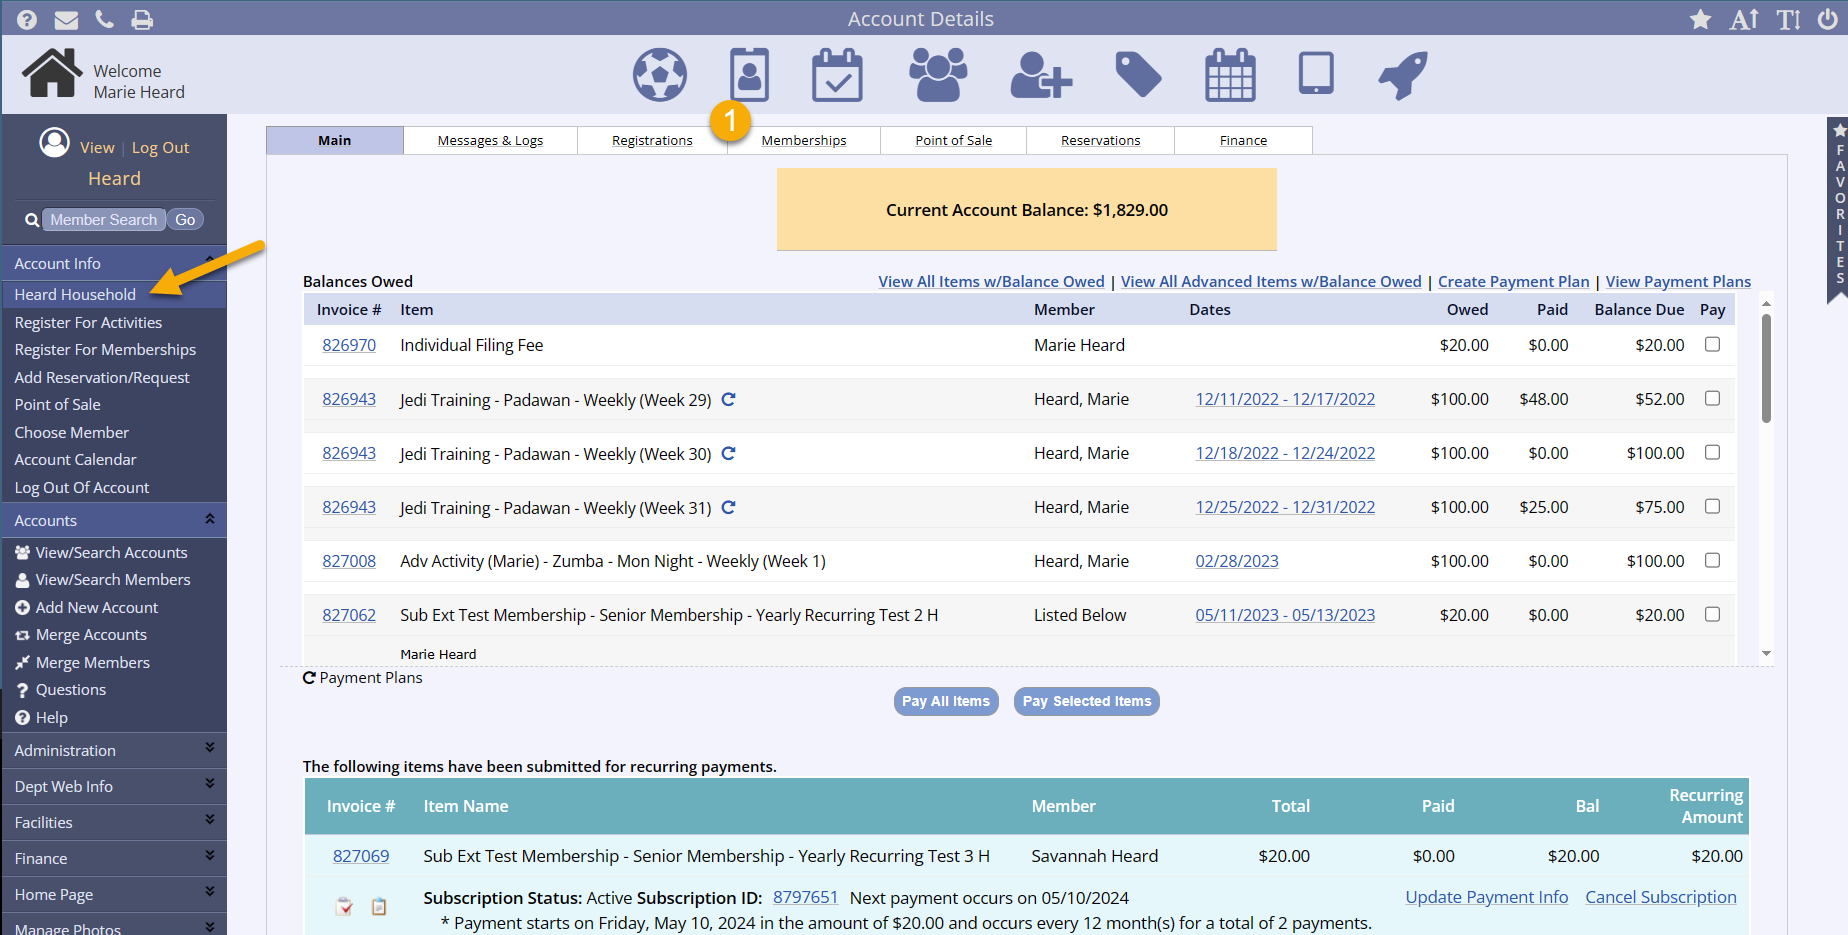
Viewing All RPPs on a Household Account
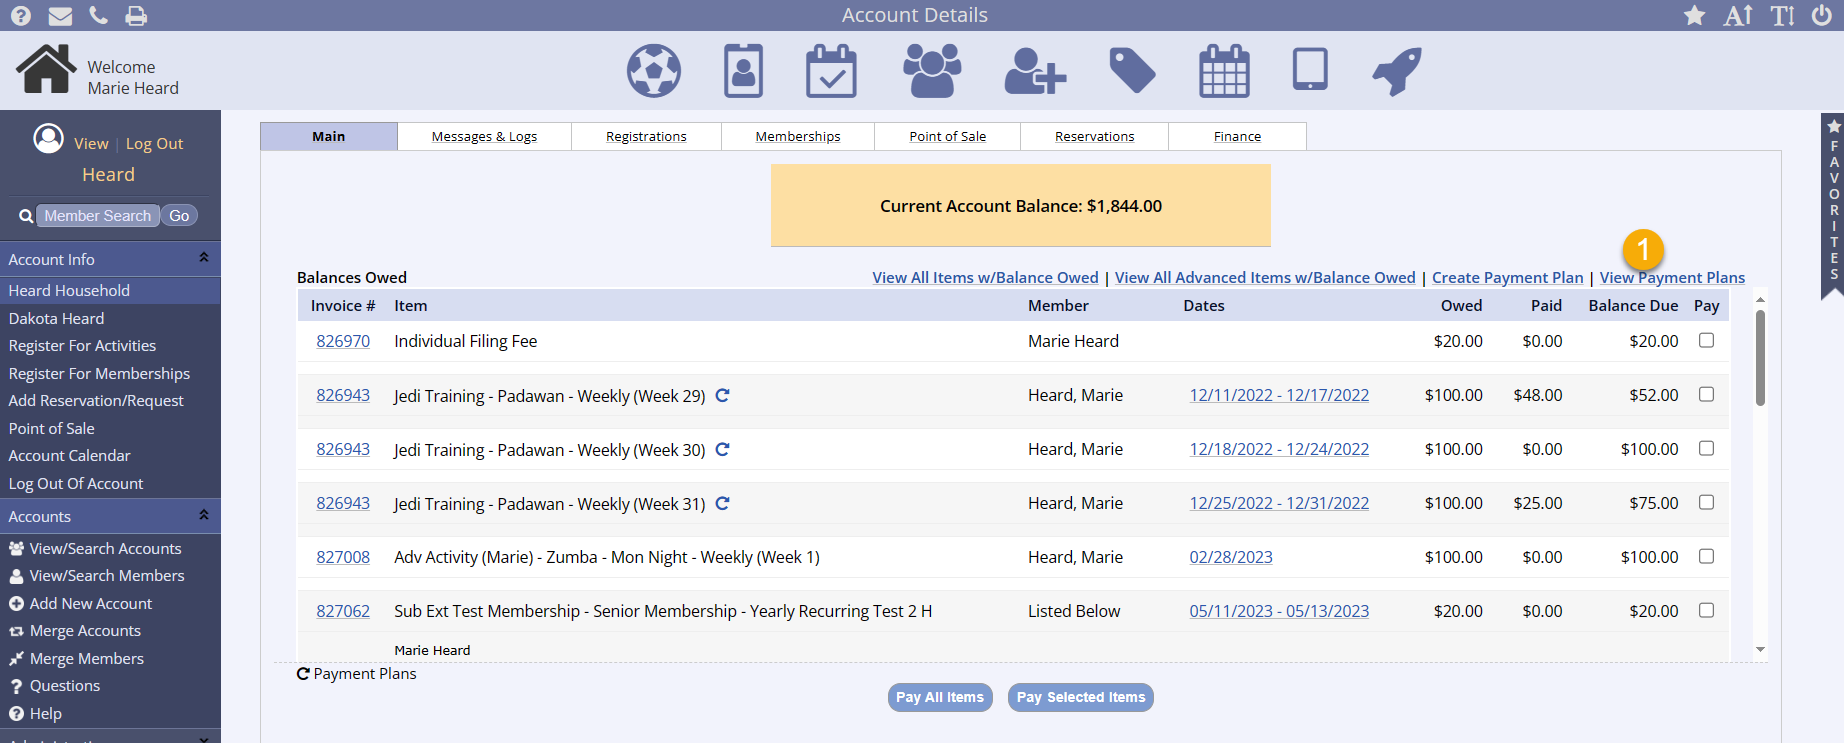
- Once you are within the household account's main tab, you can click View Payment Plans on the far right
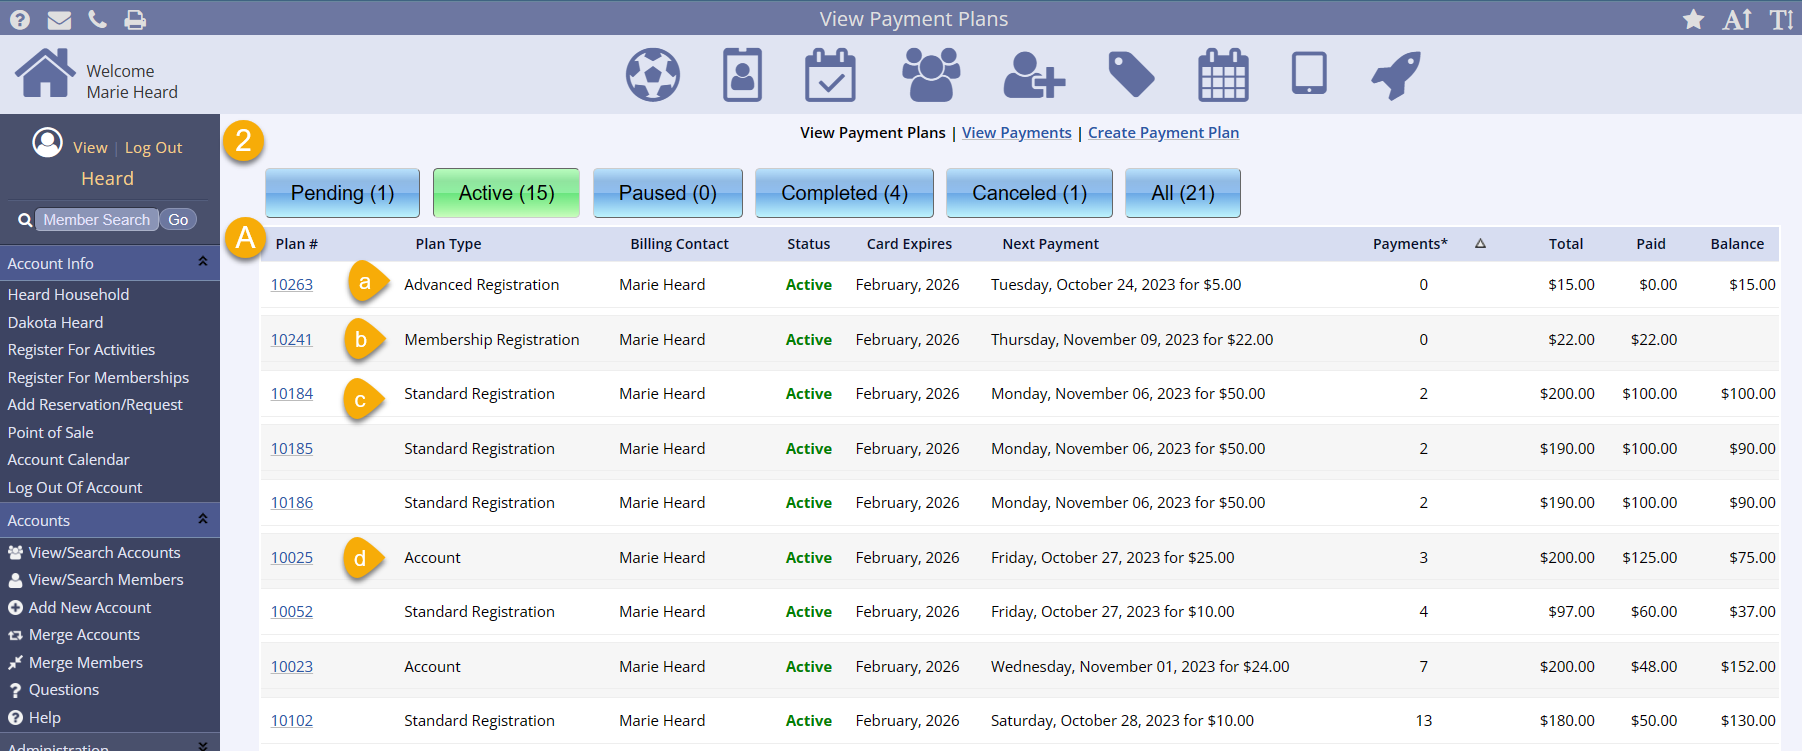
- Now, you can see pending, active, paused, completed, canceled, and all payment plans by clicking the tabs along the top
- You can sort the results by clicking the column titles and you can see the Payment Plan type (to search specific RPPs, see the section above)
- Advanced Registration
- Membership Registration
- Standard Registration
- Account
- You can sort the results by clicking the column titles and you can see the Payment Plan type (to search specific RPPs, see the section above)
For more information, you can click the Plan # for the payment plan
- View the payment plan details and payment information
- See the schedule of upcoming payments
- View the items that are included on the payment plan